File Checksums

All files created or tools used in a forensic investigation need to include a checksum for validation against fraud. A checksum is basically the value of a file hash. If one character in the code or file is changed, the hash will produce a different checksum. This helps validate content. A specific application version will have a unique checksum different from all other versions of the software.

A good tool for Windows to use to create checksums is File Checksum Integrity Verifier (http://support.microsoft.com/kb/841290). Tool use is very simple.

Command: 
<File Checksum Integrity Verifier EXECUTABLE> <FILE TO CHECKSUM>

Capture4
A good tool pre-installed in most Linux environments to use to create checksums is md5sum.
Command: 
md5sum <FILE TO CHECKSUM>

Ncat for Live Incident Response

When a system is vital in daily operations, it often cannot be taken offline for duplication. Also because of its importance it cannot risk the chance of state change, forensic tools cannot be downloaded onto the system. In a court case, the installation of tools could be considered as tampering with the evidence because there is a chance the tools could overwrite important data. The same goes for saving data on the victim machine. A live incident response looks to collect data from a machine without changing the environment. I recommend mapping a network drive or preferably using Ncat to transfer information between analyzing machine and the victim machine during a live investigation.

Ncat comes pre-installed on most Linux distributions and can be called by the ‘nc’ command. For Windows, a portable executable can be downloaded from here.

If using Ncat to transfer logs the following commands can be used:

Command to setup a Ncat listener on host machine: 
Linux: nc –v –l  –p <PORT> > <LOG FILE>
Windows: <NCAT EXECUTABLE> –v –l  –p <PORT> > <LOG FILE>
Capture

The port number is any port desired for the Ncat listener to listen on for communication. The log file is just a file for the data to be stored in on the analyzing host machine.

Command to send data from a victim machine: 
Linux: <COMMAND> | nc <IP ADDRESS OF LISTENING MACHINE> <PORT>
Windows: <COMMAND> | <NCAT EXECUTABLE> <IP ADDRESS OF LISTENING MACHINE> <PORT>
Capture2

Basically the command sends the results of a command performed on the victim machine to the listening host machine. <COMMAND> is the command issued on the victim machine. The IP address and port are of the host machine with Ncat listening. The connection can be closed by CONTROL C/D or closing the terminal/command prompt. Once closed, the listener will output all received data to the output file.

Not only can Ncat be used to send command output but it can be used to listen for text or file transfers.

Capture3


Overall, it is an easy to use clean tool for transferring information between host machines.

Scanning With Nmap

Nmap is an effective network-scanning tool that can be used for host and open port service discovery. It can be downloaded from here.

In my experiences, to find hidden services or special services, not located on common ports, the below scans can be used. Different services respond to different packet messages. The “-p” tag specifies a port range, it is not required. However, when I stated the range, I found more running services than when the range was not stated. My theory is nmap, on a basic scan will look at popular ports and not necessarily all ports when not stated.

  • Find UDP Services: nmap –sU <ADDRESS> –p1-6000
  • Basic Service Scan: nmap –v <ADDRESS> –p1-6000
  • Basic All Service Scan: nmap –A <ADDRESS> –p1-6000
  • Null port scan (Does not set and bits in the TCP flag header): nmap –sN <ADDRESS> –p1-6000
  • Fin port scans (Sets just the TCP FIN bit): nmap –sF <ADDRESS> –p1-6000
  • Christmas port scans (Sets the FIN, PSH and URG flags): nmap –sX <ADDRESS> –p1-6000

Ping Sweep

nmap is a great tool to use to perform a network ping sweep, however there is an effective way to perform a ping sweep with out any additional installation. A FOR loop can be used to perform consecutive pings.

Ping Sweep FOR Loop: FOR /L %i in (<Host Number Start (0-255)>,1,<Ending Host Number (0-255)>) do @ping -n 1 <Network Prefix>.%i | find “Reply”

The FOR loop is basically saying start at a network prefix with stated starting host number value and send a ping. Once a reply as been received the first loop is finished and it continues to the next loop. After each loop, the host number increases and a ping is sent to that address on the network. For example, say the network prefix is 192.168.0 and we want to ping host numbers (3-43). We would enter 3 as our beginning host number and 43 as are finishing host number. The one in between the two parameters states to increase each address by one for each running of the for loop. This allows us to ping each host on the the specified network range, thus performing a ping sweep.

Windows Example:

The following command ping sweeps addresses in range 192.168.100.0 – 192.168.100.255

FOR /L %i in (1,1,255) do @ping -n 1 192.168.100.%i | find "Reply"

The same function can be done in the Linux Terminal.

Linux Ping Sweep:

Linux is slightly different but follows almost the same pattern.

for i in {0..255}; do ping -c 1 -t 1 <IP PREFIX>.$i | grep 'from'; done

Editing the Registry in CMD

Command to display: reg query <registry keyname> /v <value name>

Command to change value: reg add <registry keyname> /v <value name> /t <type: DWORD, etc.> /d <data> /f

Registry keyname – complete registry key name

/v – adds or changes a value

/t – The type of value: REG_BINARY, REG_DWORD…

/s – specifies the character used to separate strings

/d – data assigned to a value

/f – forces overwriting of existing values with prompting

***Registry values manage computer settings and operations. If a registry is incorrectly changed or deleted, the computer might not startup or run.

Windows CMD Adding and Removing Users

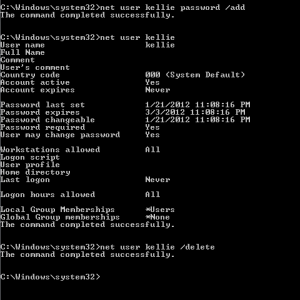
To View Users: net user

To View Specific User: net user <username>

Add User: net user <username> <password> /add

Delete User: net user <username> /delete

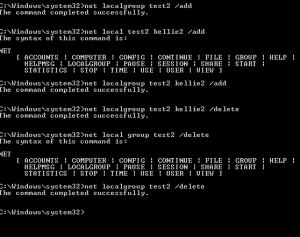
Create a local user group (for network groups use ‘group’ instead of ‘localgroup’: net localgroup <group name> /add

Add user to local group: net localgroup <group name> <username> /add

Delete user from group: net localgroup <username> /delete

Delete local group: net localgroup <group name> /delete