What is a splash page? Well it’s basically a welcome page. Router’s can have splash pages to greet users immediately after connecting to the network, notify them of conditions of use and/or require user authentication.
I want a splash page for my guest network to basically inform guests that my guest network is a risky environment… it is free at least. Say for instance, if fingerprinting or enumeration tools just happen to be used in my guest network, they wave their rights to taking action against it by agreeing to access the network in the first place.

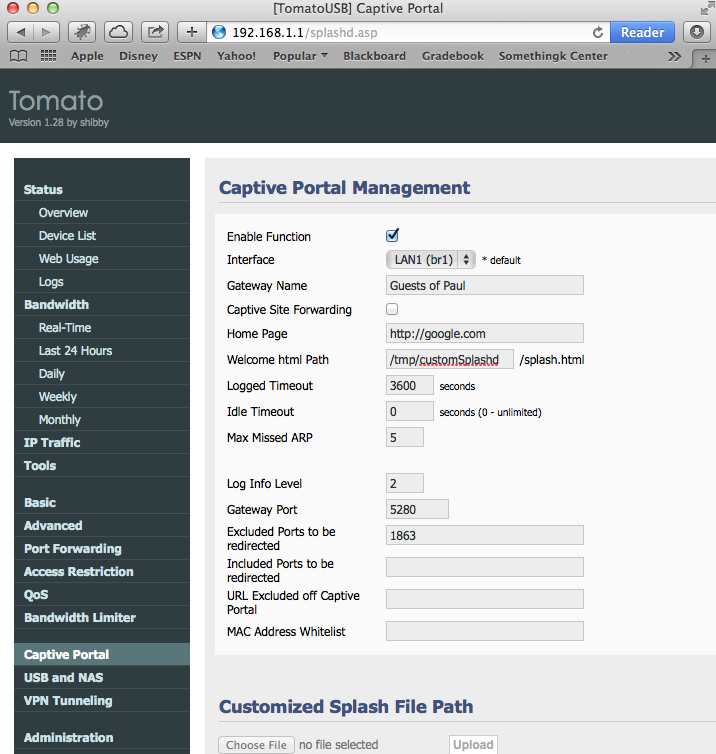
In Tomato Shibby, this can be done in the web UI (default 192.168.1.1) under the Captive Portal section. Just enable the feature and save. Now you are using the default splash page.
You can change things up by uploading your own html splash page. I couldn’t get this to work, so instead I SSH directly to the router and wrote my own in the console.
To SSH:
ssh root@192.168.1.1
The root account should have the same password as the admin web UI account.

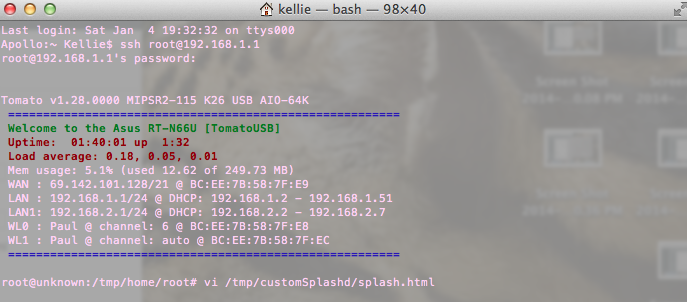
Once in, I kind of fudged around. I recommend keeping a copy of the original splash page… just in case. I customized the current splash.html page to fit my needs with vi.
vi /tmp/splashd/splash.html
My html page code is displayed below with the red section being the area I changed from the original:
<!DOCTYPE html PUBLIC "-//W3C//DTD XHTML 1.0 Transitional//EN"
"http://www.w3.org/TR/xhtml1/DTD/xhtml1-transitional.dtd">
<html xmlns="http://www.w3.org/1999/xhtml">
<head>
<meta http-equiv="Content-Type" content="text/html;
charset=UTF-8">
<title>Guests of Paul</title>
<style>
body, html, #wrapper {width: 100%; height: 100%;}
body, html, form, h1 { margin: 0; padding: 0; }
body {
background: #121b1d url(tomatousb_bg.png);
font: 14px Tahoma, Arial, sans-serif;
width: 100%;
height: 100%;
}
a {
color: #e02600;
}
a:hover {
padding: 3px;
text-decoration:none;
color: #fff;
background: #e02600;
}
img { border: 0; padding-top: 8px; float: right; }
#splash {
width: 520px;
margin: 0 auto;
padding-top: 10px;
position: relative;
}
#splash_header {
position: relative;
background-color: #2f3d40;
padding: 8px;
}
#splash_header h1 {
/* font: 28px 'Century Gothic', Tahoma, Arial, Sans-serif; */
font-size: 28px;
text-align: center;
color: #919EA1;
}
#splash_content {
color: black;
background-color: white;
padding: 15px;
}
textarea {
white-space: pre-wrap;
word-wrap: break-word;
font: 12px monospace;
width: 96%;
height: 230px;
min-width: 96%;
min-height: 230px;
padding: 10px;
}
form { -webkit-box-align: center; text-align: center; }
button {
font: bold 1em Arial, Sans-serif;
color: #919EA1;
width: 200px;
padding: 4px;
margin-top: 15px;
background: #283033;
border: 1px solid #CCC;
}
button:hover {
color: white;
background: #E02600;
}
div#status{
background: #ededed;
}
iframe {
border: 0;
border-spacing: 0;
}
#footer {
color: #919EA1;
margin: 0;
text-align: center;
padding-top: 8px;
}
</style>
<script type="text/javascript">
function toggle(element) { document.getElementById(element).
style.display = (document.getElementById(element).style.display
== "none") ? "" : "none"; }
</script>
</head>
<body>
<table id="wrapper">
<tbody>
<tr>
<td valign="middle">
<div id="splash">
<div id="splash_header">
<h1>Guests of Paul</h1>
</div>
<div id="splash_content">
<!-- "textarea" is where you put your Text -->
<center><b>Wifi Network & Internet conditions:</b></center>
<textarea readonly="readonly">
You are solely responsible for the risks of joining this
network and accept this term by clicking the "OK, I AGREE"
button.
We are not responsible for faulty operation of your computer or
equipment. You will be at risk to other devices on the network.
By joining, you accept all risks and verify you are okay with
the chance of possible device enumeration. You may be asked to
stop using your equipment.
This banner will appear again periodically.
To renew your access time, you must agree once again every 3600
seconds.
Thank You, and Enjoy!</textarea>
<form method="POST" action=$action>
<input type="hidden" name="mode_login">
<input type="hidden" name="redirect" value=$redirect>
<input type="hidden" name="accept_terms" value="yes">
<button type="submit" value="Submit">Ok, I Agree!</button>
</form>
</div>
</div>
</td>
</tr>
</tbody>
</table>
</body>
</html>
So now I have this new splash page, make sure you update your code with the correct router IP address. Now I need to set it as the router’s splash page. In the Captive Portal section on the Tomato web UI, I just confirmed that the welcome path was set to my splash page.
Save it all, and that’s it. Enjoy!
I don’t have the Captive Portal option by default. Any guess what I am missing?
Have you checked that you have the latest release?
Using Latest but still no Captive Portal Menu
tomato-RT-N66U_RT-AC6x–132-AIO-64K
Is it possible to generate voucher or password for the captive portal?
I looked into this, basically it seems you’ll have to go through a 3rd party if you want users to login or authenticate through a splash page. You could try coding up something, but the splash page is all client side languages such as html, CSS, js, etc.
Does this means that it can be fooled? (If it is all done on client side?)
Most likely, but this is a simple splash page. There are services that allow you to do user accounts/etc, that would come in handy if you wanted to charge users. I imagine they have more security backing it up.
Did you find that activating the Captive Portal on Tomato made it so that the guest ignored the iptables rules? I turned on CP and suddenly the guest connection can ping/access 192.168.1.0/24 networks
I’ve been having the same issues. I think it’s a bug.
For anyone customising the splash page, I would advise you to do the following otherwise your custom page will be lost after each reboot.
Login to the GUI and go to Administration » JFFS and tick then enable box. Then click the Format/Erase button.
Now you can create a file called splash.html in /jffs/splash.html so it won’t be overwritten after each boot! Be sure to change the html path on the captive portal settings though.
Nice, thanks!
Hi..
On mine, I have the latest build of Shibby, but Captive Portal only works on br0..if I enable it on br1, It drops the connection to the guest network and it won’t connect again until I disable it…any ideas?
Hi..
The splash page only works from time to time.. and defenitely does not work on guest (br1) network account… it also breaks the entire internet, so I have do disable it in order to have internet. Can you please give me any suggestions?
I have asked other questions in the thread before, but noone ever answers..is anybody ever see these?
I see you! The splash page shouldn’t be breaking the internet, can you send settings?
It will also not always show up, based on the timeout you provided for users. It will only appear for new access requests or timed out access requests.
How about a button for “no i don’t accept”, were you are not granted access?
It’s all HTML, you can add another button and forward the user somewhere else.
hi K4Paul,
could you please post it on youtube or atleast video elsewhere where i could follow. im not that good with cli.
tnx
hi K4Paul,
could you please post it on youtube or atleast video elsewhere where i could follow. im not that good with cli. i want to use this tomato portal feature.
tnx
Hi,
I have created a custom screen with a username and password. The password is stored in the file itself in clear text, but serves its purposes as it can be easily changed in the interface and will be good for a hotel that requires an elegant page :
Feel free to fork me 🙂
https://github.com/upggr/Tomato-Router-Splash-Page-With-Password
Hi yokefellow 😐
I use ssh root@192.168.1.1,it error timeout
Thnaks for your answer
Hi, thanks for that. On my side the captive portal never showed up…