The most important thing you’ll learn in the command line
This is just for fun, maybe you’ll learn something!
[embedyt] https://www.youtube.com/watch?v=q7-aEspwwEI[/embedyt]
This is just for fun, maybe you’ll learn something!
[embedyt] https://www.youtube.com/watch?v=q7-aEspwwEI[/embedyt]
I’ve been doing a log of programming at work and some of the worst errors to run into are segfaults or segmentation faults. This deals with problems in your logic and more often then not is a memory issue. They really suck to debug…

For best practices, I keep a working version and development version of code. This way, when I run into these problems I can compare my issues against a working copy. I use none other than the great diff command. This sometimes helps with faults among other debugging tools like (gdb).
It’s pretty obvious by the name what this command does, it points out the differences between files.
Command:
diff <FILE 1> <FILE 2>
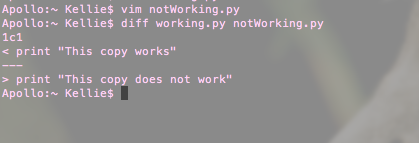
The example points out a line that is different between two given files. New lines can really screw up the results so be careful.
That’s the gist, visit the it’s man page for more details.
Happy Programming!
These are tools I have used for a live investigation of a target Windows machine and I recommend to other users. These tools are open source and provide clean GUI or command line executable.
Sysinternals Suite contains numerous forensic tools for a Windows environment. A few helpful tools for a live investigation include:
FPort is a tool that enumerates ports and executables running on the ports. Unknown processes accessing a port should be flagged as suspicious and analyzed.
UserDump is a tool used to create memory dumps for specific processes. Process dumps are important in reviewing the actions of a process. After the dump file is created the Sysinternal tool strings can be used to pull out any words sentences found in the dump file. This material can be reviewed to gain an understanding of what actions a process or executable performs.
All files created or tools used in a forensic investigation need to include a checksum for validation against fraud. A checksum is basically the value of a file hash. If one character in the code or file is changed, the hash will produce a different checksum. This helps validate content. A specific application version will have a unique checksum different from all other versions of the software.
A good tool for Windows to use to create checksums is File Checksum Integrity Verifier (http://support.microsoft.com/kb/841290). Tool use is very simple.
Command:
<File Checksum Integrity Verifier EXECUTABLE> <FILE TO CHECKSUM>


A good tool pre-installed in most Linux environments to use to create checksums is md5sum.
Command:
md5sum <FILE TO CHECKSUM>
When a system is vital in daily operations, it often cannot be taken offline for duplication. Also because of its importance it cannot risk the chance of state change, forensic tools cannot be downloaded onto the system. In a court case, the installation of tools could be considered as tampering with the evidence because there is a chance the tools could overwrite important data. The same goes for saving data on the victim machine. A live incident response looks to collect data from a machine without changing the environment. I recommend mapping a network drive or preferably using Ncat to transfer information between analyzing machine and the victim machine during a live investigation.
Ncat comes pre-installed on most Linux distributions and can be called by the ‘nc’ command. For Windows, a portable executable can be downloaded from here.
If using Ncat to transfer logs the following commands can be used:
Command to setup a Ncat listener on host machine:
Linux: nc –v –l  –p <PORT> > <LOG FILE>
Windows: <NCAT EXECUTABLE> –v –l  –p <PORT> > <LOG FILE>

The port number is any port desired for the Ncat listener to listen on for communication. The log file is just a file for the data to be stored in on the analyzing host machine.
Command to send data from a victim machine:
Linux: <COMMAND> | nc <IP ADDRESS OF LISTENING MACHINE> <PORT>
Windows: <COMMAND> | <NCAT EXECUTABLE> <IP ADDRESS OF LISTENING MACHINE> <PORT>

Basically the command sends the results of a command performed on the victim machine to the listening host machine. <COMMAND> is the command issued on the victim machine. The IP address and port are of the host machine with Ncat listening. The connection can be closed by CONTROL C/D or closing the terminal/command prompt. Once closed, the listener will output all received data to the output file.
Not only can Ncat be used to send command output but it can be used to listen for text or file transfers.

Overall, it is an easy to use clean tool for transferring information between host machines.
Nmap is an effective network-scanning tool that can be used for host and open port service discovery. It can be downloaded from here.
In my experiences, to find hidden services or special services, not located on common ports, the below scans can be used. Different services respond to different packet messages. The “-p” tag specifies a port range, it is not required. However, when I stated the range, I found more running services than when the range was not stated. My theory is nmap, on a basic scan will look at popular ports and not necessarily all ports when not stated.
This is a tool used to brute force subdomains and domains for a specified website. It accomplishes the attacks through the use of a wordlists.
Command Use:
This tool can retrieve host addresses, name servers, MX records, sub domains, whois performances and reverse lookups for netblocks. It performs a quick enumeration.
Command Use:
The flags allow for a powerful scan including sub domains.
This tool will use google to search a domain for given file types and extract the metadata to a viewable HTML file. It is part of the footprinting stages of penetration testing.
Command Use:
This is a tool used to extract hostnames, subdomains, IP and email addresses from a given domain through information from google. It is part of the footprinting stages of penetration testing.
Command Use: