Linux – Compiling Downloaded Source Code with Make’s 101

I’ve been doing quite a bit of source code compiling using the “make” command and figured I provide a brief primer on how to compile.

DISCLAIMER – Not all source codes are the same, some may/may not follow this structure.

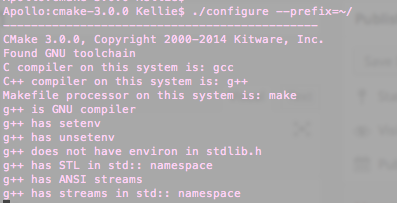
First step, download the source code you wish to compile. For this example, I will download cmake 3.0. The tool can be downloaded from: http://www.cmake.org/files/v3.0/cmake-3.0.0.tar.gz.

Untar the file, the following command will work when executed from the same directory the tar file is located.

tar -xvf cmake-3.0.0.tar.gz
Screen Shot 2014-07-28 at 9.50.37 PM

Next, change directories into the newly tar-ed folder (the source code directory).

cd cmake-3.0.0

The following commands need to be executed within the source directory. Some source codes have and autogen.sh file. If this exists, run it to auto generate the correct configure.

./autogen.sh

However, if there is already a configure file (note this is not configure.<EXTENSION>), run that to check and setup your environment.

./configure

The command

./configure --help

will show you the manner different setup variables you can assign values. For example, if you do not want the source code to be compiled in default directories, add the –prefix flag to specify another directory.

./configure –prefix=<DIRECTORY FOR INSTALL>
Screen Shot 2014-07-28 at 9.52.33 PM

Some sources require you to run

make

first to run/setup default variables. However, I normal just run

make install
Screen Shot 2014-07-28 at 9.58.47 PM

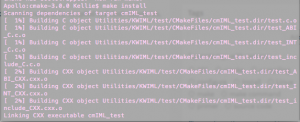
in most instances, after configuring.

That’s pretty much it! It is compiled and ready to go. Happy coding!

Intel RAID 5 on Windows 8.1

I upgraded by Windows 8 to Windows 8.1 a couple of months ago and since the change I was getting blue screens (of death…) consistently.

This issue was do to a piece of memory that was incorrectly over written, my RAID drivers were also failing. There really wasn’t anything important on my Windows partition so I decided to delete the partition and reinstall Windows 8.1 as a fix. There are helpful debugger tools to deal with this along with memory tests but it was just as easy for me to delete and start over.

The following instructions apply to an Intel Motherboard.

Enabling RAID (I already had my RAID setup, so I didn’t need to perform these steps since it is configured on the hardware level.)

  1. Turn on the computer and during the first screen that  flashes the manufacturer name (the screen before the Windows logo) enter the BIOS menu. The screen flashes quickly and for those who don’t know how to enter this screen, it’s normally a F key. The manufacturer screen normally has on it a list of  key options, just look for the one that will get you to the BIOS configuration (Don’t worry if you miss it, just keep shutting down the machine and turning it back on until you get it). For me, the Intel key was “F2”.
  2. Under the configuration tab in the BIOS, set the “Chipset SATA Mode” to RAID. Directions on how to change values are displayed on the right hand side of the screen.
  3. Save changes and exit the BIOS screen (ESC key).
2014-02-01 09.43.41
BIOS Configuration Tab

Configuring RAID Volumes (Once again I already had this setup.)

  1. Reboot the computer. There should now be an additional screen that appears between manufacturer screens when you start the machine up. This lists all your RAID volumes.
  2. Quickly, press CTRL-I to get to the RAID configuration utility while the screen is up. This was actually tricky for me, I had to make multiple attempts. For some reason, I could not get this to work on my bluetooth keyboard but it worked with another keyboard… some bug. Even with a different keyboard, I basically held down CTRL and went crazy pressing “i” over and over and over again.
  3. In this window you can create RAIDS! Choose option 1 to create your volumes or look at the other available options for different functions.
  4. My settings consist of two bootable RAID 5 volumes across my three ~4TB (3.6TB actual) hard drives. One with 125GB and the other with 7.1TB. The screenshot below shows my setup for your reference. Depending on your setup (RAID 5 requires at least 3 hard drives), you may want to do some research into RAID and your options. I chose 5 because it is supported by my motherboard and provides mirroring/striping. So it optimizes parallel communications and provides redundancy. In the case that one of my hard drives fails, I won’t loose anything. If two hard drives fail… I’m screwed. Basically, you have some protection from failure but still replace bad hard drives ASAP.

2014-02-01 10.22.15

Install Windows

Intel Raid Driver I Used

  1. Download the Intel RAID drivers from their website and put them on a USB device. The screenshot above shows the driver I downloaded. Keep the USB plugged in during the following steps.
  2. I had a DVD with a Windows 8.1 ISO burned to it. This was placed into the computer before I shut it down. I then turned the computer on and again during the manufacturer/first screen, I hit the “F10” key to select from where to boot. Most of the time, by default you boot from the Windows partition on your hard drive. However, this time, I wanted to boot from my install DVD containing Windows 8.1.
  3. It took awhile to load the Windows menu, but once it did, I chose to “Install.”
  4. The next few screens deal with entering your license key and junk.
  5. Once I was prompted for Default or Advanced setup. I chose Advanced. This was because I needed to mess with the partitions.
  6. The next screen will show the existing partitions but we have RAID going on and to make the install aware of this, we need to provide the drivers. In the current window, look for and select “Load driver.”
  7. I pointed the device to my USB to search for drivers. Once it found my Intel RAID driver, I selected it and clicked “Next.”
  8. After a few minutes, you will be returned to the partition window and you should see you RAIDs correctly.
  9. Format a new partition for your Windows (I deleted the previous). In my setup, I have 8 TB of hard drive space. I dedicated 124 GB to my Windows partition and the remainder to a partition I call “cabinet.” This is where I store my documents, media, etc. Windows does have a problem with creating a partition greater than 2TB. These drives must use GPT. This page discusses more on GPT. If this is what you plan to do, don’t partition the larger now, wait to use the Windows disk utility described in the link.
  10. Continue and let Windows install. Was completed, install drivers as needed. Intel has a tool that helps with this process.
2014-02-01 01.13.18
Driver Selection
2014-02-01 01.13.21
Partition Window

There you have it!

OpenVas for Kali Linux on the Raspberry Pi

I’m working on creating a semi-portable security platform. I decided to experiment with installing and using the armel version of Kali Linux (the new backtrack OS) on the raspberry pi. Initially, I faced a lot of problems getting OpenVAS to work on the device. This is one of the very few if only open source armel vulnerability scanners I could find. The following steps cover my successful attempt to setting up OpenVAS for anyone else interested in working with this tool in Kali on a Pi. Be prepared to spend a good amount of time waiting for the plugins to install and the database to update.

  1. Downloaded and installed a fresh armel image of Kali (http://www.kali.org/downloads/). I used this image (Username: root, password: toor).
  2. Use a disk imager to image a SD card with the Kali image to run on the Pi. I used Win32 Disk Imager.
  3. Insert the SD card into the pi and power it up.
  4. You may want to expand the partition created by the disk imager, a tutorial on how to expand an active partition can be found here.
  5. Set the correct date if needed:
    date <month><day><hour><minute><year>.<second>
  6. Create the openVAS certificate:
    openvas-mkcert
  7. Create the openVAS client certificate:
    openvas-mkcert-client -n om -i
  8. Download the openVAS NVT’s (This takes a few minutes):
    openvas-nvt-sync
  9. Start the openVAS scanner (This takes 30+ minutes.):
    openvassd
  10. Build the openVAS database (This can take an hour or more.):
    openvasmd --rebuild
  11. Create an admin account:
    openvasad -c 'add_user' -n openvasadmin -r Admin
  12. Update the  openVAS database with the latest definition (This can take an hour or more.):
    openvasmd --update
  13. Migrate the database (This can take an hour or more.):
    openvasmd --migrate
  14. Rebuild one last time to be safe (This can take an hour or more.):
    openvasmd --rebuild
  15. Start the openVAS manager on port 9390:
    openvasmd -p 9390 -a 127.0.0.1
  16. Start the openVAS admin:
    openvasad -a 127.0.0.1 -p 9393
  17. Start GSAD, this is the client tool for openVAS:
    gsad --http-only -p 9392
  18.  Use the web client to interact with the tool, it can be accessed on http://<IP OF PI>:9392. You can log in with the admin account created earlier.

Capture

That’s it! Now you can use this amazing tool to scan machines in a network!

After a reboot or shutdown, openVAS can be started with the commands:

  1. Start the openVAS scanner (This takes a few minutes this time.): openvassd
  2. Start the openVAS manager on port 9390: openvasmd -p 9390 -a 127.0.0.1
  3. Start the openVAS admin: openvasad -a 127.0.0.1 -p 9393
  4. Start GSAD on port 9392, this is the client tool for openVAS: gsad –http-only -p 9392