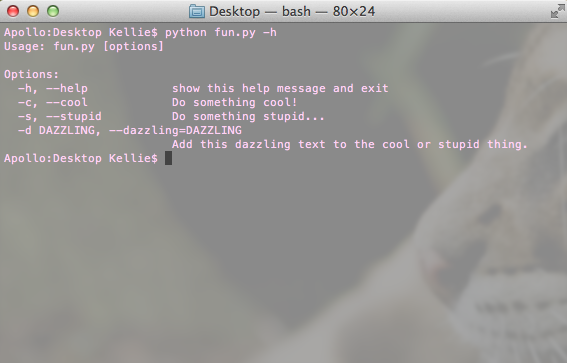
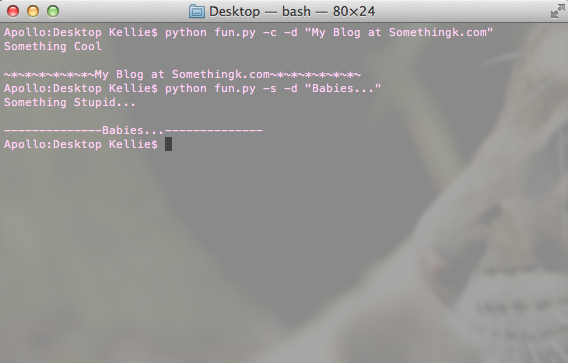
Python URL Term Scrapper (Kind of Like a Very Dumb/Simple Watson)

I wrote this a while back to scrape a given URL page for all links it contains and then search those links for term relations. The Python scrapper first finds all links in a given url. It then searches all the links found for a list of search terms provided. It will return stats on the number of times specific provided terms show up.

This may come in handy while trying to find more information on a given topic. I’ve used it on Google searches (be careful, you can only scrape google once ever 8 or so seconds before you are locked out) and wikipedia pages to gather correlation statistics between topics.

It is old code… so there might be some errors. Keep me posted!

#!/usr/bin/env python
#ENSURE permissions are 755 in order to have script run as executable

import os, sys, re, datetime
from optparse import OptionParser
import logging, urllib2

def parsePage(link, list):
    searchList = {}
    try:
        f = urllib2.urlopen(link)
        data = f.read()
        for item in list:
            if (item.title() in data) or (item.upper() in data) or (item.lower() in data):
                searchList[item]=searchList[item]+1
                searchList["count"]=searchList["count"]+1
        return searchList
    except Exception, e:
        print "An error has occurred while parsing page " +str(link)+"."
        log.error(str(datetime.datetime.now())+" "+str(e))

def searchUrl(search):
    try:
        f = urllib2.urlopen(search)
        data = f.read()
        pattern = r"/wiki(/\S*)?$" #regular expression to find url
        links = re.findall(pattern, data)
        return links
    except Exception, e:
        print "An error has occurred while trying to reach the site."
        log.error(str(datetime.datetime.now())+" "+str(e))

def main():
    try:
        parser = OptionParser() #Help menu options
        parser.add_option("-u", "--url", dest="search", help="String containing URL to search.")
        parser.add_option("-f", "--file", dest="file", help="File containing search terms.")
        (options, args) = parser.parse_args()
        if not options.search or not options.file:
            parser.error('Term file or URL to scrape not given')
        else:
            urls = searchUrl(options.search)
            f = open(options.file, 'r')
            terms = f.readlines()
            for url in urls:
                parsePage(url, terms)
            print "Results:"
            print searchList
    except Exception, e:
        log.error(str(datetime.datetime.now())+" "+str(e))

if __name__ == "__main__":
    log = logging.getLogger("error") #create error log
    log.setLevel(logging.ERROR)
    formatter = logging.Formatter('[%(levelname)s] %(message)s')
    handler = logging.FileHandler('error.log')
    handler.setFormatter(formatter)
    log.addHandler(handler)
    try:
        main()
    except Exception, e:
        print "An error has occurred, please review the error.log for more details."
        log.error(str(datetime.datetime.now())+" "+str(e))

Python OptionParser

I love when code makes life easier. However, if you don’t know what the code does… life isn’t so easy now. That’s why we have man pages!

In honor of those “man” pages…

Except building a man page for a script and handling the “-h” argument from a command prompt can be tedious.

Python has a really cool library called optparse, that includes the ability to make a “help” output for a script along with argument handling. You know how nice that is to have a library take care of the whole argument handling? Very nice! I would hate to use regular expressions to try and parse a list of command line inputs.

If my blog posts about the language haven’t made this obvious already, I really love Python. It does have faults because it is not a type-safe language and in some circumstances that can be an issue. I’ll go into detail at a later time. Ideally, it is best to have both type-safe and dynamic type languages in your repertoire of tools.

Anyways, back to Optparse. It’s basically self-explanatory.

Import OptionParser.

from optparse import OptionParser

Next, setup an OptionParser object.

parser = OptionParser()

Give it some flags or parameter options. You do not have to create a -h or help option, this will be created for you automatically. Below is a template for creating an option.

parser.add_option("-<OPTION LETTER>", "--<OPTION NAME>", dest="<VARIABLE NAME TO STORE OPTION CONTENT>", default=<DEFAULT VALUE>, help="<HELP TEXT>")

Each option creates a possible input parameter that user’s can specify. If you do not want the user to have to input a value, maybe a flag is more your style.

A flag is a true or false notification that does not require additional user input. If a flag is present do something, if not do something else. To create a flag, set the default option to true or false and add “action=”store_true” or add “action=”store_false” in order to simulate a flag option. When you want the flag to turn a statement true set “action=”store_true” and “default=False” and the exact opposite for a flag to turn something false. 

To help clarify things, I wrote up a fun example below.

Example

The below was coded for Python 2.7 and saved to a file called fun.py.

from optparse import OptionParser
import os, time

def somethingCool(dazzling):
    print "Something Cool"
    if dazzling:
        print "\n~*~*~*~*~*~*~"+dazzling+"~*~*~*~*~*~*~"

def somethingStupid(dazzling):
    print "Something Stupid..."
    if dazzling:
        print "\n--------------"+dazzling+"--------------"

def main():
    parser = OptionParser() #Help menu options
    parser.add_option("-c", "--cool", action="store_true", dest="cool", default=False, help="Do something cool!")
    parser.add_option("-s", "--stupid", action="store_true", dest="stupid", default=False, help="Do something stupid...")
    parser.add_option("-d", "--dazzling", dest="dazzling", default=None, help="Add this dazzling text to the cool or stupid thing.")
    (options, args) = parser.parse_args()
    if options.cool:
        somethingCool(options.dazzling)
    elif options.stupid:
        somethingStupid(options.dazzling)
    else:
        print "Lame, you selected nothing..."

if __name__ == "__main__":
    main()

Explanation

OptionParser will automatically create a help option (-h) for you. Here is what the help screen looks like for my code example:

Screen Shot 2014-01-21 at 3.52.37 PM

Basically, if I call the script with the -c flag, something cool will happen.

python fun.py -c

If I call the script with the -s flag, something stupid will happen.

python fun.py -s

Screen Shot 2014-01-21 at 3.52.55 PM

If I call the script with the -d <TEXT> and a flag something will happen with text.

python fun.py -c -d "My Blog at Somethingk.com"

Screen Shot 2014-01-21 at 3.54.36 PM

If I don’t provide a -s or a -c flag, the code insults me… A flag isn’t required but nothing else will happen if one isn’t given.

Screen Shot 2014-01-21 at 4.07.48 PM

Check out http://docs.python.org/2/library/optparse.html for more details. Have fun!

Logging on Python 2.7

Something actually useful… logging! Not talking about lumber but logging code issues, data, access, anything useful in an application environment. Python makes this super easy!

Logging is part of the Python standard library and can be imported with the following line of code.

import logging

Setup

First step after importing the library is to initiate the logger. 

log = logging.getLogger(__name__) #create a log object

The logger name hierarchy is analogous/identical to the Python package hierarchy if you organize your loggers on the recommended per-module basis. This is why you should use “__name__” which is the module’s name in the Python package namespace.

After creating a log, now the level needs to be specified. There are different declared levels of severity for logging. Below is a list of these levels ordered from least to most severe.

  • DEBUG – Detailed information for diagnosing problems.
  • INFO – Confirmation that things are working as expected.
  • WARNING – Notice that something unexpected happened, however the software is still working as expected.
  • ERROR – Data on an issue that has happened, which has preventing a function from being performed.
  • CRITICAL – Information about a serious problem! The program may not even run at all with this going on!

Items are logged based on the level of severity you set for the log. The default level is “warning”, this will track warning, error and critical items. If you selected debug, everything on up would be tracked.

Remember, you are the one who determines the level for a log message, so say you create a debug warning but your logging level is set to error. The debug message will not be printed because it is not of the error severity or higher.

log.setLevel(logging.<LOGGING LEVEL>)

Formats the log all pretty. This format, places the level first followed by the message I choose to insert.

formatter = logging.Formatter('[%(levelname)s] %(message)s')

This creates a handler for logging everything to a specified file.

handler = logging.FileHandler(<FILE PATH>)

Set the file handler with the format specified earlier.

handler.setFormatter(formatter)

Enforce the log to use the handler.

log.addHandler(handler)


All together

#!/usr/bin/env python
import logging
log = logging.getLogger(__name__)
log.setLevel(logging.error) #error level
formatter = logging.Formatter('[%(levelname)s] %(message)s')
handler = logging.FileHandler('error.log') #log to file error.log
handler.setFormatter(formatter)
log.addHandler(handler)

Implementation – Logging Items

It’s simple, just use the following syntax wherever you want a log entry to be made in your code.

log.<LEVEL>('<MESSAGE>')

Example

logging.info('This is awesome!')

I like to use logging to report errors from “try and except” statements in a situation where I don’t want the loop to stop because of an error.
while 1:
  try:
                  doSomething()
  except, Exception E:
                  logging.error(str(datetime.datetime.now())+" "+e) #I’ll add the timestamp with datetime for kicks
                  pass

There you have it, very useful and simple python programming. More documentation at http://docs.python.org/2/howto/logging.html.

My Ultimate Network Monitor/Enumeration Tool – Putting It All Together

Finally, all the parts come together. Look at my previous posts for all the pieces to building the LilDevil network monitor and enumeration tool.

The LilDevil

So this tool I created sits on a Raspberry Pi. Its purpose is to monitor and enumerate all devices currently connected to a network. In this case, it sits on my Guest network. Tomato Shibby is running on my router and I used its web interface to setup the network, along with limiting access. For all guests jointing this network, they are warned by the router’s splash page that tools such as this will be running. Its a free network and they really can’t expect anything different going on. In this case, its not malicious, but it is good practice to be wary of guest networks.

To be less suspicious, the hostname of the Raspberry Pi is RainbowDash 😉 This amuses me so much, the perfect disguise! If I saw a device named LilDevil running on a guest network I would be totally alarmed. I also themed the Pi accordingly, see the below screenshot. The coloring isn’t perfect, I blame VNC.

RainbowDash

The Pi runs a Django Restful server that stores mmap scan information about detected machines on the network. The Python 2.7 scripts for this are here. I had to make a few versions in order for things to work on Django 1.6.

In views.py, change

encoded = json.loads(request.raw_post_data)

to

encoded = json.loads(request.body)

Also, I had to make some changes in dirtBag.py, in order to get the ping sweep to work appropriate.

Change MIN and MAX to an integer instead of a string.

MIN="0"
MAX="12"

to

MIN=0
MAX=12

Here is a copy of the new main function.

def main():
    global results
    while 1:
        new = ""
        for x in range(MIN,MAX):
            new = new + commands.getoutput("ping -c 1 -t 1 "+PREFIX+"."+str(x) + " | grep 'from'") #Ping sweep the network to find connected devices
        tmp = re.findall(PREFIX+".(d+)", str(new)) #Pull out IP addresses from the ping results
        if tmp != results:
            for ip in tmp:
                if ip not in results:
                    gotcha = commands.getoutput('nmap -v -A -Pn '+PREFIX+'.'+ip)
                    sendDevice(gotcha)
            for r in results:
                if r not in tmp:
                    removeDevice(PREFIX+'.'+r)
            results = tmp

The information is up to date on all devices currently connected. It may be nice in the future to include a log of all scans but for now, I’m really only interested in connected machines.

Data is then displayed in a visible GUI. The below screenshot shows the tool windows along with the GUI. Currently, no devices were connected to the network.

Screen Shot 2014-01-17 at 9.27.49 PM


Ahhh it detected a device… in this case, itself.

Screen Shot 2014-01-19 at 7.58.55 PM

There you have it! A portable network enumeration tool. There are so many versions of this everywhere, but this is just something I coded up for fun. I plan to add to the Pi later for kicks.

IMPROVEMENTS: Detecting New Network Devices with Python and Tkinter

So I wasn’t too happy with the kludginess of the network monitoring tool that I posted about earlier this week. It lagged and really wasn’t an ideal tool. I decided to redesign the entire model.

New Model

The new tool still utilizes Python 2.7 and consists of three parts:

  • Ping/Enumeration Script
  • RESTful Django Script
  • Tkinter Reporting GUI Script

Here is how they connect. The Ping/Enumeration Script, pings all devices given within a network range. Whenever it finds a new device, it runs a NMAP scan on the device then formulates a request to the server to notify it of the device scan results. The script will also notify the server when a device disconnects from the network (this was an issue with the old version).

The Django server manages a sqlite database containing scan results on all devices currently connected to the network. It will remove or add a device record based on the ping script’s RESTful HTTP request. The server can also return a list of all devices detected. This list is used by the GUI script.

The GUI script maintains a Tkinter dialog window that will circulate through all network connected device scan results. It first sends a GET request to the Django server asking for a JSON list of all connected devices. The script will then display each record found in the JSON. Each device record will appear in the GUI window for 20 seconds. After it has made the rounds through each item, it will make another call to the server for a fresh JSON to iterate through.

The Ping/Enumeration Script is basically the same as what I discussed earlier. The difference is, after data is collected, it is sent to the Django server in a POST request.


import commands, re, json, urllib2, binascii
PREFIX = "192.168.1" #Network prefix
MIN = "0" #Starting network address, eg 192.168.1.0
MAX = "12" #Closing network address, e.g. 192.168.1.55
results = []

def escapeMe(message): #Escape characters (using ASCII value) not allowed in JSON
    new = ""
    for num in range(len(message)):
        char_code = ord(message[num])
        if char_code < 32 or char_code == 39 or             char_code == 34 or char_code == 92:
            new = new + "%" + binascii.hexlify(message[num])
        else:
            new = new + message[num]
    return new

def sendDevice(gotcha): #Send the device report to the server as a POST
    try:
        url = "http://127.0.0.1:3707/new/" #Server address
        gotcha = escapeMe(gotcha)
        values = json.dumps({'device' : str(gotcha)})
        req = urllib2.Request(url)
        req.add_header('Content-Type', 'application/json')
        rsp = urllib2.urlopen(req, values)
        code = rsp.getcode()
    except Exception, e:
        print e

def removeDevice(ip): #Send request to remove device
    try:
        ip = ip.replace('.','-')
        url = "http://127.0.0.1:3707/remove/"+ip+"/"
        rsp = urllib2.urlopen(url)
        code = rsp.getcode()
    except Exception, e:
        print e

def main():
    global results
    while 1:
        new = commands.getoutput('for i in {'+MIN+'..'+MAX+'}; do ping -c 1 -t 1 '+PREFIX+'.$i | grep "from"; done') #Ping sweep the network to find connected devices
        tmp = re.findall(PREFIX+"\.(\d+)", str(new)) #Pull out IP addresses from the ping results
        if tmp != results:
            for ip in tmp:
                if ip not in results:
                    gotcha = commands.getoutput('nmap -v -A -Pn '+PREFIX+'.'+ip) #nmap new devices found on the network
                    sendDevice(gotcha) #send device record to server
            for r in results:
                if r not in tmp:
                    removeDevice(PREFIX+'.'+r) #remove device if it wasn't found in the latest ping
            results = tmp

if __name__ == "__main__":
    main()

Django is an awesome Python Web Application Framework that I absolutely adore (not the movie 🙂 ). It is known as the web framework for perfectionists with deadlines. Most of my web projects utilize Django.

Django

It comes with its own lightweight server to host its applications, so its perfect for any development environment. For the sake of this project, I’m using its server, all script/server functionality is limited to the host machine running the tool. Everything is internal. Django also handles the RESTful routing and database modeling. It uses the model view controller (MVC) structure. Here is a great tutorial on how to create your own Django app, definitely worth looking into!

The following is the break down of code I wrote for the Django server (running version 1.3).


####################models.py####################
from django.db import models

class Devices(models.Model):
    device = models.TextField()

####################ADD to urls.py####################
url(r'^new/$', 'lilDevil.views.new', name='new'),
url(r'^listDevices/$', 'lilDevil.views.listDevices', name='listDevices'),
url(r'^remove/(?P*ip*.+)/$', 'lilDevil.views.remove', name='remove'), #REPLACE * with greater/less sign containing brackets

####################views.py####################
from django.http import HttpResponse
from lilDevil.models import Devices
import json

def remove(request, ip):
    try:
        ip = ip.replace('-','.')
        devicelist = Devices.objects.all()
        for d in devicelist:
            if ip in d.device:
                d.delete()
        return HttpResponse(status = 200)
    except Exception, e:
        return HttpResponse(e)

def new(request):
    try:
        encoded = json.loads(request.raw_post_data)
        new = Devices(device=encoded["device"])
        new.save()
        return HttpResponse(status = 200)
    except Exception, e:
        return HttpResponse(e)

def listDevices(request):
    try:
        json_string = '{"devices": ['
        devicelist = Devices.objects.all()
        first = True
        for d in devicelist:
            if first:
                first = False
            else:
                json_string = json_string + ', '
            json_string = json_string + '{"device": "'+str(d.device)+'"}'

        json_string = json_string + ']}'
        return HttpResponse(json_string)
    except Exception, e:
        print HttpResponse(e)
        return

Finally, the GUI script. Very similar to the one in the old post. Again, I just added the ability to request device data from the server.


from Tkinter import *
import time, urllib2, urllib, json
class flipGUI(Tk):
    def __init__(self,*args, **kwargs): #Setup the GUI and make it pretty
        Tk.__init__(self, *args, **kwargs)
        self.label1 = Label(self, width= 65, justify=CENTER, padx=5, pady=5, text="Guests") #Text label
        self.label2 = Label(self, text="") #Photo label
        self.label2.grid(row=0, column=1, sticky=W+E+N+S, padx=5, pady=5)
        self.label1.grid(row=0, column=0)
        self.flipping()

    def flipping(self): #Flip through NMAP scans of detected devices
        t = self.label1.cget("text")
        t = self.label2.cget("image")
        data = getData()
        found = json.loads(data)
        photo = PhotoImage(file="picture.gif")
        if found['devices']:
            for f in found['devices']: #Loop through all but the last item
                fixed = f['device'].replace('%0a', '\n') #return to ASCII value from earlier escaped hex
                self.label1.config(text=fixed)
                self.label1.update()
                self.label2.config(image=photo)
                self.label2.update()
                time.sleep(20)
        else:
            self.label1.config(text="No connected devices")
            self.label1.update()
            time.sleep(20)
        self.after(1, self.flipping())

def getData(): #Get a list of devices from server
    url = "http://127.0.0.1:3707/listDevices/" #server address
    response = urllib2.urlopen(url)
    code = response.getcode()
    if int(code) == 200:
        return response.read()
    else:
        return

if __name__ == "__main__":
    try:
        while 1:
            app = flipGUI()
            app.mainloop()
    except Exception, e:
        print e

Final Note: Make sure to delete/clear out database or old results will carry over! I did this in an init.d script that calls the service.

Put it all together and you have a much more stable tool. I renamed it from the Hindenburg to the Lil Devil.

The Lil Devil
The Lil Devil

Detecting New Network Devices with Python and Tkinter

UPDATE: I made a better version of this tool with server implementation here.

Today I felt like building a python 2.7 script that would enumerate a network along with alert me to the presence of a new device.

I limited my project to functions in the standard library.

So something lightweight and okay fast is a ping sweep. From an early post I included the Linux command for a sweep. I used this command along with the python commands to execute the ping sweep along with storing the results in a variable.

new = commands.getoutput('for i in {'+MIN+'..'+MAX+'}; do ping -c 1 -t 1 '+PREFIX+'.$i | grep "from"; done')

Following, I used some regular expressions to pull out the IP addresses detected in a given prefix range.

tmp = re.findall(PREFIX+"\.(\d+)", str(new)) #Pull out IP addresses from the ping results

Put that in a loop with some comparison data and you have a script that prints an alert whenever a new device is detected.

import commands, re
PREFIX = "192.168.1" #Network prefix
MIN = "0" #Starting network address, eg 192.168.1.0
MAX = "12" #Closing network address, e.g. 192.168.1.55
results = []
while 1:
new = commands.getoutput('for i in {'+MIN+'..'+MAX+'}; do ping -c 1 -t 1 '+PREFIX+'.$i | grep "from"; done') #Ping sweep the network to find connected devices
tmp = re.findall(PREFIX+"\.(\d+)", str(new)) #Pull out IP addresses from the ping results
if tmp != results:
for t in tmp:
if t not in results:
print "New device at" + PREFIX + "." + str(t)
results = tmp

There are a few short comings in the code but that’s the basic idea.

Now take this further, I hooked it up to a GUI with enumeration information! The new beastly application constantly flips through NMAP scan results of devices found connected to the network and displays the results in a GUI. I even placed a picture in the GUI. I call this app, the Hindenburg, its kind of hacked together.

The Hindenburg!
The Hindenburg!
from Tkinter import *
import time, commands, re
PREFIX = "192.168.1" #Network prefix
MIN = "0" #Starting network address, eg 192.168.1.0
MAX = "12" #Closing network address, eg 192.168.1.12
class flipGUI(Tk):
def __init__(self,*args, **kwargs): #Setup the GUI and make it pretty
Tk.__init__(self, *args, **kwargs)
self.label1 = Label(self, width= 65, justify=CENTER, padx=5, pady=5, text="Guests") #Text label
self.label2 = Label(self, text="Guests") #Photo label
self.label2.grid(row=0, column=1, sticky=W+E+N+S, padx=5, pady=5)
self.label1.grid(row=0, column=0)
self.flipping()
    def flipping(self): #Flip through NMAP scans of detected devices
t = self.label1.cget(“text”)
t = self.label2.cget(“image”)
found = scanNetwork()
photo = PhotoImage(file=”picture.gif”)
for f in found[:-1]: #Loop through all but the last item
self.label1.config(text=f)
self.label1.update()
self.label2.config(image=photo)
self.label2.update()
time.sleep(15)
self.label1.config(text=found[-1]) #the last item doesn’t require the sleep, it takes enough time to run the scans
self.label1.update()
self.label2.config(image=photo)
self.label2.update()
self.after(1, flipping())

def scanNetwork():
found = []
new = commands.getoutput(‘for i in {‘+MIN+’..’+MAX+’}; do ping -c 1 -t 1 ‘+PREFIX+’.$i | grep “from”; done’) #Ping sweep the network to find connected devices
tmp = re.findall(PREFIX+”\.(\d+)”, str(new)) #Pull out IP addresses from the ping results
for ip in tmp: #Loop through each found IP
found.append(commands.getoutput(‘nmap -v -A -Pn ‘+PREFIX+’.’+ip))
return found

app = flipGUI()
app.mainloop()

It’s ideal for an environment where it can just sit on the screen without much of any type of activity going on. If you are enumerating the entire network, there will be a lag… it happens.