Intel RAID 5 on Windows 8.1

I upgraded by Windows 8 to Windows 8.1 a couple of months ago and since the change I was getting blue screens (of death…) consistently.

This issue was do to a piece of memory that was incorrectly over written, my RAID drivers were also failing. There really wasn’t anything important on my Windows partition so I decided to delete the partition and reinstall Windows 8.1 as a fix. There are helpful debugger tools to deal with this along with memory tests but it was just as easy for me to delete and start over.

The following instructions apply to an Intel Motherboard.

Enabling RAID (I already had my RAID setup, so I didn’t need to perform these steps since it is configured on the hardware level.)

  1. Turn on the computer and during the first screen that  flashes the manufacturer name (the screen before the Windows logo) enter the BIOS menu. The screen flashes quickly and for those who don’t know how to enter this screen, it’s normally a F key. The manufacturer screen normally has on it a list of  key options, just look for the one that will get you to the BIOS configuration (Don’t worry if you miss it, just keep shutting down the machine and turning it back on until you get it). For me, the Intel key was “F2”.
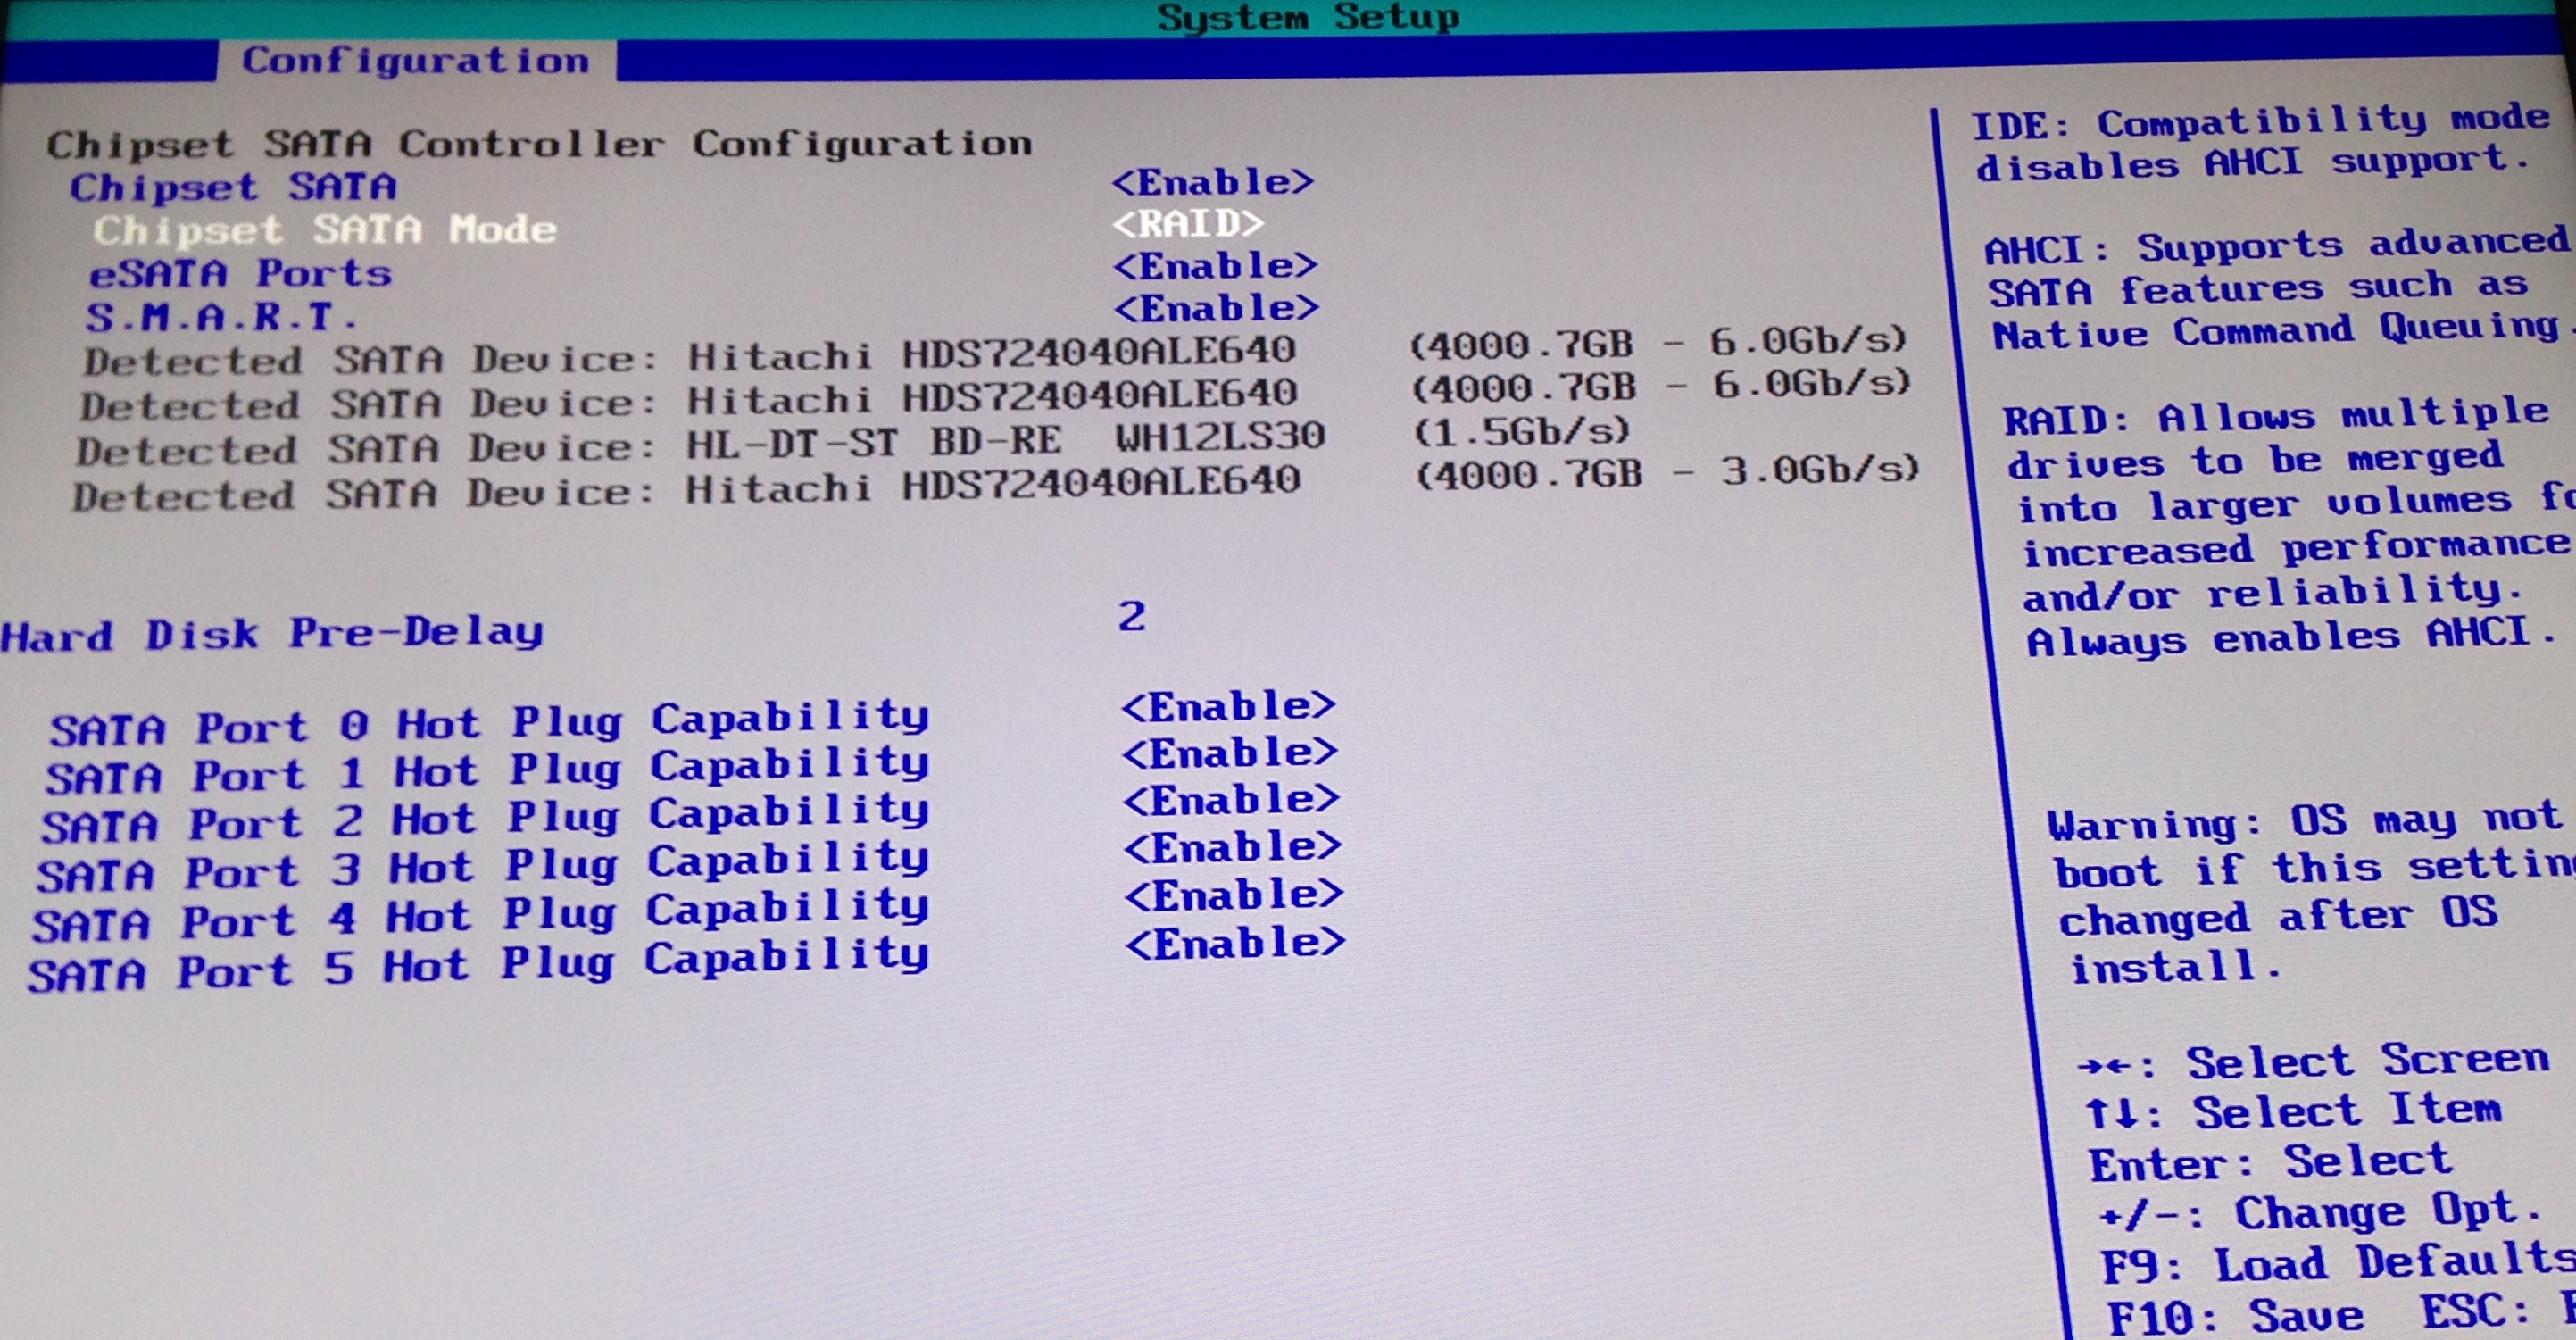
  2. Under the configuration tab in the BIOS, set the “Chipset SATA Mode” to RAID. Directions on how to change values are displayed on the right hand side of the screen.
  3. Save changes and exit the BIOS screen (ESC key).
2014-02-01 09.43.41
BIOS Configuration Tab

Configuring RAID Volumes (Once again I already had this setup.)

  1. Reboot the computer. There should now be an additional screen that appears between manufacturer screens when you start the machine up. This lists all your RAID volumes.
  2. Quickly, press CTRL-I to get to the RAID configuration utility while the screen is up. This was actually tricky for me, I had to make multiple attempts. For some reason, I could not get this to work on my bluetooth keyboard but it worked with another keyboard… some bug. Even with a different keyboard, I basically held down CTRL and went crazy pressing “i” over and over and over again.
  3. In this window you can create RAIDS! Choose option 1 to create your volumes or look at the other available options for different functions.
  4. My settings consist of two bootable RAID 5 volumes across my three ~4TB (3.6TB actual) hard drives. One with 125GB and the other with 7.1TB. The screenshot below shows my setup for your reference. Depending on your setup (RAID 5 requires at least 3 hard drives), you may want to do some research into RAID and your options. I chose 5 because it is supported by my motherboard and provides mirroring/striping. So it optimizes parallel communications and provides redundancy. In the case that one of my hard drives fails, I won’t loose anything. If two hard drives fail… I’m screwed. Basically, you have some protection from failure but still replace bad hard drives ASAP.

2014-02-01 10.22.15

Install Windows

Intel Raid Driver I Used

  1. Download the Intel RAID drivers from their website and put them on a USB device. The screenshot above shows the driver I downloaded. Keep the USB plugged in during the following steps.
  2. I had a DVD with a Windows 8.1 ISO burned to it. This was placed into the computer before I shut it down. I then turned the computer on and again during the manufacturer/first screen, I hit the “F10” key to select from where to boot. Most of the time, by default you boot from the Windows partition on your hard drive. However, this time, I wanted to boot from my install DVD containing Windows 8.1.
  3. It took awhile to load the Windows menu, but once it did, I chose to “Install.”
  4. The next few screens deal with entering your license key and junk.
  5. Once I was prompted for Default or Advanced setup. I chose Advanced. This was because I needed to mess with the partitions.
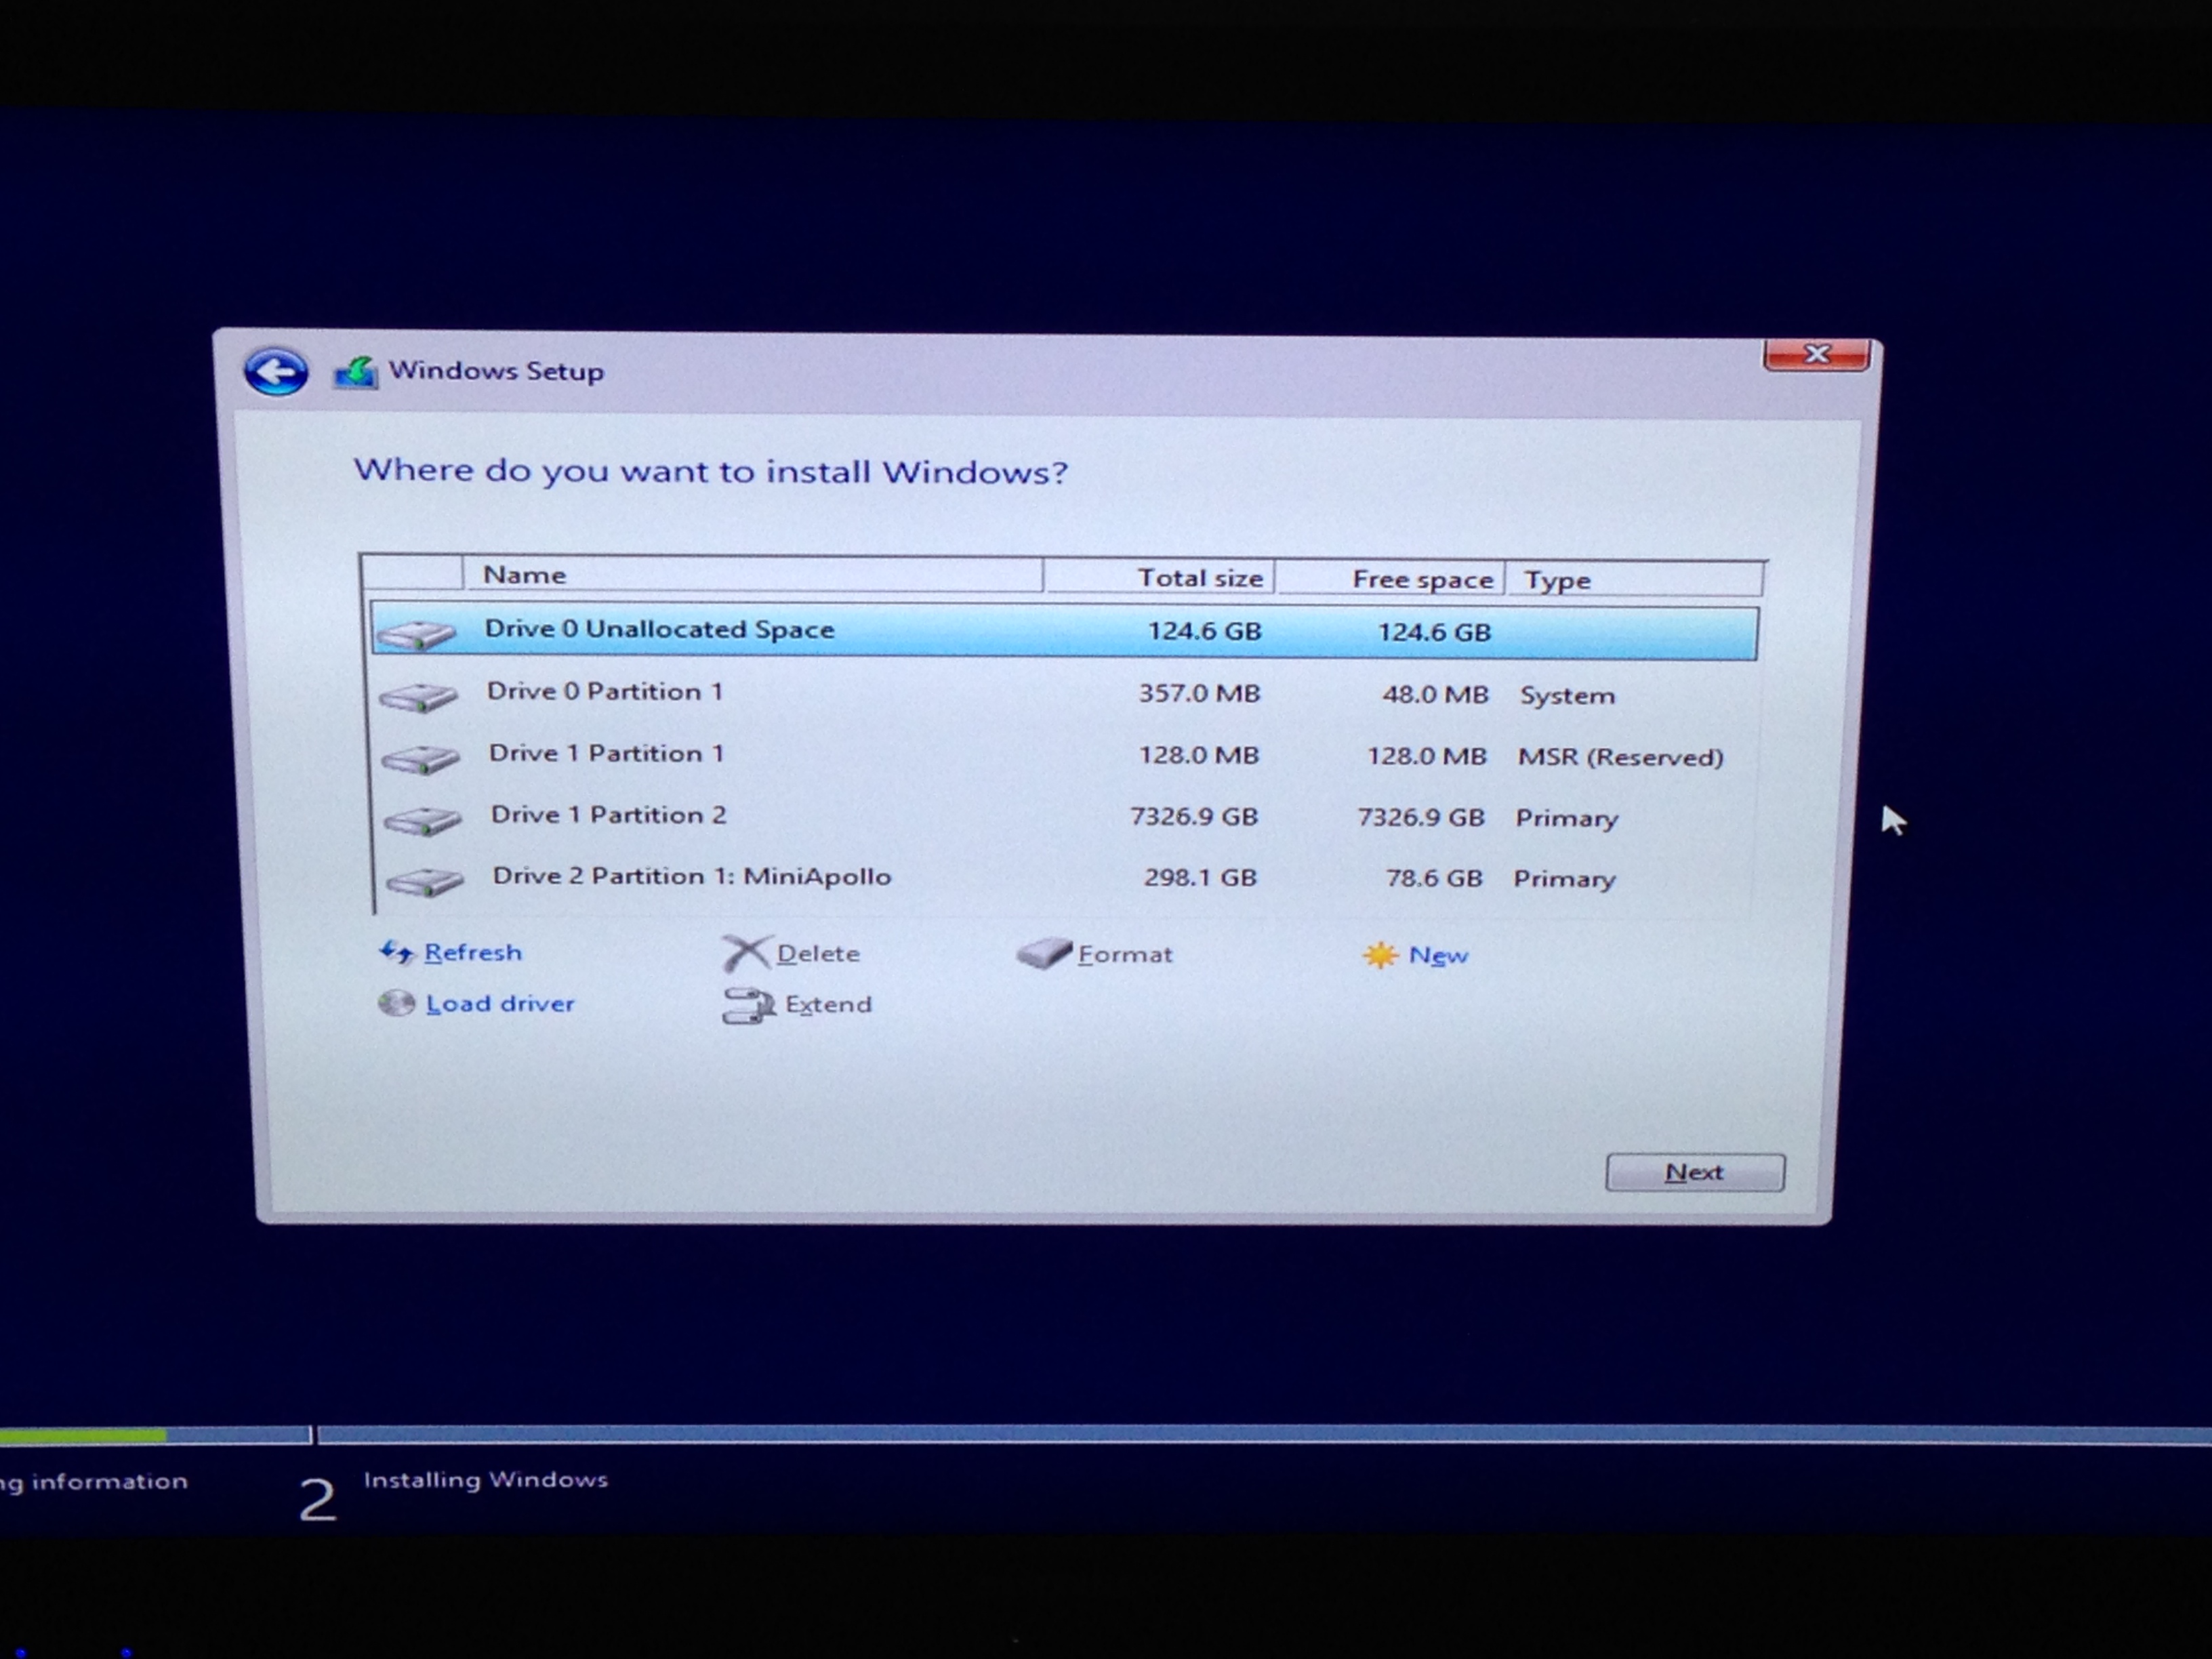
  6. The next screen will show the existing partitions but we have RAID going on and to make the install aware of this, we need to provide the drivers. In the current window, look for and select “Load driver.”
  7. I pointed the device to my USB to search for drivers. Once it found my Intel RAID driver, I selected it and clicked “Next.”
  8. After a few minutes, you will be returned to the partition window and you should see you RAIDs correctly.
  9. Format a new partition for your Windows (I deleted the previous). In my setup, I have 8 TB of hard drive space. I dedicated 124 GB to my Windows partition and the remainder to a partition I call “cabinet.” This is where I store my documents, media, etc. Windows does have a problem with creating a partition greater than 2TB. These drives must use GPT. This page discusses more on GPT. If this is what you plan to do, don’t partition the larger now, wait to use the Windows disk utility described in the link.
  10. Continue and let Windows install. Was completed, install drivers as needed. Intel has a tool that helps with this process.
2014-02-01 01.13.18
Driver Selection
2014-02-01 01.13.21
Partition Window

There you have it!

Hard Drive Encryption

On a totally different encryption tangent, I need to encrypt my hard drives. Kind of ashamed that they aren’t encrypted already… I studied the field of cyber-security. However, for a basic home server it didn’t seem as pertinent to encrypt my drives.

I’m not going crazy or anything with confidential data. However, something really cool with hard drive encryption is that in most cases (strong password utilized, best practices, etc.), if the user is not logged into the computer at the time of seizure, it can be close to impossible (at the moment of writing this) for forensics to decrypt the data. True, there are tools that are part of the FTK toolkit like PRTK that can be used to attempt to decrypt your hard drive. Now correct me if I’m wrong, but if your password is over 12 characters long and includes different characters, numbers, symbols and all that jazz, the decryption attempt will take forever! The investigators are likely to be long gone before anything is returned (the cracking system would also have to be amazing and last just as long).

There are primarily two types of encryption, hardware and software encryption. I prefer the idea of hardware encryption, it encrypts data at the lowest level and tends to be more secure. If someone has access to your environment with a software encryption scheme there is a greater likelihood they will be able to obtain the key through brute force. A simple reference site for an explanation of encryption and the differences can be found here. One uses the computers resources to encrypt while the other relies on the hardware to encrypt data on its own dedicated processor. There really isn’t much difference between performance, problem is not all hard drives come with a dedicated processor for encryption.

My environment consists of three 4 TB hard drives in a RAID5 array that are currently partitioned into two drives. One drive contains Windows 8 and the other is for storage.

The hard drives I'm currently using.
The hard drives I’m currently using.

So my options, hardware or software encrypt. I’ve already been using the drives for quite some time, I don’t really want to lose the data already stored on the devices. There are some issues I foresee with hardware encryption and a RAID system. Is it even possible with RAID? I have to concern myself with how encryption will affect the stripping and mirroring of data. It all depends on the drive and in my case, its easy, my hard drives don’t even include the capability to hardware encrypt so on to software encryption.

For software encryption, BitLocker and TrueCrypt are two free solutions that I am familiar with and could consider using. I could also look at converting my entire system into a NAS (FreeBSD and FreeNAS can setup a software based RAID and they include encryption capabilities) but… I’ll save that for another day.

BitLocker is already made available on Windows 8 Enterprise and Ultimate, but is it better than TrueCrypt? According to Tomshardware.com, both encryption tools are almost identical in performance. Bottom line, Microsoft’s BitLocker apparently has a few advantages via Intel’s new AES extensions. Despite this, TrueCrypt gives is compatible with non-Windows environments and it allows users to create “secret” partitions. These partitions are totally hidden and are only accessible from the TrueCrypt passphrase screen.

Mmm I think I’ll explore both options. BitLocker is quite easy to setup. From the start screen, type in BitLocker and there it is!

Finding BitLocker

Select to turn on BitLocker and follow the wizard instructions. It’ll take a couple restarts to get things going followed by a long, long wait.

BitLocker

Easy Sauce!

TrueCrypt is slightly different. The install demonstrated was performed on a MacBook Pro with Mavericks installed.

I couldn’t encrypt the working hard drive because it was in use, kind of defeats the purpose of what I was attempting however, I was able to create a hidden/secret partition. So I’m just going with that.

After starting up TrueCrypt, select to “Create Volume.”

TrueCrypt Main Menu

Follow the wizard directions to “Create an encrypted file container.”

Encrypted File Container

Following, select “Hidden TrueCrypt volume.”

Hidden Drive

Select a file location for the TrueCrypt volume. This volume will appear as a file which can then be mounted by the TrueCrypt software. Once mounted, it can be accessed just like another filesystem with directory trees, files, etc.

Choose whatever encryption algorithm works for your environment, testing is always a good idea.

Outer Volume Encryption Options

The Outer Volume Format window is slightly peculiar, you just mouse around the window a lot to create a random key sequence.

Outer Volume Format

After selecting, “Format,” the outer volume for the hidden/secret partition will be created. This volume contains the hidden and can act as a decoy. The wizard continues with the hidden volume creation.

Screen Shot 2014-01-02 at 6.57.22 PM

It’s basically identical to the earlier, outer volume process.

Now to access the two volumes, open TrueCrypt and mount the file you created. You can either enter in the password for the hidden or decoy volume depending on which on you want to access.

TrueCrypt Password Prompt

So why this outer volume/hidden volume setup? Say, somehow, someone knew you had the TrueCrypt volume and they were forcing you to provide the password. Well, thank goodness you have a decoy! They’ll think they’re getting the goods when really you are only supplying them with decoy files, while the hidden ones lay secretly nestled inside the decoy undetected.

Wow, what a long post but there you have it, the joys of encryption!