Tomato by Shibby Splash Page

What is a splash page? Well it’s basically a welcome page. Router’s can have splash pages to greet users immediately after connecting to the network, notify them of conditions of use and/or require user authentication.

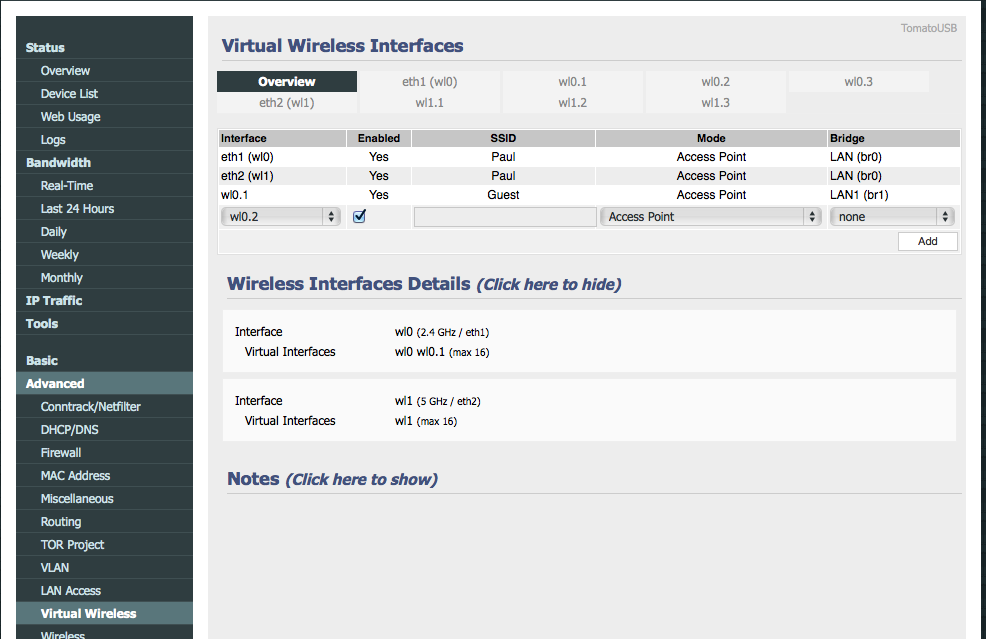
I want a splash page for my guest network to basically inform guests that my guest network is a risky environment… it is free at least. Say for instance, if fingerprinting or enumeration tools just happen to be used in my guest network, they wave their rights to taking action against it by agreeing to access the network in the first place.

Screen Shot 2014-01-04 at 7.39.34 PM
My splash page

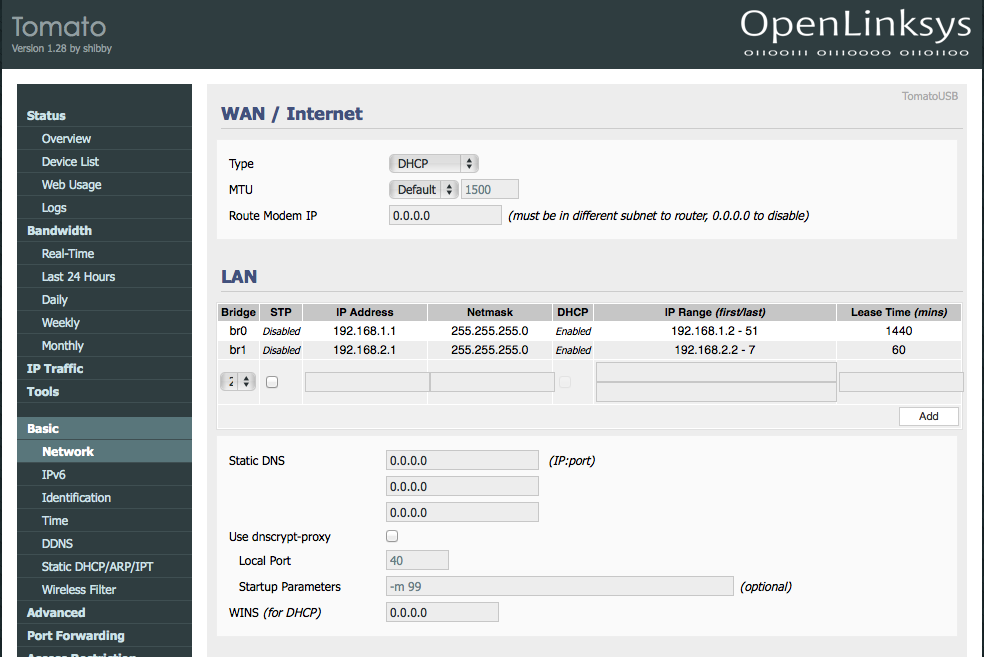
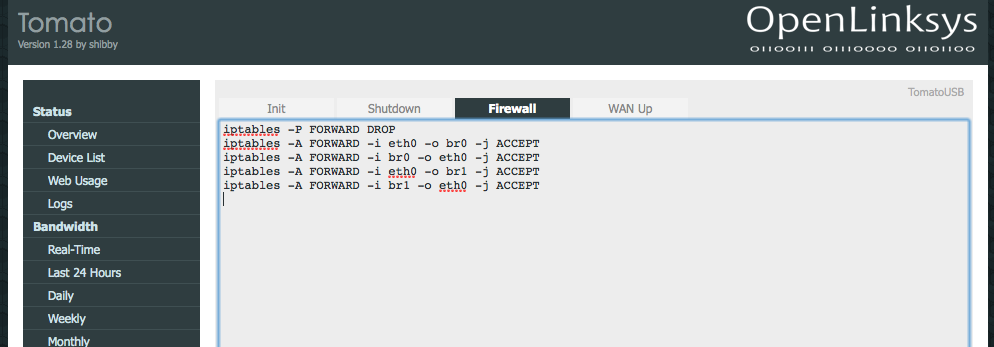
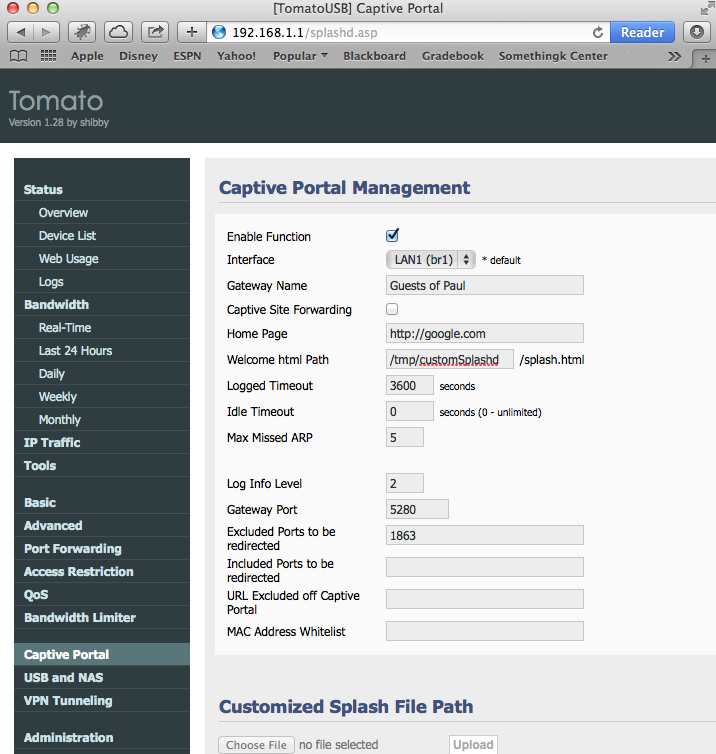
In Tomato Shibby, this can be done in the web UI (default 192.168.1.1) under the Captive Portal section. Just enable the feature and save. Now you are using the default splash page.

Screen Shot 2014-01-04 at 7.40.08 PM

You can change things up by uploading your own html splash page. I couldn’t get this to work, so instead I SSH directly to the router and wrote my own in the console.

To SSH:

ssh root@192.168.1.1

The root account should have the same password as the admin web UI account.

Screen Shot 2014-01-04 at 7.40.48 PM

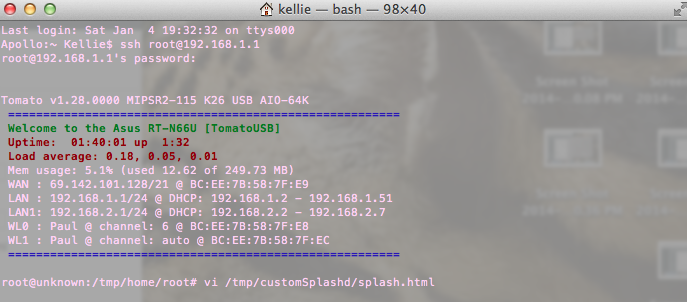
Once in, I kind of fudged around. I recommend keeping a copy of the original splash page… just in case. I customized the current splash.html page to fit my needs with vi.

vi /tmp/splashd/splash.html

My html page code is displayed below with the red section being the area I changed from the original:

<!DOCTYPE html PUBLIC "-//W3C//DTD XHTML 1.0 Transitional//EN" 
"http://www.w3.org/TR/xhtml1/DTD/xhtml1-transitional.dtd">
<html xmlns="http://www.w3.org/1999/xhtml">
<head>
    <meta http-equiv="Content-Type" content="text/html; 
    charset=UTF-8">
    <title>Guests of Paul</title>
    <style>
        body, html, #wrapper {width: 100%; height: 100%;}
        body, html, form, h1 { margin: 0; padding: 0; }
        body {
            background: #121b1d url(tomatousb_bg.png);
            font: 14px Tahoma, Arial, sans-serif;
            width: 100%;
            height: 100%;
        }
        a {
            color: #e02600;
        }
        a:hover {
            padding: 3px;
            text-decoration:none;
            color: #fff;
            background: #e02600;
        }
        img { border: 0; padding-top: 8px; float: right; }
        #splash {
            width: 520px;
            margin: 0 auto;
            padding-top: 10px;
            position: relative;
        }
        #splash_header {
            position: relative;
            background-color: #2f3d40;
            padding: 8px;
        }
        #splash_header h1 {
            /* font: 28px 'Century Gothic', Tahoma, Arial, Sans-serif; */
            font-size: 28px;
            text-align: center;
            color: #919EA1;
        }
        #splash_content {
            color: black;
            background-color: white;
            padding: 15px;
        }
        textarea {
            white-space: pre-wrap;
            word-wrap: break-word;
            font: 12px monospace;
            width: 96%;
            height: 230px;
            min-width: 96%;
            min-height: 230px;
            padding: 10px;
        }
        form { -webkit-box-align: center; text-align: center; }
        button {
            font: bold 1em Arial, Sans-serif;
            color: #919EA1;
            width: 200px;
            padding: 4px;
            margin-top: 15px;
            background: #283033;
            border: 1px solid #CCC;
        }
        button:hover {
            color: white;
            background: #E02600;
        }
        div#status{
            background: #ededed;
        }
        iframe {
            border: 0;
            border-spacing: 0;
        }
        #footer {
            color: #919EA1;
            margin: 0;
            text-align: center;
            padding-top: 8px;
        }
    </style>
    <script type="text/javascript">
    function toggle(element) { document.getElementById(element).
    style.display = (document.getElementById(element).style.display 
     == "none") ? "" : "none"; }
    </script>
</head>
<body>
    <table id="wrapper">
        <tbody>
        <tr>
            <td valign="middle">
                <div id="splash">
                    <div id="splash_header">
                        <h1>Guests of Paul</h1>
                    </div>
                    <div id="splash_content">
                        <!-- "textarea" is where you put your Text -->
                        <center><b>Wifi Network &amp; Internet conditions:</b></center>
                        <textarea readonly="readonly">
                        You are solely responsible for the risks of joining this 
                        network and accept this term by clicking the "OK, I AGREE" 
                        button.
                        We are not responsible for faulty operation of your computer or 
                        equipment. You will be at risk to other devices on the network. 
                        By joining, you accept all risks and verify you are okay with 
                        the chance of possible device enumeration. You may be asked to
                        stop using your equipment.
                        This banner will appear again periodically.
                        To renew your access time, you must agree once again every 3600 
                        seconds.
                        Thank You, and Enjoy!</textarea>
                        <form method="POST" action=$action>
                            <input type="hidden" name="mode_login">
                            <input type="hidden" name="redirect" value=$redirect>
                            <input type="hidden" name="accept_terms" value="yes">
                            <button type="submit" value="Submit">Ok, I Agree!</button>
                        </form>
                    </div>
                </div>
            </td>
        </tr>
        </tbody>
    </table>
</body>
</html>

So now I have this new splash page, make sure you update your code with the correct router IP address. Now I need to set it as the router’s splash page. In the Captive Portal section on the Tomato web UI, I just confirmed that the welcome path was set to my splash page.

Save it all, and that’s it. Enjoy!

Tomato Shibby Guest Wireless

I want a guest network to mess around with, I mean what are guests for after all?

What other reasons are there for having a guest network?

Well, say you don’t want to give out the password to your actual home network. You may want to limit activity of guests. You do not want guests to be able to communicate with personal devices on your network. You might have some malicious/untrustworthy  friends and you want to keep yourself safe. So many reasons.

Worry not peoples, there is an easy way to set this up on Tomato Shibby and most other new router firmwares! The following steps use the tomato firmware web UI. By default, the UI can be accessed on 192.168.1.1 by a computer connected wirelessly to the router.

First thing is first, a new bridge has to be greater for this guest network. This bridge can be created in the Basic -> Network section under LAN. Simple click ‘Add’ and enter in your desired settings.

Screen Shot 2014-01-04 at 6.01.03 PM

The bridge I created (br1), is pictured above. It is set to use IP addresses 192.168.2.2-192.168.2.7 with the router hosting on 192.168.2.1. I’m only allowing up to 6 guests. I don’t want my experience to get bogged down by guests so I limit the amount of addresses available to them hence limiting the number of guests able to connect. Also, I set the lease time for guests to 60 minutes, they don’t need a long lease time. Save your progress.

Sweet, so I now have this bridge. Now I must assign it to a VLAN.

“In computer networking, a single layer-2 network may be partitioned to create multiple distinct broadcast domains, which are mutually isolated so that packets can only pass between them via one or more routers; such a domain is referred to as a virtual local area network, virtual LAN or VLAN” (Wikipedia).

I don’t want guests accessing my stuff, so I will put them on a separate VLAN. Create a VLAN (for me it was 3) and assign the new bridge (br1) to it in Advanced -> VLAN under VLAN.

Screen Shot 2014-01-05 at 9.25.48 AM

In my setup above, I’m not expecting guests to connect directly to a port on the router so I did not configure any of them. I expect guests to just connect wirelessly. Save your progress after setting this up.

Now time to set up the wireless SSID for the guests. Go to Advanced -> Virtual Wireless. Add the wl0.1 interface (or whatever one you want to use) and set it to use the new bridge (br1). Give it any SSID you want, I chose to call mine Guest, as seen below. Save it.

Screen Shot 2014-01-04 at 7.46.16 PM

You can configure settings for the wireless interface by selecting the coordinating tab (wl0.1) from the top of the page. For instance, you might want to give it security. For now, I gave mine security but I don’t think I’ll keep it. Save it.

Screen Shot 2014-01-04 at 7.46.21 PM

Finally, double check all is set correctly in Advanced -> VLAN.

Screen Shot 2014-01-04 at 7.46.32 PM

Basically, look to make sure the right bridge is setup to the right wireless interface. Save it.

Next to make sure my guest VLAN users cannot access my private network devices I added a few block forwarding IP table rules. To do this,  add the following commands in Administration->Scripts under Firewall:

iptables -P FORWARD DROP
iptables -A FORWARD -i eth0 -o br0 -j ACCEPT
iptables -A FORWARD -i br0 -o eth0 -j ACCEPT
iptables -A FORWARD -i eth0 -o br1 -j ACCEPT
iptables -A FORWARD -i br1 -o eth0 -j ACCEPT

Screen Shot 2014-03-08 at 10.07.36 AM

These rules first drop all forwarding communications. Following, the next rules set the firewall to allow communications between both bridges and the external world (eth0) only. This way the networks cannot talk to each other but still have internet connectivity. Save and you’re done with the basics!

I went ahead and added a few extra things like a splash page for guests and I also limited their bandwidth activity. I’ll explain how to do this in a later post, this one is too long.

Tomato Shibby on ASUS RT-N66W

I decided to change up the firmware on my router. I want more control than the standard firmware gives. It’s for fun.

I own an ASUS RT-N66W.

With my last router, I had DD-WRT firmware installed (which I liked), but I want something new. This time I’m trying out Tomato by Shibby.

“Tomato is a system based on Linux, dedicated for routers with Broadcom chipset and distributed on the GPL license. Its development was started by Jonathan Zarate. This advanced system consists of especially user-friendly interface, thanks to which even inexperienced users can work with it easily” (http://tomato.groov.pl).

On the Tomato website, there isn’t a firmware download specifically for the RT-N66W version, however there is one for RT-N66U. The two routers are almost identical and can operate the same firmware. The firmware I used was:

K26RT-N -> build5x-115-EN (latest english version at the time) -> Asus RT-N66u 64k -> tomato-K26USB-1.28.RT-N5x-MIPSR2-115-AIO-64K.trx

Capture


I suggest going and getting a backup of the router’s default firmware from ASUS… just in case.

Now, ASUS has software that will help you put new firmware on your router but I haven’t had any luck with it. I found it very unreliable. The first time I tried to install Tomato on my router I used the recommended software and the upload failed repetitively, leaving my router in this limbo state… not fun. Instead, I recommend using the web interface. Much easier!!

Here are the steps to upload the new firmware:

  • Put the router into recovery mode.
    • unplug the power from the router
    • press and hold in the reset button (circled in picture below)

2014-01-04 17.04.55

    • plug the power back into the router
    • push the power button to turn the router on (make sure you are still pressing the reset button)
    • wait until the power light slowly (and I mean very slowly) flashes on and off
    • release the reset button
  • Connect an ethernet cable from any of the ports (excluding the port connected to the modem) to your computer.
  • Statically set your ethernet network adapter IP on your computer to 192.168.1.2 and net mask to 255.255.255.0. If you’re not sure how, Windows users can follow these instructions.

Capture2

  • With that changed, you can now force your computer to open the recovery webpage. In a browser go to 192.168.1.1.

Capture4

  • Choose to upload the firmware you downloaded earlier.

Capture5

  • The following screen tells you the upload is complete and to chill until the unit reboots.

Capture6

  • I waited about 15 minutes and this screen never changed, I did not even notice my router reboot. I just got tired and clicked “continue.”
  • Next thing you know, you have Tomato Shibby installed on your RT-N66W. You should be able to view the router’s web UI on 192.168.1.1. The default credentials are admin:admin.
  • It is suggested to clear the NVRAM. This clears any old firmware settings and is a good practice. This can be done in the router’s web UI. Go to Administration -> Configuration, then choose “Erase all data in NVRAM…” under Restore Default Configuration.

NVRAM

Tah Dah! You now have Tomato Shibby installed, have fun.