Skip to content

Just another technical day

Somethingk: Tech Blog

  • Home
  • About

Tomato Shibby Guest Wireless

By K4Paul January 5, 2014 March 23, 2017 70 Networking guest network, router, Tomato Shibby

I want a guest network to mess around with, I mean what are guests for after all?

What other reasons are there for having a guest network?

Well, say you don’t want to give out the password to your actual home network. You may want to limit activity of guests. You do not want guests to be able to communicate with personal devices on your network. You might have some malicious/untrustworthy  friends and you want to keep yourself safe. So many reasons.

Worry not peoples, there is an easy way to set this up on Tomato Shibby and most other new router firmwares! The following steps use the tomato firmware web UI. By default, the UI can be accessed on 192.168.1.1 by a computer connected wirelessly to the router.

First thing is first, a new bridge has to be greater for this guest network. This bridge can be created in the Basic -> Network section under LAN. Simple click ‘Add’ and enter in your desired settings.

Screen Shot 2014-01-04 at 6.01.03 PM

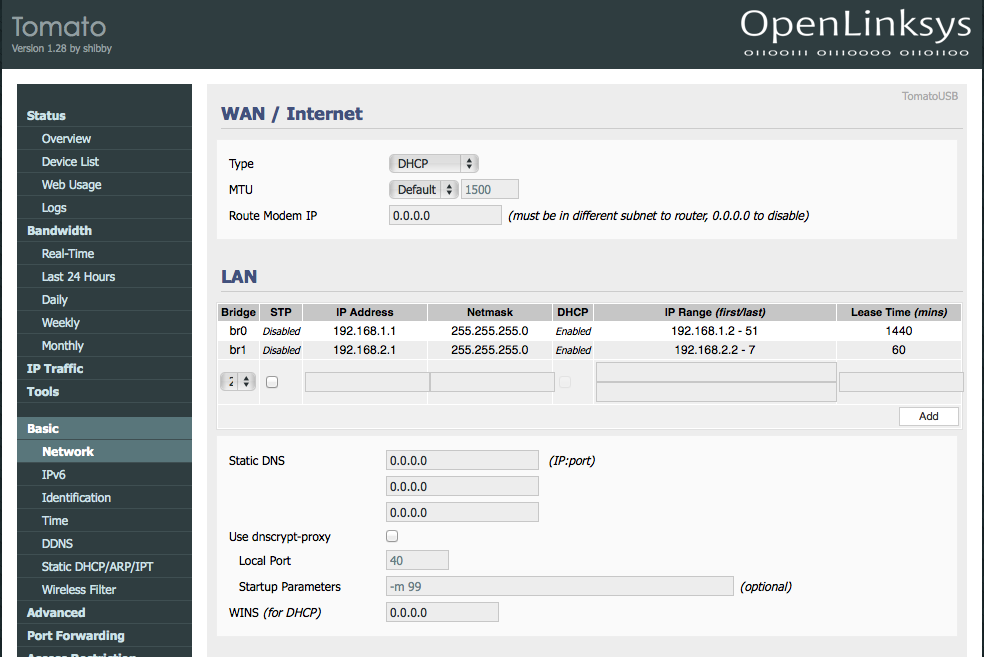
The bridge I created (br1), is pictured above. It is set to use IP addresses 192.168.2.2-192.168.2.7 with the router hosting on 192.168.2.1. I’m only allowing up to 6 guests. I don’t want my experience to get bogged down by guests so I limit the amount of addresses available to them hence limiting the number of guests able to connect. Also, I set the lease time for guests to 60 minutes, they don’t need a long lease time. Save your progress.

Sweet, so I now have this bridge. Now I must assign it to a VLAN.

“In computer networking, a single layer-2 network may be partitioned to create multiple distinct broadcast domains, which are mutually isolated so that packets can only pass between them via one or more routers; such a domain is referred to as a virtual local area network, virtual LAN or VLAN” (Wikipedia).

I don’t want guests accessing my stuff, so I will put them on a separate VLAN. Create a VLAN (for me it was 3) and assign the new bridge (br1) to it in Advanced -> VLAN under VLAN.

Screen Shot 2014-01-05 at 9.25.48 AM

In my setup above, I’m not expecting guests to connect directly to a port on the router so I did not configure any of them. I expect guests to just connect wirelessly. Save your progress after setting this up.

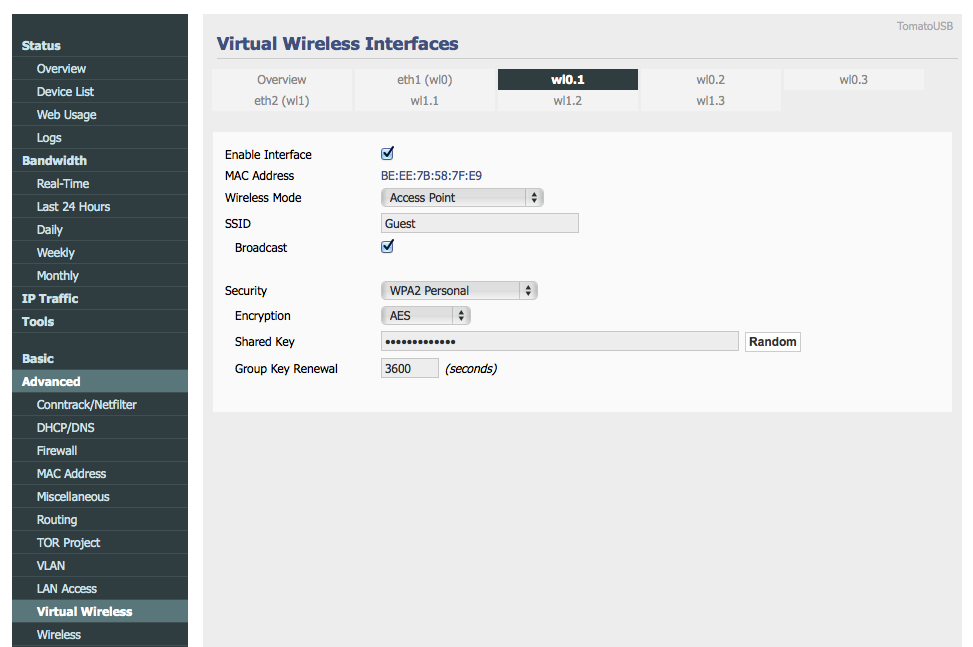
Now time to set up the wireless SSID for the guests. Go to Advanced -> Virtual Wireless. Add the wl0.1 interface (or whatever one you want to use) and set it to use the new bridge (br1). Give it any SSID you want, I chose to call mine Guest, as seen below. Save it.

Screen Shot 2014-01-04 at 7.46.16 PM

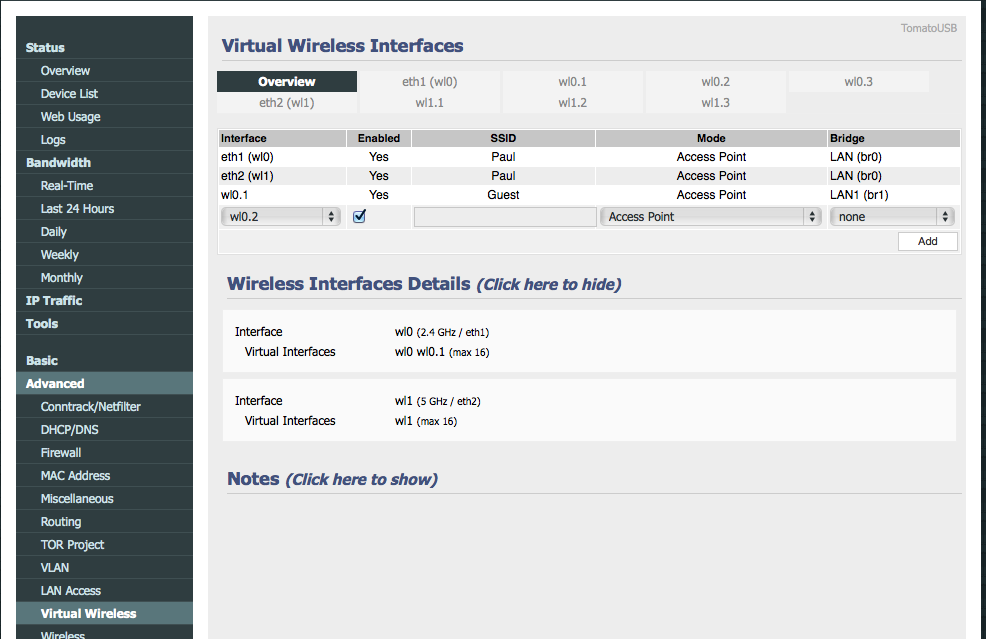
You can configure settings for the wireless interface by selecting the coordinating tab (wl0.1) from the top of the page. For instance, you might want to give it security. For now, I gave mine security but I don’t think I’ll keep it. Save it.

Screen Shot 2014-01-04 at 7.46.21 PM

Finally, double check all is set correctly in Advanced -> VLAN.

Screen Shot 2014-01-04 at 7.46.32 PM

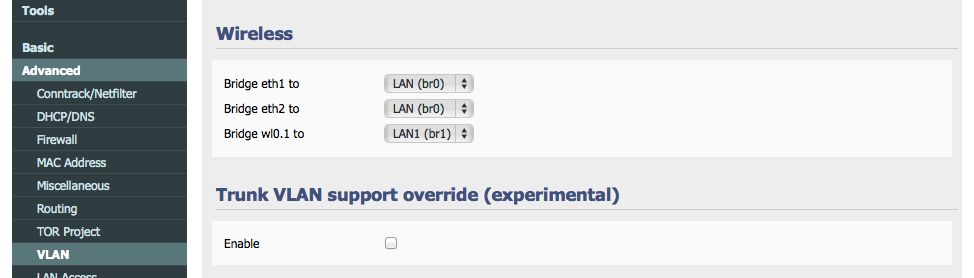
Basically, look to make sure the right bridge is setup to the right wireless interface. Save it.

Next to make sure my guest VLAN users cannot access my private network devices I added a few block forwarding IP table rules. To do this,  add the following commands in Administration->Scripts under Firewall:

iptables -P FORWARD DROP
iptables -A FORWARD -i eth0 -o br0 -j ACCEPT
iptables -A FORWARD -i br0 -o eth0 -j ACCEPT
iptables -A FORWARD -i eth0 -o br1 -j ACCEPT
iptables -A FORWARD -i br1 -o eth0 -j ACCEPT

Screen Shot 2014-03-08 at 10.07.36 AM

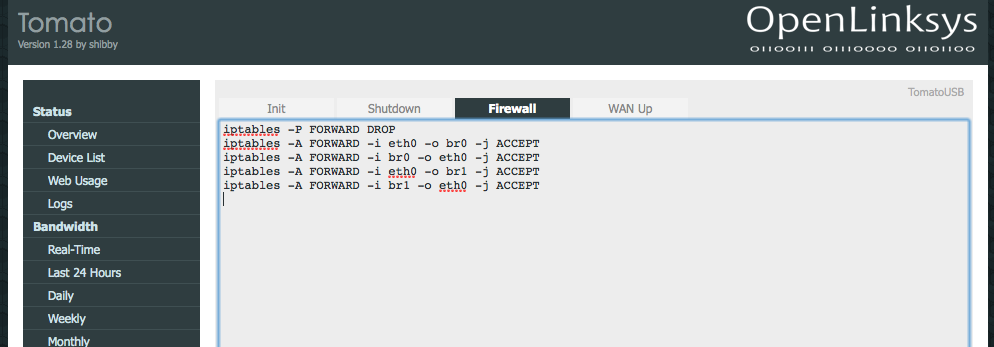
These rules first drop all forwarding communications. Following, the next rules set the firewall to allow communications between both bridges and the external world (eth0) only. This way the networks cannot talk to each other but still have internet connectivity. Save and you’re done with the basics!

I went ahead and added a few extra things like a splash page for guests and I also limited their bandwidth activity. I’ll explain how to do this in a later post, this one is too long.

Tomato Shibby on ASUS RT-N66W

By K4Paul January 4, 2014 January 8, 2014 3 Networking firmware, router, RT-N66W, Tomato Shibby

I decided to change up the firmware on my router. I want more control than the standard firmware gives. It’s for fun.

I own an ASUS RT-N66W.

With my last router, I had DD-WRT firmware installed (which I liked), but I want something new. This time I’m trying out Tomato by Shibby.

“Tomato is a system based on Linux, dedicated for routers with Broadcom chipset and distributed on the GPL license. Its development was started by Jonathan Zarate. This advanced system consists of especially user-friendly interface, thanks to which even inexperienced users can work with it easily” (http://tomato.groov.pl).

On the Tomato website, there isn’t a firmware download specifically for the RT-N66W version, however there is one for RT-N66U. The two routers are almost identical and can operate the same firmware. The firmware I used was:

K26RT-N -> build5x-115-EN (latest english version at the time) -> Asus RT-N66u 64k -> tomato-K26USB-1.28.RT-N5x-MIPSR2-115-AIO-64K.trx

Capture


I suggest going and getting a backup of the router’s default firmware from ASUS… just in case.

Now, ASUS has software that will help you put new firmware on your router but I haven’t had any luck with it. I found it very unreliable. The first time I tried to install Tomato on my router I used the recommended software and the upload failed repetitively, leaving my router in this limbo state… not fun. Instead, I recommend using the web interface. Much easier!!

Here are the steps to upload the new firmware:

  • Put the router into recovery mode.
    • unplug the power from the router
    • press and hold in the reset button (circled in picture below)

2014-01-04 17.04.55

    • plug the power back into the router
    • push the power button to turn the router on (make sure you are still pressing the reset button)
    • wait until the power light slowly (and I mean very slowly) flashes on and off
    • release the reset button
  • Connect an ethernet cable from any of the ports (excluding the port connected to the modem) to your computer.
  • Statically set your ethernet network adapter IP on your computer to 192.168.1.2 and net mask to 255.255.255.0. If you’re not sure how, Windows users can follow these instructions.

Capture2

  • With that changed, you can now force your computer to open the recovery webpage. In a browser go to 192.168.1.1.

Capture4

  • Choose to upload the firmware you downloaded earlier.

Capture5

  • The following screen tells you the upload is complete and to chill until the unit reboots.

Capture6

  • I waited about 15 minutes and this screen never changed, I did not even notice my router reboot. I just got tired and clicked “continue.”
  • Next thing you know, you have Tomato Shibby installed on your RT-N66W. You should be able to view the router’s web UI on 192.168.1.1. The default credentials are admin:admin.
  • It is suggested to clear the NVRAM. This clears any old firmware settings and is a good practice. This can be done in the router’s web UI. Go to Administration -> Configuration, then choose “Erase all data in NVRAM…” under Restore Default Configuration.

NVRAM

Tah Dah! You now have Tomato Shibby installed, have fun.

BitLocker Enable Pin Windows 8

By K4Paul January 3, 2014 January 3, 2014 0 Windows BitLocker, Encryption, Hard Drive, Pin, TMP

So from my earlier post, I choose to enable BitLocker encryption. For the more paranoid users, there may be a desire to intensify security.

After I went through the excruciating long wait for my drives to finish encrypting, I wanted to enable pin authentication on startup. I thought this would automatically be enabled but for me it wasn’t.

The process for this was super easy but a simple search did not render any useful documentation so I figured I would just post how to do it.

The first part of the process required editing the Windows Group Policy. Group policies are awesome, definitely worth exploring! “Group Policy provides the centralized management and configuration of operating systems, applications, and users’ settings in an Active Directory environment” (Wikipedia).

In Windows 8, simple search or type “group policy” on the startup page. Select “Edit group policy.”

Find Group Policy

From the tree on the left of the policy window, go to:

Local Computer Policy -> Computer Configuration -> Administrative Templates -> Windows Components -> BitLocker Drive Encryption -> Operating System Drives

Group Policy


Open the setting, “Require additional authentication at startup.”

Addition BitLocker Security

The only change I made was to enable the authentication setting, I kept all default settings. Be aware, this may not be ideal for users who do not have TPM because the machine might expect a USB key which is a pain to require for each startup. TPM stands for Trusted Platform Module and version 1.2 can be found on most Windows systems older than 2011.

After changing the group policy, force your computer to update by running the command:

gpupdate

Lastly, go into BitLocker management and edit the startup setting from the “Change how drive is unlocked at startup” option. Add a pin or whatever else to beef up your security.

BitLocker Menu

Complete.

Hard Drive Encryption

By K4Paul January 2, 2014 January 8, 2014 0 Enumeration, Forensics, Windows BitLocker, Encryption, Hard Drive, RAID, TrueCrypt

On a totally different encryption tangent, I need to encrypt my hard drives. Kind of ashamed that they aren’t encrypted already… I studied the field of cyber-security. However, for a basic home server it didn’t seem as pertinent to encrypt my drives.

I’m not going crazy or anything with confidential data. However, something really cool with hard drive encryption is that in most cases (strong password utilized, best practices, etc.), if the user is not logged into the computer at the time of seizure, it can be close to impossible (at the moment of writing this) for forensics to decrypt the data. True, there are tools that are part of the FTK toolkit like PRTK that can be used to attempt to decrypt your hard drive. Now correct me if I’m wrong, but if your password is over 12 characters long and includes different characters, numbers, symbols and all that jazz, the decryption attempt will take forever! The investigators are likely to be long gone before anything is returned (the cracking system would also have to be amazing and last just as long).

There are primarily two types of encryption, hardware and software encryption. I prefer the idea of hardware encryption, it encrypts data at the lowest level and tends to be more secure. If someone has access to your environment with a software encryption scheme there is a greater likelihood they will be able to obtain the key through brute force. A simple reference site for an explanation of encryption and the differences can be found here. One uses the computers resources to encrypt while the other relies on the hardware to encrypt data on its own dedicated processor. There really isn’t much difference between performance, problem is not all hard drives come with a dedicated processor for encryption.

My environment consists of three 4 TB hard drives in a RAID5 array that are currently partitioned into two drives. One drive contains Windows 8 and the other is for storage.

The hard drives I'm currently using.
The hard drives I’m currently using.

So my options, hardware or software encrypt. I’ve already been using the drives for quite some time, I don’t really want to lose the data already stored on the devices. There are some issues I foresee with hardware encryption and a RAID system. Is it even possible with RAID? I have to concern myself with how encryption will affect the stripping and mirroring of data. It all depends on the drive and in my case, its easy, my hard drives don’t even include the capability to hardware encrypt so on to software encryption.

For software encryption, BitLocker and TrueCrypt are two free solutions that I am familiar with and could consider using. I could also look at converting my entire system into a NAS (FreeBSD and FreeNAS can setup a software based RAID and they include encryption capabilities) but… I’ll save that for another day.

BitLocker is already made available on Windows 8 Enterprise and Ultimate, but is it better than TrueCrypt? According to Tomshardware.com, both encryption tools are almost identical in performance. Bottom line, Microsoft’s BitLocker apparently has a few advantages via Intel’s new AES extensions. Despite this, TrueCrypt gives is compatible with non-Windows environments and it allows users to create “secret” partitions. These partitions are totally hidden and are only accessible from the TrueCrypt passphrase screen.

Mmm I think I’ll explore both options. BitLocker is quite easy to setup. From the start screen, type in BitLocker and there it is!

Finding BitLocker

Select to turn on BitLocker and follow the wizard instructions. It’ll take a couple restarts to get things going followed by a long, long wait.

BitLocker

Easy Sauce!

TrueCrypt is slightly different. The install demonstrated was performed on a MacBook Pro with Mavericks installed.

I couldn’t encrypt the working hard drive because it was in use, kind of defeats the purpose of what I was attempting however, I was able to create a hidden/secret partition. So I’m just going with that.

After starting up TrueCrypt, select to “Create Volume.”

TrueCrypt Main Menu

Follow the wizard directions to “Create an encrypted file container.”

Encrypted File Container

Following, select “Hidden TrueCrypt volume.”

Hidden Drive

Select a file location for the TrueCrypt volume. This volume will appear as a file which can then be mounted by the TrueCrypt software. Once mounted, it can be accessed just like another filesystem with directory trees, files, etc.

Choose whatever encryption algorithm works for your environment, testing is always a good idea.

Outer Volume Encryption Options

The Outer Volume Format window is slightly peculiar, you just mouse around the window a lot to create a random key sequence.

Outer Volume Format

After selecting, “Format,” the outer volume for the hidden/secret partition will be created. This volume contains the hidden and can act as a decoy. The wizard continues with the hidden volume creation.

Screen Shot 2014-01-02 at 6.57.22 PM

It’s basically identical to the earlier, outer volume process.

Now to access the two volumes, open TrueCrypt and mount the file you created. You can either enter in the password for the hidden or decoy volume depending on which on you want to access.

TrueCrypt Password Prompt

So why this outer volume/hidden volume setup? Say, somehow, someone knew you had the TrueCrypt volume and they were forcing you to provide the password. Well, thank goodness you have a decoy! They’ll think they’re getting the goods when really you are only supplying them with decoy files, while the hidden ones lay secretly nestled inside the decoy undetected.

Wow, what a long post but there you have it, the joys of encryption!

Decrypting Files by Sound? Part 1

By K4Paul January 2, 2014 January 2, 2014 0 Enumeration, Exploit, Forensics, Penetration Testing Adi Shamir, Decyption, Enumeration, RSA, Sound

I found this paper recently that discuss how an RSA encryption key can be enumerated by sound. It was written by Adi Shamir, the co-inventor of the RSA algorithm (the ‘S’ in RSA), so the paper seems to be a little more legit than just someone’s paranoia. Basically, the idea is based off of the noises a computer makes when utilizing different levels of power. These noises consist of high-pitched tones that can be detected by the right equipment. Each task performed by a computer requires varying amounts of resources and power therefore a new unique set of tones for a process. So it seems possible that the noises resulting from a machine decrypting a key could be picked up and used to for enumeration.

This is definitely something I would love to test out! However, as of now I don’t have the right equipment but I don’t want to give up on the project yet. Instead, I’ll make baby steps. Encrypt something with RSA.

To be continued…

Distributed Agent Cloud-Sourced Malware Reporting

By K4Paul December 22, 2013 0 Malware Reporting, Python Antivirus, BYU, CSRL, Malware, Malware Reporting Framework

I recently graduated from BYU with my masters degree. I really enjoyed my research I want to share what I worked on. For my thesis I looked into creating a distributed agent malware reportage framework.

“Malware is a fast growing threat that consists of a malicious script or piece of software that is used to disrupt the integrity of a user’s experience. Antivirus software can help protect a user against these threats and there are numerous vendors users can choose from for their antivirus protection. However, each vendor has their own set of virus definitions varying in resources and capabilities in recognizing new threats. Currently, a persistent system is not in place that measures and displays data on the performance of antivirus vendors to new malware over a continuous period of time. There is a need for a system that can evaluate antivirus performance in order to better inform end users of their security options in addition to informing clients of prevalent threats occurring in their network. This project is dedicated to developing a cloud sourced malware reporting system that uses distributed agents to assess the performance of antivirus software based on malware signatures.”

My research site: http://itsecurity.et.byu.edu:85

Publications: Using Agent Technologies to Correlate and Compare Anti-Malware Software

Currently, the study is being continued by the Cyber Security Research Lab (CSRL) at Brigham Young University.

Python Visualization

By K4Paul November 18, 2013 November 18, 2013 0 Python HPC, Python, Scientific Computing, Visualization, XKCD

Here is another great reason to love Python!

Matplotlib is a plotting visualization tool for plotting graphs in python. What better way to present data than in XKCD format!

Python XKCD Plotting

image

Advance MPI

By K4Paul November 17, 2013 0 Supercomputing HPC, MPI, Parallelism, Supercomputing

One of the Intel tutorials I attended this year at SC13 (Supercomputing 2013) was on advance MPI concepts and the improvements made in the new MPI 3 standard. There notes can be found at http://www.mcs.anl.gov/~thakur/sc13-mpi-tutorial/. This post will cover a few of the topics they mentioned in the lecture along with briefly reviewing basic MPI concepts. I will be adding models and figures in a post update.

Refresher

MPI stands for Message-Passing Interface. Basically it is a standard for sharing information between nodes and processes. This is appealing for a supercomputing environment because MPI can be used to communicate between nodes. So when a cluster is processing large amounts of data, the load can be divided among nodes with MPI implemented to communicate data when necessary.

Timeline

The following timeline highlights on a few of the MPI introduced features.

  • 1994, MPI1
    • supported point-to-point communication
    • custom datatypes for message passing
    • communication to select process groups known as collectives
  • 1997, MPI2
    • added parallel I/O functionality with thread support
    • one sided operations
  • 2012, MPI3
    • Nonblocking and neighborhood collectives
    • Tools interface
    • Improved one-sided communications

Datatypes

MPI requires developers to explicitly implement parallel algorithms. A developer has to create a datatype or state data for MPI processes. Basically, the programmer needs to know and plan out how to divide the dataset workload among processes with MPI constructs and datatypes.

Datatypes let users specify the data type, content and size. MPI has a library of familiar types such as int, double, float, etc and together these types can be used to create customized datatypes. Process data is not always aligned sequentially in memory, instead it may be stripped across message segments. Customized datatypes can recognize a pattern and create a structure that reads the correct pieces of data in a stripped segment to be utilized by a node process. The more general the datatypes, the harder it is for MPI to optimize.

MPI 3 Collective Improvements

MPI collectives are actually a pretty cool concept. A programmer can of course use MPI to talk to all processes at once (COMM WORLD) but there are times where maybe only certain processes need to be utilized. For instance only odd numbered processes should deal with a specific data chunk. Collectives are sub groups of processes that MPI can call upon.

What gets even better is that the new MPI3 standard includes additional collectives for analyzing neighboring node data. In the past there has been a problem with calculating border data for a mesh segment on a single node without being aware of neighboring datasets. An example was presented in which MPI can be used to implement a halo of neighbor data around a process dataset. This would eliminate the border problem because this collective allows a node to become aware of neighboring segments.

MPI 3 Windows

Windows may be used to specify public data within a process. This details that some data is private from other processes and also sets up an environment for one sided communications. These communication calls include commands like GET and PUSH in order to transfer data across processes. These calls are useful because they allow a developer to implement code that accesses data without requiring synchronization across all processes and therefore accessing data without being affected by individual process delays.

MPI 3 Multi-threading

In a single threaded environment, each process consists of one thread. By introducing multi-threading, a process can simultaneously execute multiple threads at the same time. However, I am not quite sure this is ideal for all environments. True multi-threading models where each thread can make MPI calls can introduce a lot of problems into an environment. As noted by the conference presenters, it can be buggy. One such problem developers should be made aware of is lock granularity. Such projects require more resources and planning. Other multi-threading methods that tend to be less resource heavy include MPI_THREAD_FUNNELED and MPI_THREAD_SERIALIZED. MPI_THREAD_FUNNELED is where a single main thread within a process makes the MPI call. Thread serialized allows only one thread at a time to make MPI calls.

Conclusion

The new MPI3 standard introduces a lot of cool features that can be implemented to improve communications in a high performance computing environment. The idea that processes can analyze data in parallel purposes a possible reduction in processing large datasets. Future studies will include more research into MPI 3 and File I/O where processes can read and write to a file at the same time.

OpenVAS Quick and Easy: Scheduling and Running Tasks

By K4Paul May 12, 2013 March 23, 2017 3 Backtrack, Kali, Linux, Vulnerability Scanner Howto, OpenVAS, Scan, Task Scheduling

“OpenVAS is a framework of several services and tools offering a comprehensive and powerful vulnerability scanning and vulnerability management solution” (http://www.openvas.org/).

So I’ve been using OpenVAS as an alternative to Nessus and I’ve actually been quite pleased with the tool. The initial installation was a little difficult (see post) but once up and running, it has been great. I haven’t been able to find a simple howto guide on the scanner so I have decided to write one from my own experience with OpenVAS server version 6 and the client tool GSAD version 3.03. I only provide this tutorial as a learning experience and I do not endorse illegal scanning activity.

  1. I used to GSAD web client interface to interact with OpenVAS once the tool was up and running (see post). I accessed the web interface at http://<OpenVAS IP Address>:<GSAD Port>.OpenVas Login
  2. Log into OpenVAS with credentials created during setup (see post). If you are unable to log in and you know your credentials are correct, its most likely your openVAS database is out-of-date. Try the following steps in a terminal window before attempting to login again:
    • Update the  openVAS database with the latest definition (This can take an hour or more.): openvasmd –update
    • Migrate the database (This can take an hour or more.): openvasmd –migrate
    • Rebuild one last time to be safe (This can take an hour or more.): openvasmd –rebuild
    • If your server date/time is off this could also cause a problem later on, to correct this you will have to first stop all openVAS processes then change the server date/time to the current. Lastly, you will need to repeat creating the necessary certificates and starting up all the openVAS tools similar to the installation process (see post).
  1. Upon a successful login, you will be greeted with a window of tasks scheduled and completed.OpenVAS Tasks
  2. So for a simple vulnerability scan, you will need to setup a target. This is the machine OpenVAS will scan. By default, the tool has localhost already configured as a target but I’m assuming you will want to scan machines other than the one running OpenVAS. To setup a target, hover over the Configuration tab then select Targets.
  3. In the next window, fill out the desired target fields. OpenVAS can be scheduled to scan one or more devices. This is determined by the Hosts field, you can either enter one IP address (x.x.x.x) for a singular host scan or a range of addresses (x.x.x.x-x.x.x.x) for a multiple host vulnerability scan. You may find your device can only handle scanning one IP at a time (This is what I found true on my Raspberry Pi). It is a best practice to always scan by IP addresses, a domain name can resolve to multiple hosts and provide conflicting results. In the picture below, I only entered into the form a target name and a singular IP address, everything else I left as default (you can experiment around with the settings for a more detailed scan). When you are finished entering in all the details, create the target by selecting the Create Target button.OpenVAS Target Creation
  4. The new target will be visible in the box below the form once successfully created. Make sure OpenVAS has a value under the IPs column. This is to ensure it found the target IP address or addresses.Targets
  5. Now it is time to create a task to scan the new target. Hover over the Scan Management tab then select New Task.
  6. Fill out the new task field with the desired task details. In the picture below, I only entered into the form a task name and selected a target to scan, everything else I left as default for a full and fast scan (you can experiment around with the settings for a more detailed scan). When you are finished entering in all the details, create the task by selecting the Create Task button. Task Setup
  7. The task will now appear in the task window and is ready to start. OpenVAS will not automatically start a task, you must select the green start icon under the Actions column in the task window to begin the scan. The other actions found in this column provide easy task management for when you want to start, pause or resume a task in order to pace server activity. New Target
  8. The scan will take a bit of time so be patient. If you want to view the progress of the scan, you can change the drop box settings above the task box to refresh ever X seconds and to no overrides. With these settings, the page will refresh every so often to notify you of the task progress under the Status column in the task box. Sometimes the task may stop itself, you can resume it by selecting the icon next to the start arrow under the Actions column.
  9. When the status of the scan shows Done, you can review the scan findings. Select the coordinating task date under the Last column. A summary of the report will be presented along with the capabilities to download a more detailed version of the report.OpenVAS Scan Results
  10. There you have it, you can review the findings in the report to learn of possible vulnerabilities in a host. Good luck!

OpenVas for Kali Linux on the Raspberry Pi

By K4Paul May 11, 2013 March 23, 2017 7 Kali, Vulnerability Scanner Install, OpenVAS, Pi, Raspberry Pi, Security Platform

I’m working on creating a semi-portable security platform. I decided to experiment with installing and using the armel version of Kali Linux (the new backtrack OS) on the raspberry pi. Initially, I faced a lot of problems getting OpenVAS to work on the device. This is one of the very few if only open source armel vulnerability scanners I could find. The following steps cover my successful attempt to setting up OpenVAS for anyone else interested in working with this tool in Kali on a Pi. Be prepared to spend a good amount of time waiting for the plugins to install and the database to update.

  1. Downloaded and installed a fresh armel image of Kali (http://www.kali.org/downloads/). I used this image (Username: root, password: toor).
  2. Use a disk imager to image a SD card with the Kali image to run on the Pi. I used Win32 Disk Imager.
  3. Insert the SD card into the pi and power it up.
  4. You may want to expand the partition created by the disk imager, a tutorial on how to expand an active partition can be found here.
  5. Set the correct date if needed:
    date <month><day><hour><minute><year>.<second>
  6. Create the openVAS certificate:
    openvas-mkcert
  7. Create the openVAS client certificate:
    openvas-mkcert-client -n om -i
  8. Download the openVAS NVT’s (This takes a few minutes):
    openvas-nvt-sync
  9. Start the openVAS scanner (This takes 30+ minutes.):
    openvassd
  10. Build the openVAS database (This can take an hour or more.):
    openvasmd --rebuild
  11. Create an admin account:
    openvasad -c 'add_user' -n openvasadmin -r Admin
  12. Update the  openVAS database with the latest definition (This can take an hour or more.):
    openvasmd --update
  13. Migrate the database (This can take an hour or more.):
    openvasmd --migrate
  14. Rebuild one last time to be safe (This can take an hour or more.):
    openvasmd --rebuild
  15. Start the openVAS manager on port 9390:
    openvasmd -p 9390 -a 127.0.0.1
  16. Start the openVAS admin:
    openvasad -a 127.0.0.1 -p 9393
  17. Start GSAD, this is the client tool for openVAS:
    gsad --http-only -p 9392
  18.  Use the web client to interact with the tool, it can be accessed on http://<IP OF PI>:9392. You can log in with the admin account created earlier.

Capture

That’s it! Now you can use this amazing tool to scan machines in a network!

After a reboot or shutdown, openVAS can be started with the commands:

  1. Start the openVAS scanner (This takes a few minutes this time.): openvassd
  2. Start the openVAS manager on port 9390: openvasmd -p 9390 -a 127.0.0.1
  3. Start the openVAS admin: openvasad -a 127.0.0.1 -p 9393
  4. Start GSAD on port 9392, this is the client tool for openVAS: gsad –http-only -p 9392

Posts navigation

Older posts
Newer posts
Connect with me on Linkedin

Categories

Recent Comments

  • Jk on Reordering an Array Based on Another Array’s Order in Javascript
  • LDLC_KolDzeRa on Simple AVL Tree in C++
  • vepambattu chand on Reordering an Array Based on Another Array’s Order in Javascript
  • Unknown on OpenVAS Quick and Easy: Scheduling and Running Tasks
  • K4Paul on Javascript Mousemove Scroll Event
Boka WordPress Theme By ThemeTim