AngularJs Virtual Repeater with a Grid

So I had a grid of images I displayed with an Angular ng-repeat, where the number of images was in the hundreds. This was just killing performance and overloading the DOM. I was getting super frustrated with the choppy scrolling and overall slow loading.

It occurred to me to use a virtual repeater, however, they either support vertical or horizontally stacked elements, not a grid. In order to get this to work, I need to structure my elements in a 2D array. That way I could still use the repeater on spitting out rows of image arrays and gain a performance boost through that.

2D Structure:
[
[img, img, img, img] ,
[img, img, img, img] ,
[img, img, img, img] ,
[img, img, img, img]
]

img = the image source url

The first thing I did, was make sure I knew the width of the total space for the grid and width of each element. I want to make sure I fill the space, so I did the math to know how many elements will fill the total space and that will be my column count. I recommend to setup some listeners on the grid width to catch changes from the user changing the window size, I won’t be showing that part in this example. The snippet below shows the creation of my 2D array that will be fed to the repeater.

//Passing in my array of images that I need to break down into a 2D array
//Also, including the width of the entire grid space and each image's uniformed width
function computeRows(imageArray, width, imageWidth) {
    var rows = [];
    if (imageArray) {
        const rowCount = width/ imageWidth;
        const copy = imageArray.slice(); //using a copy instead of affecting actual element
        while (copy.length) { //create the 2D array by looping through the imageArray and splicing it into chunks
            rows.push(copy.splice(0, rowCount)); 
        }
    }
    return rows;
}
//Will need to bind computeRows() to the scope

Once I have my 2D array, I bound it to me scope and used it in my template. I chose to use vs-repeat because it was very quick and easy to implement.

<div vs-repeat vs-excess="10">
    <div ng-repeat="row in rows">
        <img 
            ng-repeat="img in row"
            ng-src="{{img}}"/>
    </div>
</div>

That was it, the end result was awesome, vs-repeat handled just showing what was necessary for the user experience and loading the remainder DOM elements as the user scrolled through the grid.

Weighted Edge Graph Data Structure in C++

So this data structure is one of the more complicated structures I’ll post about, I think I’ll be done with C++ for awhile.

A brief description of a graph, as explained by Wikipedia, “A graph data structure consists of a finite (and possibly mutable) set of vertices or nodes or points, together with a set of unordered pairs of these vertices for an undirected graph or a set of ordered pairs for a directed graph. These pairs are known as edges, arcs, or lines for an undirected graph and as arrows, directed edges, directed arcs, or directed lines for a directed graph. The vertices may be part of the graph structure, or may be external entities represented by integer indices or references.”

This being said, in simple, it is a structure with connected node points. An ideal use for it, is determining the shortest path. Take on the airplane analogy. What is the shortest path an airlines can put you through? There are so many ways to fly from one place to another, think of all the possible transfers, not just a direct flight. So a graph data structure would be perfect for storing each airport and the total distance to each one. Then when a customer comes to buy a ticket, it will be easy to calculate the shortest path for them to their destination.

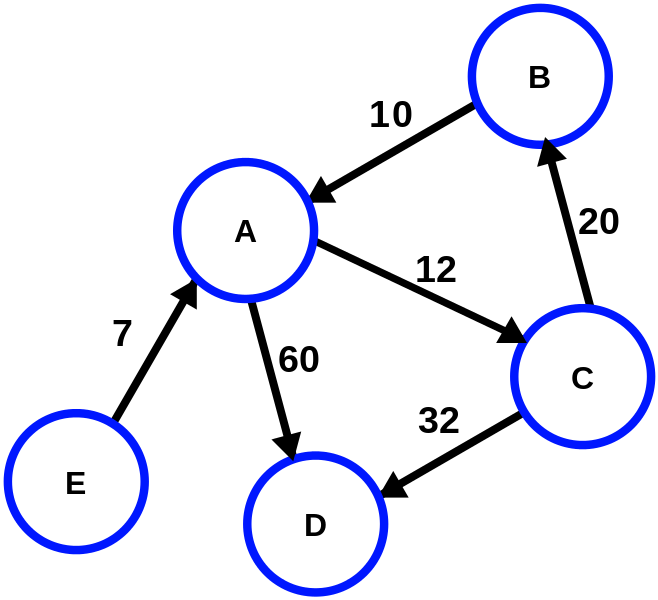
Just imagine A, B, C, D, E are different airports and the numbers show the distance to each


We are specifically going to look at graphs with weighted edges, from our analogy above, the weighted edge describes the distance to each airport. The weight determines which route the algorithm will take, ideally the lesser weight because it will be the shortest path.

#include <iostream>
#include <vector>
#include <assert.h>

using namespace std;

class graph{
public:
    static const size_t MAX = 20;

    graph(){
        numVerticies = 0;
        edges = new int*[MAX];
        labels = new char*[MAX];
        for(size_t i = 0; i < MAX; i++){
            edges[i] = new int[MAX];
            labels[i] = nullptr;
        }
        for (size_t i = 0; i < MAX; i++){
            for(size_t j = 0; j < MAX; j++) {
                edges[i][j] = -1;
            }
        }
    }

    ~graph() {
        delete[] labels;
        delete[] edges;
    }

    void add_edge(int source, int target, int weight=0) {
        assert(source >= 0 && source < numVerticies);
        assert(target >= 0 && target < numVerticies);

        edges[source][target] = weight;
    }

    void add_vertex(char * vertexLabel) {
        assert(numVerticies < MAX);
        for(size_t i = 0; i < numVerticies + 1; i++) {
            edges[i][numVerticies] = -1;
            edges[numVerticies][i] = -1;
        }
        labels[numVerticies] = new char[strlen(vertexLabel) + 1];
        strcpy(labels[numVerticies], vertexLabel);
        numVerticies++;
    }

    void shortestPath(int start) {
        int* distance = new int[numVerticies];
        bool* marked = new bool[numVerticies];
        for(size_t i = 0; i < numVerticies; i++){
            marked[i] = false;
        }
        vector<int> path;
        reset(distance);
        distance[start] = 0;

        cout << "Starting Dijkstra’s Shortest-Distance Algorithm with vertex " << labels[start] << endl;

        int min = start;
        while(path.size() < numVerticies) {
            for (int v = 0; v < numVerticies; v++) {
                if (!marked[v]){
                    if(distance[v] < distance[min]) {
                        min = v;
                    }
                }
            }
            //Print it out

            if (path.size() > 0){
                int src = min;
                int src_index = path.size() - 1;
                while (edges[path[src_index]][min] != (distance[min] - distance[path[src_index]])){
                    src_index--;
                }
                src = path[src_index];
                cout << "Vertex Pair " << labels[src] << "," << labels[min] << " ";
                cout << "     Pair Cost: " << (distance[min] - distance[src]);
                cout << "     Cost From Start: " << distance[min] << endl;
            }
            
            path.push_back(min);
            marked[min] = true;

            for (int i = 0; i < numVerticies; i++) {
                if(is_edge(min, i) && (distance[i] > (distance[min] + edges[min][i]))) {
                    distance[i] = edges[min][i] + distance[min];
                }
            }
            for (int x = 0; x < numVerticies; x++) {
                if (!marked[x]){
                    min = x;
                    break;
                }
            }
        }

        delete[] marked;
        delete[] distance;
    }

    void reset (int *&dist) {
        for (int i = 0; i < numVerticies; i++) {
            dist[i] = 999999999;
        }
    }


    void DFS(int start) {
        assert(start >= 0 && start < numVerticies);

        bool* marked = new bool[numVerticies];
        for(size_t i = 0; i < numVerticies; i++){
            marked[i] = false;
        }

        cout << "Starting DFS with vertex " << labels[start] << endl;

        DFS(start, marked);

        cout << endl;

        delete[] marked;
    }

private:
    int** edges;
    char** labels;
    int numVerticies;

    bool is_edge(int source, int target) {
        assert(source >= 0 && source < numVerticies);
        assert(target >= 0 && target < numVerticies);

        return edges[source][target] > -1;
    }

    void DFS(int start, bool marked[]){
        assert(start >= 0 && start < numVerticies);

        marked[start] = true;

        cout << labels[start] << " ";

        for (int i = 0; i < numVerticies; ++i) {
            if(edges[start][i] > -1 && !marked[i]) {
                DFS(i, marked);
            }
        }
    }
};

Good luck and happy programming!

AngularJS Setup Environment

Similar to yesterday’s post, I started a basic AngularJS startup environment, something I can just grab and program with whenever I want to start a new angular app. It’s just a pain re-setting up the environment each time.

Borrow if you like or contribute, thanks!


Screenshot of github.com
angular-setup-environment
Initial Angular Environment Setup

React Setup Environment

I started a react startup environment, something I can just grab and program with whenever I want to start a new React app. It’s just a pain re-setting up the environment each time.

Borrow if you like or contribute, thanks!


Screenshot of github.com
react-setup-environment
Initial React Environment Setup

Reference: https://scotch.io/tutorials/setup-a-react-environment-using-webpack-and-babel

Reordering an Array Based on Another Array’s Order in Javascript

So I had a problem, awhile ago, where I needed to reorder elements in an array based off of the order of another array. So I basically had to capture the order from one and apply it to another. In my case, both arrays had a common id field. However, with the model I have here, I was able to order additional arrays without the id field, if I needed to, which I did šŸ™‚

Below is my code solution.

function getNewOrder() {
    //Get an identifier from the array you want to base the order on
    const newIds = newArrayOrder.map(x => x.id);
    
    //Get an identifier from the array you want to update
    const ids = arrayToOrder.map(x => x.id);
    
    //placeholder for order
    const order = [];
    
    //loop through the ids, pushing the arrayToOrder's index of the new order ids
    //We end up with an array of indexes
    for(let i = 0; i < ids.length; i++) {
      order.push(ids.indexOf(newIds[i]));
    }
    
    //reorder the array
    reorderIds(order, arrayToOrder);
}

//Preform the reordering
function reorderIds(order, arrayToOrder){
    //Get a copy of the array we want to change
    const temp = arrayToOrder.slice(0);
    
    //loop through the indexes
    //use the indexes to place the items in the right place from the copy into the original
    for(let i = 0; i < arrayToOrder.length; i++) {
      arrayToOrder[order[i]] = temp[i];
    }
}


Deep Photo Style Transfer

This really cool github project, called deep-photo-style-transfer, was shared with me awhile back.

It basically takes two images and merges them together very cleanly. Their code takes an approach to photographic style transfer that can take onĀ a large variety of image content while preservingĀ theĀ reference style. Their research can be viewed here. Here are some pictures below of what it can do!

Check it out!

Javascript Cloning and Moving DOM Elements to Mouse Position

So I was working with dragula, a super easy to use drag and drop library. However, I ran into an issue where when a user clicks the dragging element, I wanted everything in the background to collapse. This messed up the dragging element’s position in relation to where the mouse’s location. In most cases when you drag and drop an element, it hovers wherever your mouse is located. In my case, when I shifted everything, the element I wanted to drag was no longer located where I clicked but rather it moved and hovered in the wrong spot with the wrong offset from my mouse. In using this library, I didn’t have access to changing their inner coding offset logic, so I needed to come up with my own fix. In the end, I decided to hide their floating mouse DOM element and create my own, that I had control over. The following code shows how to do just that!

Happy coding! Let me know if you have any comments or improvements.

//call this function when we want to initiate the listener for moving the mouse
//For instance, call this function once the user starts dragging an element
//requires an event and element to be passed.
function startMouseMove(e, element) {
    $('.my-background-content').css( 'display', 'none' ); //collapse background elements
    const container = $(element).find('.item-to-clone').clone().appendTo('.my-container'); //clone the element you want to hover around mouse
    $(container).attr('id', 'cursor_element'); //give the clone element an id so we can reference it later
    $('#cursor_element').css({'position': 'fixed', 'top': e.pageY, 'left': e.pageX}); //set clone element's position to mouse's position
    $document.on('mousemove', moveElement); //bind mouse event
}
 
function moveElement(e) {
    const y = e.pageY; //get y position
    const x = e.pageX; //get x position
    $('#cursor_element').css({'top': y, 'left': x}); //move the position of the element to match mouse, whenever mouse moves
}
 
//call this function when we want to stop the listener for moving the mouse
//For instance, call this function once the user drops a dragging element
function stopMouseMove() {
    $('#cursor_element').remove(); //delete cloned element
    $('.my-background-content').css( 'display', '' ); //un-collapse background elements
    $document.unbind('mousemove', moveElement); //unbind mouse event
}

Note that $document and JQuery must be declared/injected into the controller for this to work.

The above code requires JQuery, but you could easily use vanilla Javascript.Ā Check this out for event help and this out for DOM selection.