BSOD Windows 8.1

So even after a fresh install, I was still getting Blue Screens of Death (BSOD). I only started receiving these issues after I upgraded to Windows 8.1 from 8. So I narrowed my speculations down to driver issues. This post describes the steps I took to analyzing the BSOD and my conclusion/solution.

Analyzing a Blue Screen

Screenshot (37)

I received the pictured blue screen consistently on my machine. Looking at the error I noticed the “CRITICAL_STRUCTURE_CORRUPTION.” Search results for the error greatly varied… and weren’t particularly helpful.

Okay, so I then chose to look at the Window Event Logs. For Windows 8.1, you can get to the event viewer by clicking the bottom left start icon on the lower left of the desktop view and selecting the tool or by searching for it.

In the Windows Logs->System log there was an error that listed a memory dump created after the computer recovered from one of the many blue screens. I deduced that this dump may have some clues to what caused the problem.

EventViewer

Next, I decided to use windbg. This is a debug tool for analyzing Windows that can be used to read the memory dump file. You can download the standalone tool from here.

After installing the tool, I accessed the executable at <INSTALL DIRECTORY>\Windows Kits\8.1\Debuggers\x64\windbg.exe (x86\windbg.exe for 32 bit machines). With the tool running, I opened the memory dump file path found in the earlier viewed event.

Open

This tool spit out some information found in the dump file.

dump

Hmmm… it wasn’t so helpful, basically said there is a problem most likely due to ntkrnlmp.exe or in other words some kernel activity. I needed a symbol table to make sense of some of there references in the dump file.

I entered the following command in the prompt at the bottom of the dump report window to download the latest symbols:

.sympath SRV*<LOCATION TO DOWNLOAD eg f:/Temp>*http://msdl.microsoft.com/download/symbols

I selected Debug->restart to rerun the debug on the memory dump file with new symbols. I then received the following results pictured below.

after

Still doesn’t help much in describing what is causing the blue screens. To further investigate, I clicked on the analyze link. This expanded the analysis results.

analyze

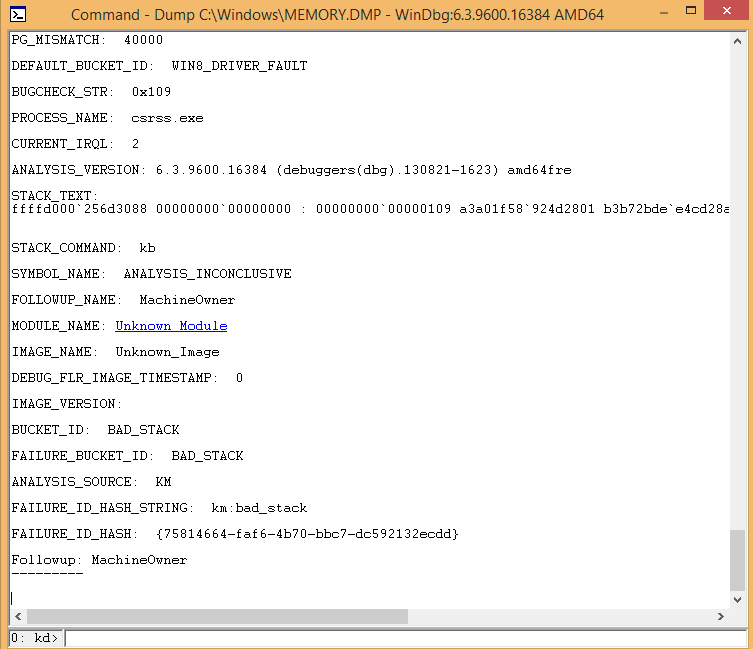
Okay, so I can definitely now see that there was a memory issue by the reference to a bad stack… but I don’t know what caused it. Clicking on the link under MODULE_NAME didn’t provide much.

lmvm

Well, I then did a search on lmvm Unknown Module. After looking through the results, I found a couple posts that mentioned conflicts between some of the Intel drivers and Windows 8.1.

Conclusion/Solution

I have an Intel motherboard and Intel drivers. I became suspicious…

Naturally, I decided to uninstall the Intel HD and network drivers from “Programs and Features.”

No blue screens as of yet. Make sure by default Windows is not set to update drivers automatically. I consider it solved… for now. I await new drivers from Intel.

Intel RAID 5 on Windows 8.1

I upgraded by Windows 8 to Windows 8.1 a couple of months ago and since the change I was getting blue screens (of death…) consistently.

This issue was do to a piece of memory that was incorrectly over written, my RAID drivers were also failing. There really wasn’t anything important on my Windows partition so I decided to delete the partition and reinstall Windows 8.1 as a fix. There are helpful debugger tools to deal with this along with memory tests but it was just as easy for me to delete and start over.

The following instructions apply to an Intel Motherboard.

Enabling RAID (I already had my RAID setup, so I didn’t need to perform these steps since it is configured on the hardware level.)

  1. Turn on the computer and during the first screen that  flashes the manufacturer name (the screen before the Windows logo) enter the BIOS menu. The screen flashes quickly and for those who don’t know how to enter this screen, it’s normally a F key. The manufacturer screen normally has on it a list of  key options, just look for the one that will get you to the BIOS configuration (Don’t worry if you miss it, just keep shutting down the machine and turning it back on until you get it). For me, the Intel key was “F2”.
  2. Under the configuration tab in the BIOS, set the “Chipset SATA Mode” to RAID. Directions on how to change values are displayed on the right hand side of the screen.
  3. Save changes and exit the BIOS screen (ESC key).
2014-02-01 09.43.41
BIOS Configuration Tab

Configuring RAID Volumes (Once again I already had this setup.)

  1. Reboot the computer. There should now be an additional screen that appears between manufacturer screens when you start the machine up. This lists all your RAID volumes.
  2. Quickly, press CTRL-I to get to the RAID configuration utility while the screen is up. This was actually tricky for me, I had to make multiple attempts. For some reason, I could not get this to work on my bluetooth keyboard but it worked with another keyboard… some bug. Even with a different keyboard, I basically held down CTRL and went crazy pressing “i” over and over and over again.
  3. In this window you can create RAIDS! Choose option 1 to create your volumes or look at the other available options for different functions.
  4. My settings consist of two bootable RAID 5 volumes across my three ~4TB (3.6TB actual) hard drives. One with 125GB and the other with 7.1TB. The screenshot below shows my setup for your reference. Depending on your setup (RAID 5 requires at least 3 hard drives), you may want to do some research into RAID and your options. I chose 5 because it is supported by my motherboard and provides mirroring/striping. So it optimizes parallel communications and provides redundancy. In the case that one of my hard drives fails, I won’t loose anything. If two hard drives fail… I’m screwed. Basically, you have some protection from failure but still replace bad hard drives ASAP.

2014-02-01 10.22.15

Install Windows

Intel Raid Driver I Used

  1. Download the Intel RAID drivers from their website and put them on a USB device. The screenshot above shows the driver I downloaded. Keep the USB plugged in during the following steps.
  2. I had a DVD with a Windows 8.1 ISO burned to it. This was placed into the computer before I shut it down. I then turned the computer on and again during the manufacturer/first screen, I hit the “F10” key to select from where to boot. Most of the time, by default you boot from the Windows partition on your hard drive. However, this time, I wanted to boot from my install DVD containing Windows 8.1.
  3. It took awhile to load the Windows menu, but once it did, I chose to “Install.”
  4. The next few screens deal with entering your license key and junk.
  5. Once I was prompted for Default or Advanced setup. I chose Advanced. This was because I needed to mess with the partitions.
  6. The next screen will show the existing partitions but we have RAID going on and to make the install aware of this, we need to provide the drivers. In the current window, look for and select “Load driver.”
  7. I pointed the device to my USB to search for drivers. Once it found my Intel RAID driver, I selected it and clicked “Next.”
  8. After a few minutes, you will be returned to the partition window and you should see you RAIDs correctly.
  9. Format a new partition for your Windows (I deleted the previous). In my setup, I have 8 TB of hard drive space. I dedicated 124 GB to my Windows partition and the remainder to a partition I call “cabinet.” This is where I store my documents, media, etc. Windows does have a problem with creating a partition greater than 2TB. These drives must use GPT. This page discusses more on GPT. If this is what you plan to do, don’t partition the larger now, wait to use the Windows disk utility described in the link.
  10. Continue and let Windows install. Was completed, install drivers as needed. Intel has a tool that helps with this process.
2014-02-01 01.13.18
Driver Selection
2014-02-01 01.13.21
Partition Window

There you have it!

What’s the Diff?

I’ve been doing a log of programming at work and some of the worst errors to run into are segfaults or segmentation faults. This deals with problems in your logic and more often then not is a memory issue. They really suck to debug…

For best practices, I keep a working version and development version of code. This way, when I run into these problems I can compare my issues against a working copy. I use none other than the great diff command. This sometimes helps with faults among other debugging tools like (gdb).

It’s pretty obvious by the name what this command does, it points out the differences between files.

Command:

diff <FILE 1> <FILE 2>

Screen Shot 2014-01-31 at 9.03.04 PM

The example points out a line that is different between two given files. New lines can really screw up the results so be careful.

That’s the gist, visit the it’s man page for more details.

Happy Programming!

PIR Sensor on the Pi

Today I soldered a PIR sensor to my Pi! Basically, I want it to detect movement and turn on a LCD screen, then turn the screen off again after a minute of no movement. So when I walk into a room, the screen turns on and when I leave, the screen turns off.

Equipment

Solder

First thing, I looked up the pinout for the Raspberry Pi. The below diagram comes from elinux.org.

We care about one of the 5V, ground and GPIO25 pins.

  • Solder the sensor red cable to either 5V.
  • Solder the black cable to ground.
  • End by soldering the yellow line to GPIO25.

Your results should be similar to my picture below.

back

Next, I used this guy’s pir.py script. The script requires the Python library RPi.GPIO. I installed this by downloading the library from here, the direct link is here. To untag or unzip the file I used the following command:

tar -xvf RPi.GPIO-0.5.4.tar.gz

Before installing it, make sure you have python-dev installed.

apt-get install python-dev

With that necessary package, install RPi.GPIO.

cd RPi.GPIO-0.5.4
python setup.py install

Now you can run the pir.py script. I made some slight changes to his code. I didn’t feel the need to call separate scripts to run a single command so I made the following edits.

import subprocess

to

import os

and

def turn_on(): 
    subprocess.call("sh /home/pi/photoframe/monitor_on.sh", shell=True)
def turn_off(): 
    subprocess.call("sh /home/pi/photoframe/monitor_off.sh", shell=True)

this

def turn_on(): 
    os.system("chvt 2")
def turn_off(): 
    os.system("chvt 2")

Run the script and test it out! The sensor will turn off after a minute of no movement and on again once it detects something. I ended by setting my script to run on startup.

2014-01-30 20.33.51

I need to put a picture in the frame to act as background to the pi…

Screen

I love using screen at work, especially while I’m in a PuTTy session. Basically, screen lets you open up another bash session without disrupting a current bash session in the same window. So I can open one PuTTy session and with screen emulate multiple. This is nice because I can do something different in each screen session without loosing my place in another. Trust me, it’s awesome.

Install

To download:

apt-get install screen

or (depends on your distribution and packet manager)

yum install screen

Use

Create a screen by typing the command:

screen

Super easy, to detach from a screen:

press CTRL+”a”+”d”

Now what? There is now a floating screen session someone. How do you reconnect to it? First you can list all screen session with:

screen -ls

With knowledge of what screens exist, you can reconnect to one with the command:

screen -r <SCREEN REFERENCE>

Screen Shot 2014-01-29 at 6.46.30 PM

To kill the current screen, use:

press CTRL+”a”+”\”

Other helpful shortcuts can be found by pressing:

CTRL+”a” release “?”

Screen Shot 2014-01-29 at 6.48.08 PM

There you have it! Manage your screens wisely.

Linux vs Unix

Yesterday, my post included a reference to Jurassic Park where the little girl made a comment about Unix systems. Cool fact, they actually used a real 3D file system Unix navigation tool for the movie. A SGI Crimson system with the fsn three-dimensional file system navigator, to be precise, appeared in the movie (sgistuff.net). Crazy! If you look closely you’ll even catch the SGI logo on the monitors… product placement I suppose. I didn’t realize tools like that existed in 1993. But who would really use it over terminal access? The tool seemed a little slow in the movie but maybe that’s due to the intensity of the scene. 😉

I was thinking, it must be cheaper for films to use open-source software over expensive things such as Windows. But, the Unix OS is an enterprise operating system found in universities and large companies for the most part. Yes, there are some Unix distributions that are open-source. Linux on the other hand is all open-source (however some distributions request a fee for premium help services). They are both very similar, Linux was created as a free alternative to Unix and is based off of the OS (so is OSX, which is why I like it). Many of the tools developed for Linux were also created as free substitutes to Unix tools.

So what are the differences between the two? This site and this explanation by IBM provide more detailed comparisons of the two, I’m just going to highlight on how proprietary versus being open-sourced has affected the development of the two and contributed to their differences.

Unix Linux
History Unix dates back to the mid-1960s. MIT, AT&T Bell Labs and General Electric joined forces to collaborate on a new system. Their first production of Unix was released in 1972. Inspired to be a free alternative to Unix. Dates back to the GNU project creation in 1983. GNU standing for “GNU’s not Unix.”
System Propriety Open-Source
Hardware Limited to architecture, the OS is normally customized/optimized specifically for the hardware Very flexible
File system Supports a limited number of file systems typically of JFS, GPFS, HFS, HFS+, UFS, XFS, ZFS format Supports almost all file systems currently available to any operating system, popular ones include:Ext2, Ext3, Ext4, JFS, ReiserFS, XFS, BTRFS, FAT, FAT32, NTFS
Development Well documented with published standards for development Anyone can join in and contribute without any real restrictions, hence open-source. Not everything is always well documented, depends on the developer’s mood
Testing Highly tested Not as much
Applications Limited, however, the tools/applications are consistent across distributions Vast library of applications because the developer community is huge but it is not always consistent
Bug Fixing Bugs aren’t as common but like any proprietary system, it takes time for a patch to be released The open-source community is vast and developers scrutinize over each other’s work (this often leads to fast bug patches)

Clearly, being open-source provides a different development community that aids to a much broader range of usage and users. With this main difference between the two, each has been shaped differently. Unix is consistent and sturdy while Linux is flexible and all over the place.

Type-Safe vs Dynamically Typed Programming Languages

So a lot of my posts include Python code. Python is a powerful, dynamically typed, free application programming language.

Programming languages are either type-safe or dynamically typed. One setting isn’t necessarily better than the other. It all just depends on your project and what you are trying to accomplish.

Type-Safe (Statically typed)

A variable type (int, unsigned int, double, float, etc.) must be explicitly stated when a variable is declared. The variable is fixed at compile time which allows the compiler then uses this supplied information to ensure the right data is used in the right context. Languages such as C, C+ and Java are type-safe.

Pros:

  • Less bugs (There is no chance of misreading a variable)
  • Safer programming
  • Easier to manage complexity in large projects (Everyone is aware of types and their purpose)
  • More control over types (You state the type, you are in control over exactly how the compiler sees it)

Cons:

  • Decreased flexibility
  • Not as recyclable (It’s not as easy to reuse your code for multiple purposes)

 Good For:

  • Complicated algorithms and data structures which require strict low-level controls
  • Memory sensitive large dataset manipulation
  • Well-defined functions that are likely not to change much over time
  • Large development teams

Dynamically Typed

Variables are not declared with a given type. Types are basically determined by the compiler. These languages normally include extensive run-time checks to prevent most type errors.

Pros:

  • Very flexible
  • Easily Recyclable
  • Quick development speed and turn-around time
  • Reduces amount of overall code leading to possible reduction in bugs

Cons:

  • Can have some undesirable effects on the code (If the wrong type is understood in a situation, some funky things can happen)
  • More prone to human failures such as typing errors (Say you mistyped a variable, it might be seen as a new variable all together in a dynamic setting)
  • Decreased efficiency due to run-time checks

Good for:

  • Connecting different components or languages together
  • Creating graphical user interface
  • Text manipulation (Concatenating, regular expressions, search, etc.)
  • Ever changing code
  • Small segments of CPU-time intensive work
  • Automatic memory administration
  • Web server communications
  • Consistent performance across OS platforms (meaning I can run the script the same on Windows, OSX, Linux, Unix etc.)

Not to Be Confused With… 

In addition, there is also something known as weakly and strongly typing (totally different concept from the type-safe/dynamic stuff). This refers to one type being able to be used as another type. A strong language will not let a string all of a sudden act as an integer. A weak language will allow this, mostly due to unintentionally loopholes. Languages such as Pearl and C are known for being weakly typed while Python is a strongly typed language.                     

People will argue one over the other, similar to the whole Mac vs PC debate, in reality both benefit and serve different programming objective purposes.

Init.d Scripts

I decided to make my own init.d script for my lilDevil app (instead of using a startup cronjob). The “init” in init.d stands for initialization and the “.d” indicates the script is a daemon process. A daemon process is commonly defined as simply something that runs in the background. So an init.d script, is one that is called on startup and runs in the background without any user controls.

And by startup I mean apps that run on Startup 😉

Setup

Making an init.d script is simple. First create the script in the init.d directory.

vim /etc/init.d/<NAME OF YOUR STARTUP SERVICE>

Next, add executive privileges to the script.

chmod +x /etc/init.d/<NAME OF YOUR STARTUP SERVICE>

Now it’s time for the inner-workings.

Script Parts

This is ultimately a bash script so it requires this little sh-bang at the top.

#!/bin/bash

Next, a service requires a LSB header. This header is used to configure startup settings and describe the service. This tutorial goes into detail on the different available settings that can be included in the header. Below is a sample of a more basic header that will add a service to the end of the startup boot order sequence.

### BEGIN INIT INFO
# Provides:          <SERVICE NAME>
# Required-Start:    $all
# Required-Stop:     $all
# Default-Start:     S
# Default-Stop:      0 1 6
# Short-Description: <LONG DESCRIPTION OF SERVICE>
# Description:
<SHORT DESCRIPTION OF SERVICE>
### END INIT INFO

The following code describes the different service actions. For instance, common actions are “start”, “stop”, “restart”, etc.

case "$1" in
<ACTION1>)

<COMMANDS/SCRIPTS TO RUN RELATING TO ACTION1>
;;
<ACTION2>)
<COMMANDS/SCRIPTS TO RUN RELATING TO ACTION2>
 ;;

<REPEAT AS NECESSARY>

Concluding, we exit and clean everything up.

exit 1
esac
exit 0

Putting it All Together

To help you see the big picture, here is a copy of my init.d script.

#!/bin/bash
#
### BEGIN INIT INFO
# Provides:          lilDevil
# Required-Start:    $all
# Required-Stop:     $all
# Default-Start:     S
# Default-Stop:      0 1 6
# Short-Description: Unleash the lilDevil
# Description:       lilDevil is an awesome network enumeration tool
### END INIT INFO 
#
case "$1" in
start)
echo "Starting lilDevil "
python /root/Projects/dirtBag.py&
python /root/Projects/demon/manage.py flush --noinput
python /root/Projects/demon/manage.py runserver 192.168.1.6:3707&
python /root/Projects/sensor.py&
;;
stop)
echo "Stopping lilDevil "
killall -9 python
;;
restart)
echo "Restarting lilDevil "
killall -9 python
python /root/Projects/dirtBag.py&
python /root/Projects/demon/manage.py flush --noinput
python /root/Projects/demon/manage.py runserver 192.168.1.6:3707&
python /root/Projects/sensor.py&
;;
*)
echo "Service"
echo $"Usage: $0 {start|stop|status}"
exit 1
esac
exit 0

Configuring it to Run

With the script completed, we pass it to insserv to be added to the Linux service boot order.

insserv -d /etc/init.d/lilDevil

Tah Dah! The service is added!

What about apps with GUIs?

Now, if your app has a GUI involved, it needs to be added to the desktop environment initialization. This is different from an init.d script. Init scripts run for the most part before the desktop has been initialized.

In Kali, I simply used their tool to add the service to startup. The tool can be found under Application Menu->Settings->Session and Startup. Under the Application Autostart tab, you can add a new command to run when the desktop loads.

Screen Shot 2014-01-26 at 12.21.58 PM

That’s it!

TightVNC on my Kali Pi

To get VNC running, you just need to install the tightvncserver package.

sudo apt-get install tightvncserver

Then to run, use the following command.

tightvncserver

After running the command, the terminal will display the hostname and display VNC is operating on. That’s it! Your pi now has a VNC server running on it. This tutorial goes into detail on how to set it to run on startup.

I use Chicken of the VNC on my MAC as a client to connect to the server.

Kali Screen Blanking

I was tired of the LCD screen hooked up to my pi going to sleep, this page had an answer that solved my problem.

Basically, the solution that worked for my involved x11-xserver-utils.

sudo apt-get install x11-xserver-utils

I then had to create a file named ~/.xinitrc. I use vim as my basic goto editor but there is always nano.

vim ~/.xinitrc

Inside the file, I added the following lines of code.

xset s off # don't activate screensaver
xset -dpms # disable DPMS (Energy Star) features.
xset s noblank # don't blank the video device

exec /etc/alternatives/x-session-manager # start lxde

Complete. Thanks  goes to Spyslab.