One of the easiest ways to run a script or command on startup is to use the crontab.
The crontab includes an entry string to let you run a script after reboot or on startup.
Enter the crontab.
crontab -e
Add an item to run on startup.
@reboot <COMMAND OR SCRIPT TO RUN>
My crontab entry is visible below. I used this to start all my scripts on my Pi creation.
Other startup options include, writing an entry into the bashrc. For the Pi, you could also write an entry in /etc/rc.local. This article discusses actually creating an init.d script for those interested.
Adafruit sells some really cute LCD screens for the Pi. I recently purchased such screen and decided to solder the screen directly to my Pi after seeing this guy’s cool pi project.
So to catch up on what I’ve done so far on my Pi, check out this post. The following steps discuss my experience soldering the pieces together.
I first soldered the LCD power lines to the batter pack. The LCD runs on 6-12V. I found this cheap battery holder on Amazon that could hold four AA batteries or 6V total. The power lines are the two that did not come attached to one of the two RCA connectors. Solder the red to the positive (+) battery pack output and the black to the negative (-) output. Think as red surging hot with power and the black as dead or negative of surging power.
Not sure this is the best soldering technique but I normally tint the soldering iron tip with a bit of solder first then I set that tip against the connection point. Last, I’ll stick the wire into the hot solder on the iron touching the connection point before carefully removing the iron from the solder.
I had batteries in the holder during this process so I could see the LCD powered on and ensure the wires were soldered correctly in place. Just be careful, don’t shock yourself.
Next, I cut off one of the RCA connectors. Basically one connector is a backup for the other, if there isn’t a signal coming in on one, the other is checked or used. It does not matter which one you choose to hook up to the screen. Make sure not to cut off too much wire during this process.
Following, I striped some of the insulator back off the wire then soldered it to the board. The picture below shows where I soldered everything on the under side of the Pi. Your colored cables might not be the same as mine. Test everything before you actually solder it onto the board. It’s easy just power on the Pi and test the wires to see what actually outputs video to the Pi.
Tah dah! Now everything is hooked up! I then taped it all to a frame to make it pretty.
BackFront
From here, you may be interested in having the Pi auto login (not advisable but I did it) and boot startx (the desktop GUI). This was the most helpful tutorial for accomplishing the auto boot stuff.
Hey all, here are some handy terminal shortcuts I’ve stumbled upon in school and work. Maybe they’ll make your life easier as you go about entering commands in a Unix bash shell.
The + sign is not part of the key combination, it’s just to show what buttons to hit together.
CTRL + “u” -> Delete current text in prompt and move cursor to the beginning
CTRL + “k” -> Similar to the last, but instead it kills the input
CTRL + “y” -> Return the last killed input
CTRL + “a” -> Jump cursor to the beginning of your terminal input line
CTRL + “e” -> Jump cursor to the end of your terminal input line
CTRL + “f” -> Move cursor forward one character (similar to right arrow key)
CTRL + “b” -> Move cursor backward one character (similar to left arrow key)
CTRL + “d” -> Backwards Delete (For all you Mac users)
CTRL + “h” -> Forward Delete
CTRL + “r” -> Extremely useful, lets you look up a previous used command. Just press CTRL plus the letter “r” then begin typing the command, the promo will return the last command that used the term.
CTRL + “l” -> Clear screen
I’ll add to this list as I come upon more helpful terminal shortcuts.
I love when code makes life easier. However, if you don’t know what the code does… life isn’t so easy now. That’s why we have man pages!
In honor of those “man” pages…
Except building a man page for a script and handling the “-h” argument from a command prompt can be tedious.
Python has a really cool library called optparse, that includes the ability to make a “help” output for a script along with argument handling. You know how nice that is to have a library take care of the whole argument handling? Very nice! I would hate to use regular expressions to try and parse a list of command line inputs.
If my blog posts about the language haven’t made this obvious already, I really love Python. It does have faults because it is not a type-safe language and in some circumstances that can be an issue. I’ll go into detail at a later time. Ideally, it is best to have both type-safe and dynamic type languages in your repertoire of tools.
Anyways, back to Optparse. It’s basically self-explanatory.
Import OptionParser.
from optparse import OptionParser
Next, setup an OptionParser object.
parser = OptionParser()
Give it some flags or parameter options. You do not have to create a -h or help option, this will be created for you automatically. Below is a template for creating an option.
parser.add_option("-<OPTION LETTER>", "--<OPTION NAME>", dest="<VARIABLE NAME TO STORE OPTION CONTENT>", default=<DEFAULT VALUE>, help="<HELP TEXT>")
Each option creates a possible input parameter that user’s can specify. If you do not want the user to have to input a value, maybe a flag is more your style.
A flag is a true or false notification that does not require additional user input. If a flag is present do something, if not do something else. To create a flag, set the default option to true or false and add “action=”store_true” or add “action=”store_false” in order to simulate a flag option. When you want the flag to turn a statement true set “action=”store_true” and “default=False” and the exact opposite for a flag to turn something false.
To help clarify things, I wrote up a fun example below.
Example
The below was coded for Python 2.7 and saved to a file called fun.py.
from optparse import OptionParser

import os, time
def somethingCool(dazzling):
print "Something Cool"
if dazzling:
print "\n~*~*~*~*~*~*~"+dazzling+"~*~*~*~*~*~*~"
def somethingStupid(dazzling):
print "Something Stupid..."
if dazzling:
print "\n--------------"+dazzling+"--------------"
def main():
parser = OptionParser() #Help menu options
parser.add_option("-c", "--cool", action="store_true", dest="cool", default=False, help="Do something cool!")
parser.add_option("-s", "--stupid", action="store_true", dest="stupid", default=False, help="Do something stupid...")
parser.add_option("-d", "--dazzling", dest="dazzling", default=None, help="Add this dazzling text to the cool or stupid thing.")
(options, args) = parser.parse_args()
if options.cool:
somethingCool(options.dazzling)
elif options.stupid:
somethingStupid(options.dazzling)
else:
print "Lame, you selected nothing..."
if __name__ == "__main__":
main()
Explanation
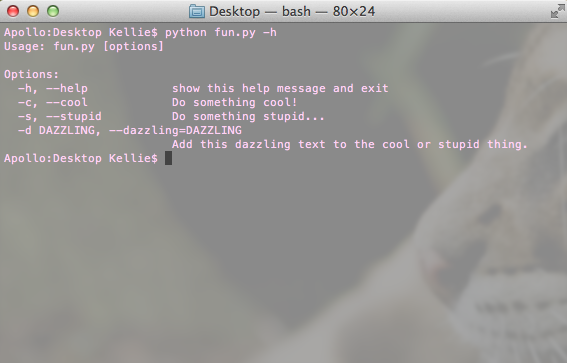
OptionParser will automatically create a help option (-h) for you. Here is what the help screen looks like for my code example:
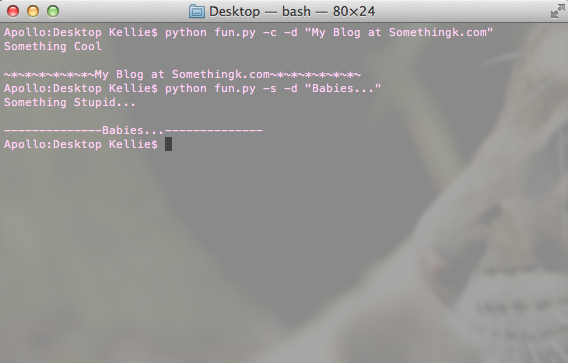
Basically, if I call the script with the -c flag, something cool will happen.
python fun.py -c
If I call the script with the -s flag, something stupid will happen.
python fun.py -s
If I call the script with the -d <TEXT> and a flag something will happen with text.
python fun.py -c -d "My Blog at Somethingk.com"
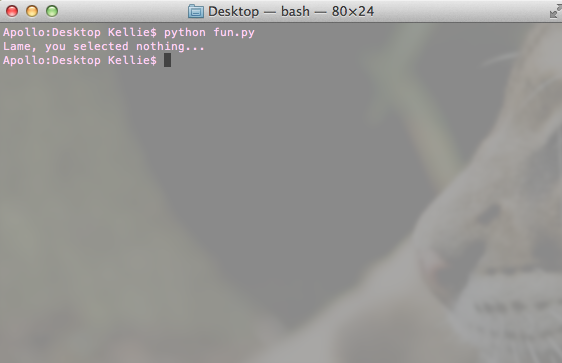
If I don’t provide a -s or a -c flag, the code insults me… A flag isn’t required but nothing else will happen if one isn’t given.
Something actually useful… logging! Not talking about lumber but logging code issues, data, access, anything useful in an application environment. Python makes this super easy!
Logging is part of the Python standard library and can be imported with the following line of code.
import logging
Setup
First step after importing the library is to initiate the logger.
log = logging.getLogger(__name__) #create a log object
The logger name hierarchy is analogous/identical to the Python package hierarchy if you organize your loggers on the recommended per-module basis. This is why you should use “__name__” which is the module’s name in the Python package namespace.
After creating a log, now the level needs to be specified. There are different declared levels of severity for logging. Below is a list of these levels ordered from least to most severe.
DEBUG – Detailed information for diagnosing problems.
INFO – Confirmation that things are working as expected.
WARNING – Notice that something unexpected happened, however the software is still working as expected.
ERROR – Data on an issue that has happened, which has preventing a function from being performed.
CRITICAL – Information about a serious problem! The program may not even run at all with this going on!
Items are logged based on the level of severity you set for the log. The default level is “warning”, this will track warning, error and critical items. If you selected debug, everything on up would be tracked.
Remember, you are the one who determines the level for a log message, so say you create a debug warning but your logging level is set to error. The debug message will not be printed because it is not of the error severity or higher.
log.setLevel(logging.<LOGGING LEVEL>)
Formats the log all pretty. This format, places the level first followed by the message I choose to insert.
handler = logging.FileHandler('error.log') #log to file error.log
handler.setFormatter(formatter)
log.addHandler(handler)
Implementation – Logging Items
It’s simple, just use the following syntax wherever you want a log entry to be made in your code.
log.<LEVEL>('<MESSAGE>')
Example
logging.info('This is awesome!')
I like to use logging to report errors from “try and except” statements in a situation where I don’t want the loop to stop because of an error. while 1: try: doSomething() except, Exception E: logging.error(str(datetime.datetime.now())+" "+e) #I’ll add the timestamp with datetime for kicks pass
There you have it, very useful and simple python programming. More documentation at http://docs.python.org/2/howto/logging.html.
So this tool I created sits on a Raspberry Pi. Its purpose is to monitor and enumerate all devices currently connected to a network. In this case, it sits on my Guest network. Tomato Shibby is running on my router and I used its web interface to setup the network, along with limiting access. For all guests jointing this network, they are warned by the router’s splash page that tools such as this will be running. Its a free network and they really can’t expect anything different going on. In this case, its not malicious, but it is good practice to be wary of guest networks.
To be less suspicious, the hostname of the Raspberry Pi is RainbowDash 😉 This amuses me so much, the perfect disguise! If I saw a device named LilDevil running on a guest network I would be totally alarmed. I also themed the Pi accordingly, see the below screenshot. The coloring isn’t perfect, I blame VNC.
The Pi runs a Django Restful server that stores mmap scan information about detected machines on the network. The Python 2.7 scripts for this are here. I had to make a few versions in order for things to work on Django 1.6.
In views.py, change
encoded = json.loads(request.raw_post_data)
to
encoded = json.loads(request.body)
Also, I had to make some changes in dirtBag.py, in order to get the ping sweep to work appropriate.
Change MIN and MAX to an integer instead of a string.
MIN="0"
MAX="12"
to
MIN=0
MAX=12
Here is a copy of the new main function.
def main():
    global results
    while 1:
        new = ""
        for x in range(MIN,MAX):
            new = new + commands.getoutput("ping -c 1 -t 1 "+PREFIX+"."+str(x) + " | grep 'from'") #Ping sweep the network to find connected devices
        tmp = re.findall(PREFIX+".(d+)", str(new)) #Pull out IP addresses from the ping results
        if tmp != results:
            for ip in tmp:
                if ip not in results:
                    gotcha = commands.getoutput('nmap -v -A -Pn '+PREFIX+'.'+ip)
                    sendDevice(gotcha)
            for r in results:
                if r not in tmp:
                    removeDevice(PREFIX+'.'+r)
            results = tmp
The information is up to date on all devices currently connected. It may be nice in the future to include a log of all scans but for now, I’m really only interested in connected machines.
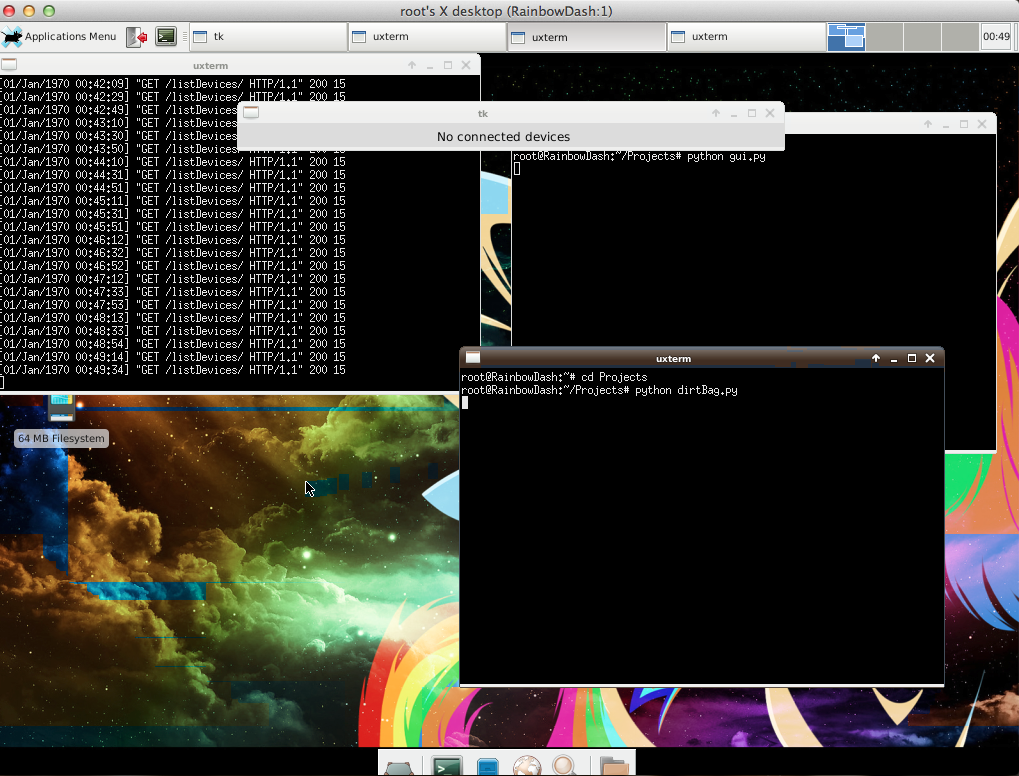
Data is then displayed in a visible GUI. The below screenshot shows the tool windows along with the GUI. Currently, no devices were connected to the network.
Ahhh it detected a device… in this case, itself.
There you have it! A portable network enumeration tool. There are so many versions of this everywhere, but this is just something I coded up for fun. I plan to add to the Pi later for kicks.
I want to use my Kali Raspberry Pi as a RESTful proxy server. Nice thing is, the little pi is portable!
My favorite web framework… still Django! While searching the web, I found a lot of extra crap people reported as necessary for the install. It really is an easy process… at least Kali.
Install Django on the Pi
This was actually very easy. Make sure everything is updated on the device.
sudo apt-get update
Following, install pip. This python package manager will be used to download Django.
sudo apt-get install -y python-pip
Follow up with Django.
sudo pip install django
Easy sauce, not a hard install at all. This installed Django 1.6. Here is a great tutorial on how to build your first app.
Why buy an expensive router when you can build a cheap one from old hardware?
Equipment
This is what I used:
Ubuntu Desktop 12.04
hostapd v0.7.3
dhcp3-server
HP Compaq DC 7800 Small Form Factor PC
Penguin Wireless N PCIe Card v3 SKU NPCIEV3 ($50-$70)
Ethernet cable
Monitor, VGA cable, mouse and keyboard
Setup
Hardware
The Wireless network card must first be installed. Open up the computer and locate the PCI slot. Insert the network card into the PCI slot.
Ensure the two cables are reachable to the outside of the case. The antennas should be connected to these points. In the picture, the wireless network card’s plate did not fit the chassis and was removed because I didn’t feel like punching holes through the original plate.
Software Install
These directions specifically apply to a machine that is running the Ubuntu 12.04 operating system. I feel this goes without mentioning but have a monitor, keyboard, etc connected to the PC for the next install steps. Install SSH in order to shell into the device later without all that necessary crap. In order to create the wireless access point two packages need to be installed.
sudo apt-get install hostapd
sudo apt-get install dhcp3-server
Hostapd provides the hosting services of an access point. It is a daemon for wireless access and authentication servers. Dhcp3-server provides a network service that automatically assigns IP addresses to clients.
Configuration
The hostapd configuration file needs to be created and edited to contain access point information. The below settings utilize WPA2-PSK authentication.
sudo vim /etc/hostapd/hostapd.conf
Add
interface=wlan0 #wireless network interface
driver=nl80211 #802.11 standard
ssid=TheShire #The hotspot name, I'm a sucker for Lord of the Rings :)
country_code=US
channel=11
hw_mode=g
auth_algs=1
wpa=3
wpa_passphrase=secretPassword #access point password
wpa_key_mgmt=WPA-PSK
wpa_pairwise=TKIP CCMP
rsn_pairwise=CCMP
Configure the interface for the DHCP server.
sudo vim /etc/default/isc-dhcp-server
Set
INTERFACES=”wlan0″
The next configuration is in the DHCP conf file. Set the range of IP addresses allowed to be allocated to connecting machines.
Configure the IP settings for the wireless network.
sudo vim /etc/network/interfaces
Add
auto lo
iface lo inet loopback

auto wlan0 #Wireless Network Interface
iface wlan0 inet static
address 10.10.0.1 #Local Router IP
netmask 255.255.255.0
Firewall Settings
Allow IP masquerading in the Iptables. This is a networking function that allows local machines to access the same connection the host router is utilizing.
echo “1” > /proc/sys/net/ipv4/ip_forward
iptables -t nat -A POSTROUTING -o eth0 -j MASQUERADE
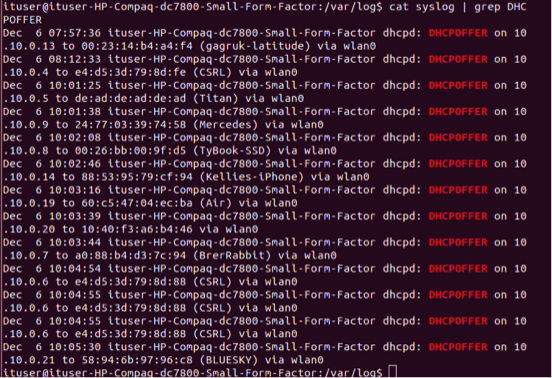
DHCP Monitoring
All DHCP requests can be found in /var/log/syslog. Grep can be used to pull certain requests for monitoring.
cat /var/log/syslog | grep DHCPOFFER
Further DHCP settings can be supplied in the configuration file, such as:
sudo vim /etc/dhcp/dhcpd.conf
Edit
subnet 10.10.0.0 netmask 255.255.255.0 {
        range 10.10.0.2 10.10.0.24;
        option domain-name-servers 192.168.0.81, 192.168.0.4;
        max-lease-time 120; #Set the max release time
        default-lease-time 120;#Set the default lease time
        option routers 10.10.0.1;
}
To flush the DHCP leases, the following can be performed:
cd /var/lib/dhcp/
sudo rm dhcpd.leases~
sudo echo “” > dhcpd.leases
Changing Signal Strength
It may be ideal to limit the signal strength to a specific room or region in order to prevent overlapping signals. For cards that support multiple transmit powers, this can be done through iwconfig.
Today, I was looking into my environment setup and realized, aliases are really useful. So for your enjoyment, here is a quick reference into how to setup and utilize the flexibility of aliases in your own Unix setup.
What is alias?
Aliases in any platform is a command that lets you replace one word for another. Nothing really confusing here. The alias command is:
alias <NAME>=<VALUE>
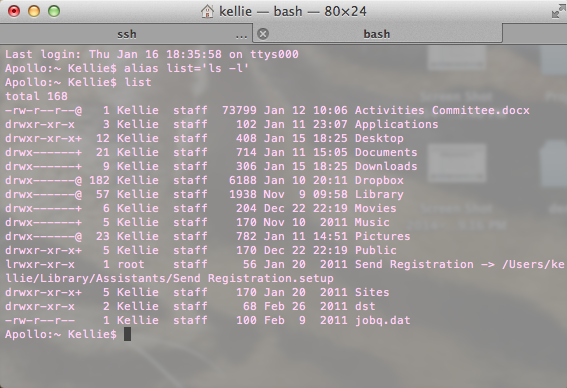
An example:
alias list='ls –l'
This will replace any instance where you type list with “ls –l.”
Listing isn’t a big deal, but say you have a really long command, imagine replacing that really long command with one word. Seeing the benefits now?
To get rid of an alias, either close your shell or type the command:
unalias <NAME>
This is great and all, but the alias will only work for the current shell it was called in. As soon as I close my shell, my list alias will disappear. What if I want an alias to be a permanent fixture. I want every shell I open to have my list alias. How do I do this? Well, the bash configuration files will help us here.
Bash Files for Unix Systems
When you login to a Unix system over bash shell, ~/.bash_profile is read. From this file, the shell gathers settings for that particular bash shell. If by chance ~/.bash_profile is corrupted or does not exist, ~/.profile is read instead. Say you are already logged into a Unix environment and you open a shell, instead of ~/.bash_profile being read, ~/.bashrc is instead reviewed for shell settings.
So ~/.bash_profile is read by a login shell and ~/.bashrc is read the other shell. I hate being repetitive. I want my aliases in one spot, I don’t want to have to manage two sets.
Well, there is a really easy fix for this problem! Ensure your ~/.bash_profile invokes ~/.bashrc! Check to see if your ~/.bash_profile has the following lines of code that perform the operation or just add them yourself.
if [ -f ~/.bashrc ]; then
. ~/.bashrc
fi
Nice, now you can store all your aliases in one place, ~/.bashrc. I just stuck mine in at the bottom of the file.
So I’ve been having fun with Amazon’s Developer Services for user authentication. In order to get the darn thing working, Amazon requires your server to use HTTPS. This isn’t a bad thing but in order to have HTTPS, you need to get a valid certificate. Now it’s easy to create a certificate (see below) however, not as easy to get a trusted certificate. Trusted certificates are those that are authenticated by a Certificate Authority or CA. I wouldn’t really trust a self-authenticated certificate. Reminds me of online dating where everyone lies, you kind of want a third party, reliable source to tell you the truth.
Here is the process to create a certificate request or CSR:
The below uses Openssl (this is native on a lot of Linux distributions, IIS on Windows handles these things differently).
Generate a RSA encrypted private key
openssl genrsa –out gen.key 2048
Create a CSR for the key
openssl req –new –key gen.key –out key.csr
Answer all the questions, leave the password blank, it’s not needed.
To get it approved:
Self (Untrusted…lame)
Remove RSA passphrase, if you don’t, the server you are running will require it upon each request
You now have a certificate that can be included in your server configuration. Check your documentation for the correct implementation. There are too many server variations out there for me to describe the process.
So why do we care about HTTPS?
Well it’s secure! HTTPS stands for Hypertext Transfer Protocol Secure and utilizes SSL/TLS protocol to lockdown communications. It is used to prevent man-in-the-middle attacks with the use of encryption (preventing some of the attacks in the ettercap post). If your data is encrypted, little hacker man can’t read it. This is why whenever you are entering in confidential information, look for “https://” in the URL, else your private data is being broadcasted in clear text (there was an ettercap attack mentioned in my last post that removed the security from a Facebook form, changing the login URL from HTTPS to HTTP… be warned).
Explanation of the SSL/TLS process:
Client browses to a secure site (HTTPS)
Hosting server sends its certificate and public key to requesting client
The client’s browser checks the server’s certificate (Looks to see if it comes from a trusted CA, relates to the correct sire, and is currently valid) – This is why you should pay attention to browser warnings, it may be trying to prevent you from going to an untrusted site.
The browser uses the public key to encrypt a random symmetric encryption key and sends it to the server
The server decrypts the key using its private key, the following communication between hosts is encrypted with the symmetric key
Once communications have concluded, the symmetric key is discarded
The Public Key is available to anyone and anything that wants it. Anyone can retrieve it from the server. That’s all fine and dandy. The Private Key, on the other hand, is kept a secret and only the owner knows it. These keys are mathematically related, whatever is encrypted with a Public Key can only be decrypted by its corresponding Private Key. So even though a hacker can get the Public Key, he/she cannot decrypted the SSL/TLS communications because they do not have the Private Key.
So here is an example of how it all works. Jack wants to send a secret message to Jill, he doesn’t want anyone else to read the message. So Jack,encrypts his message with Jill’s Public Key. Jill is cool with giving out her Public Key to anyone who wants it because it is after all public. Jill is the only person who can decrypt the Public Key because she is the only one with its corresponding Private Key. So now Jack’s message can only be read by Jill. Even if hacker Todd gets a hold of the encrypted data, he can’t read it because he doesn’t have the decryption or Private key.