So this tool I created sits on a Raspberry Pi. Its purpose is to monitor and enumerate all devices currently connected to a network. In this case, it sits on my Guest network. Tomato Shibby is running on my router and I used its web interface to setup the network, along with limiting access. For all guests jointing this network, they are warned by the router’s splash page that tools such as this will be running. Its a free network and they really can’t expect anything different going on. In this case, its not malicious, but it is good practice to be wary of guest networks.
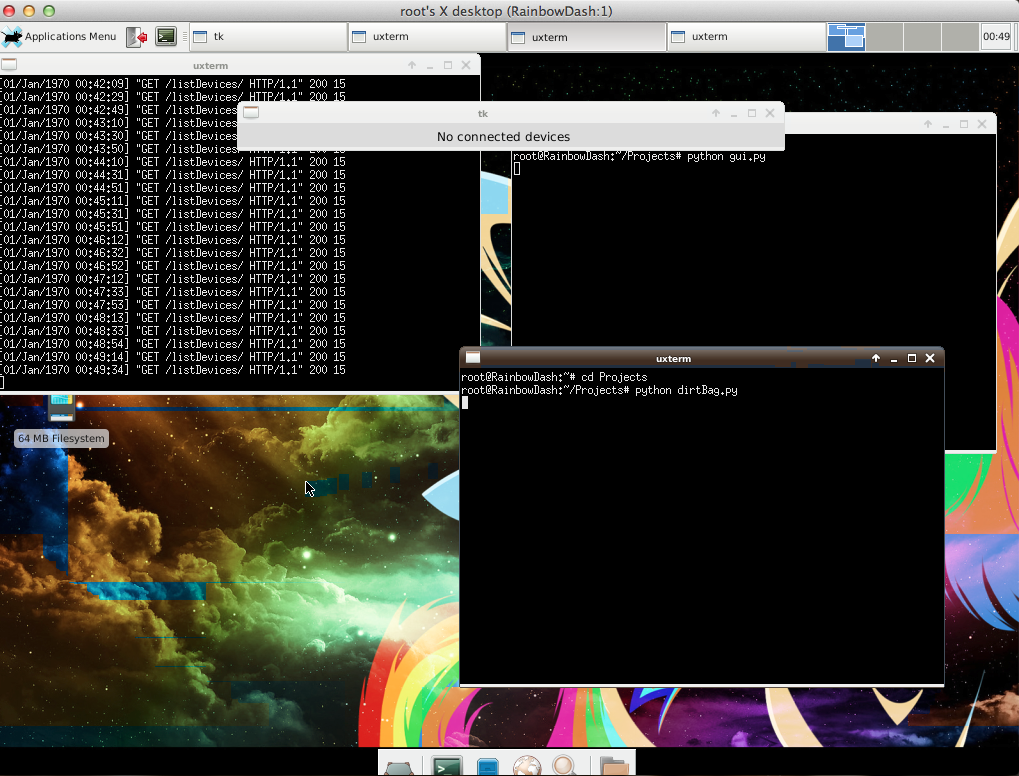
To be less suspicious, the hostname of the Raspberry Pi is RainbowDash 😉 This amuses me so much, the perfect disguise! If I saw a device named LilDevil running on a guest network I would be totally alarmed. I also themed the Pi accordingly, see the below screenshot. The coloring isn’t perfect, I blame VNC.
The Pi runs a Django Restful server that stores mmap scan information about detected machines on the network. The Python 2.7 scripts for this are here. I had to make a few versions in order for things to work on Django 1.6.
In views.py, change
encoded = json.loads(request.raw_post_data)
to
encoded = json.loads(request.body)
Also, I had to make some changes in dirtBag.py, in order to get the ping sweep to work appropriate.
Change MIN and MAX to an integer instead of a string.
MIN="0"
MAX="12"
to
MIN=0
MAX=12
Here is a copy of the new main function.
def main():
    global results
    while 1:
        new = ""
        for x in range(MIN,MAX):
            new = new + commands.getoutput("ping -c 1 -t 1 "+PREFIX+"."+str(x) + " | grep 'from'") #Ping sweep the network to find connected devices
        tmp = re.findall(PREFIX+".(d+)", str(new)) #Pull out IP addresses from the ping results
        if tmp != results:
            for ip in tmp:
                if ip not in results:
                    gotcha = commands.getoutput('nmap -v -A -Pn '+PREFIX+'.'+ip)
                    sendDevice(gotcha)
            for r in results:
                if r not in tmp:
                    removeDevice(PREFIX+'.'+r)
            results = tmp
The information is up to date on all devices currently connected. It may be nice in the future to include a log of all scans but for now, I’m really only interested in connected machines.
Data is then displayed in a visible GUI. The below screenshot shows the tool windows along with the GUI. Currently, no devices were connected to the network.
Ahhh it detected a device… in this case, itself.
There you have it! A portable network enumeration tool. There are so many versions of this everywhere, but this is just something I coded up for fun. I plan to add to the Pi later for kicks.
So I wasn’t too happy with the kludginess of the network monitoring tool that I posted about earlier this week. It lagged and really wasn’t an ideal tool. I decided to redesign the entire model.
The new tool still utilizes Python 2.7 and consists of three parts:
Ping/Enumeration Script
RESTful Django Script
Tkinter Reporting GUI Script
Here is how they connect. The Ping/Enumeration Script, pings all devices given within a network range. Whenever it finds a new device, it runs a NMAP scan on the device then formulates a request to the server to notify it of the device scan results. The script will also notify the server when a device disconnects from the network (this was an issue with the old version).
The Django server manages a sqlite database containing scan results on all devices currently connected to the network. It will remove or add a device record based on the ping script’s RESTful HTTP request. The server can also return a list of all devices detected. This list is used by the GUI script.
The GUI script maintains a Tkinter dialog window that will circulate through all network connected device scan results. It first sends a GET request to the Django server asking for a JSON list of all connected devices. The script will then display each record found in the JSON. Each device record will appear in the GUI window for 20 seconds. After it has made the rounds through each item, it will make another call to the server for a fresh JSON to iterate through.
The Ping/Enumeration Script is basically the same as what I discussed earlier. The difference is, after data is collected, it is sent to the Django server in a POST request.
import commands, re, json, urllib2, binascii

PREFIX = "192.168.1" #Network prefix

MIN = "0" #Starting network address, eg 192.168.1.0

MAX = "12" #Closing network address, e.g. 192.168.1.55

results = []
def escapeMe(message): #Escape characters (using ASCII value) not allowed in JSON

    new = ""

    for num in range(len(message)):

        char_code = ord(message[num])

        if char_code < 32 or char_code == 39 or             char_code == 34 or char_code == 92:

            new = new + "%" + binascii.hexlify(message[num])

        else:

            new = new + message[num]

    return new
def sendDevice(gotcha): #Send the device report to the server as a POST

    try:

        url = "http://127.0.0.1:3707/new/" #Server address

        gotcha = escapeMe(gotcha)

        values = json.dumps({'device' : str(gotcha)})

        req = urllib2.Request(url)

        req.add_header('Content-Type', 'application/json')

        rsp = urllib2.urlopen(req, values)

        code = rsp.getcode()

    except Exception, e:

        print e
def removeDevice(ip): #Send request to remove device

    try:

        ip = ip.replace('.','-')

        url = "http://127.0.0.1:3707/remove/"+ip+"/"

        rsp = urllib2.urlopen(url)

        code = rsp.getcode()

    except Exception, e:

        print e
def main():

    global results

    while 1:

        new = commands.getoutput('for i in {'+MIN+'..'+MAX+'}; do ping -c 1 -t 1 '+PREFIX+'.$i | grep "from"; done') #Ping sweep the network to find connected devices

        tmp = re.findall(PREFIX+"\.(\d+)", str(new)) #Pull out IP addresses from the ping results

        if tmp != results:

            for ip in tmp:

                if ip not in results:

                    gotcha = commands.getoutput('nmap -v -A -Pn '+PREFIX+'.'+ip) #nmap new devices found on the network

                    sendDevice(gotcha) #send device record to server

            for r in results:

                if r not in tmp:

                    removeDevice(PREFIX+'.'+r) #remove device if it wasn't found in the latest ping

            results = tmp
if __name__ == "__main__":

    main()
Django is an awesome Python Web Application Framework that I absolutely adore (not the movie 🙂 ). It is known as the web framework for perfectionists with deadlines. Most of my web projects utilize Django.
It comes with its own lightweight server to host its applications, so its perfect for any development environment. For the sake of this project, I’m using its server, all script/server functionality is limited to the host machine running the tool. Everything is internal. Django also handles the RESTful routing and database modeling. It uses the model view controller (MVC) structure. Here is a great tutorial on how to create your own Django app, definitely worth looking into!
The following is the break down of code I wrote for the Django server (running version 1.3).
####################models.py####################
from django.db import models
class Devices(models.Model):
device = models.TextField()
####################ADD to urls.py####################
url(r'^new/$', 'lilDevil.views.new', name='new'),
url(r'^listDevices/$', 'lilDevil.views.listDevices', name='listDevices'),
url(r'^remove/(?P*ip*.+)/$', 'lilDevil.views.remove', name='remove'), #REPLACE * with greater/less sign containing brackets
####################views.py####################
from django.http import HttpResponse
from lilDevil.models import Devices
import json
def remove(request, ip):
try:
ip = ip.replace('-','.')
devicelist = Devices.objects.all()
for d in devicelist:
if ip in d.device:
d.delete()
return HttpResponse(status = 200)
except Exception, e:
return HttpResponse(e)
Finally, the GUI script. Very similar to the one in the old post. Again, I just added the ability to request device data from the server.
from Tkinter import *

import time, urllib2, urllib, json

class flipGUI(Tk):

    def __init__(self,*args, **kwargs): #Setup the GUI and make it pretty

        Tk.__init__(self, *args, **kwargs)

        self.label1 = Label(self, width= 65, justify=CENTER, padx=5, pady=5, text="Guests") #Text label

        self.label2 = Label(self, text="") #Photo label

        self.label2.grid(row=0, column=1, sticky=W+E+N+S, padx=5, pady=5)

        self.label1.grid(row=0, column=0)

        self.flipping()
    def flipping(self): #Flip through NMAP scans of detected devices

        t = self.label1.cget("text")

        t = self.label2.cget("image")

        data = getData()

        found = json.loads(data)

        photo = PhotoImage(file="picture.gif")

        if found['devices']:

            for f in found['devices']: #Loop through all but the last item

                fixed = f['device'].replace('%0a', '\n') #return to ASCII value from earlier escaped hex

                self.label1.config(text=fixed)

                self.label1.update()

                self.label2.config(image=photo)

                self.label2.update()

                time.sleep(20)

        else:

            self.label1.config(text="No connected devices")

            self.label1.update()

            time.sleep(20)

        self.after(1, self.flipping())
def getData(): #Get a list of devices from server

    url = "http://127.0.0.1:3707/listDevices/" #server address

    response = urllib2.urlopen(url)

    code = response.getcode()

    if int(code) == 200:

        return response.read()

    else:

        return
if __name__ == "__main__":

    try:

        while 1:

            app = flipGUI()

            app.mainloop()

    except Exception, e:

        print e
Final Note: Make sure to delete/clear out database or old results will carry over! I did this in an init.d script that calls the service.
Put it all together and you have a much more stable tool. I renamed it from the Hindenburg to the Lil Devil.
UPDATE: I made a better version of this tool with server implementation here.
Today I felt like building a python 2.7 script that would enumerate a network along with alert me to the presence of a new device.
I limited my project to functions in the standard library.
So something lightweight and okay fast is a ping sweep. From an early post I included the Linux command for a sweep. I used this command along with the python commands to execute the ping sweep along with storing the results in a variable.
new = commands.getoutput('for i in {'+MIN+'..'+MAX+'}; do ping -c 1 -t 1 '+PREFIX+'.$i | grep "from"; done')
Following, I used some regular expressions to pull out the IP addresses detected in a given prefix range.
tmp = re.findall(PREFIX+"\.(\d+)", str(new)) #Pull out IP addresses from the ping results
Put that in a loop with some comparison data and you have a script that prints an alert whenever a new device is detected.
import commands, re

PREFIX = "192.168.1" #Network prefix

MIN = "0" #Starting network address, eg 192.168.1.0

MAX = "12" #Closing network address, e.g. 192.168.1.55

results = []

while 1:

new = commands.getoutput('for i in {'+MIN+'..'+MAX+'}; do ping -c 1 -t 1 '+PREFIX+'.$i | grep "from"; done') #Ping sweep the network to find connected devices

tmp = re.findall(PREFIX+"\.(\d+)", str(new)) #Pull out IP addresses from the ping results

if tmp != results:

for t in tmp:

if t not in results:

print "New device at" + PREFIX + "." + str(t)

results = tmp
There are a few short comings in the code but that’s the basic idea.
Now take this further, I hooked it up to a GUI with enumeration information! The new beastly application constantly flips through NMAP scan results of devices found connected to the network and displays the results in a GUI. I even placed a picture in the GUI. I call this app, the Hindenburg, its kind of hacked together.
The Hindenburg!
from Tkinter import *

import time, commands, re

PREFIX = "192.168.1" #Network prefix

MIN = "0" #Starting network address, eg 192.168.1.0

MAX = "12" #Closing network address, eg 192.168.1.12

class flipGUI(Tk):

def __init__(self,*args, **kwargs): #Setup the GUI and make it pretty

Tk.__init__(self, *args, **kwargs)

self.label1 = Label(self, width= 65, justify=CENTER, padx=5, pady=5, text="Guests") #Text label

self.label2 = Label(self, text="Guests") #Photo label

self.label2.grid(row=0, column=1, sticky=W+E+N+S, padx=5, pady=5)

self.label1.grid(row=0, column=0)

self.flipping()
def flipping(self): #Flip through NMAP scans of detected devices
t = self.label1.cget(“text”)
t = self.label2.cget(“image”)
found = scanNetwork()
photo = PhotoImage(file=”picture.gif”)
for f in found[:-1]: #Loop through all but the last item
self.label1.config(text=f)
self.label1.update()
self.label2.config(image=photo)
self.label2.update()
time.sleep(15)
self.label1.config(text=found[-1]) #the last item doesn’t require the sleep, it takes enough time to run the scans
self.label1.update()
self.label2.config(image=photo)
self.label2.update()
self.after(1, flipping())
def scanNetwork():
found = []
new = commands.getoutput(‘for i in {‘+MIN+’..’+MAX+’}; do ping -c 1 -t 1 ‘+PREFIX+’.$i | grep “from”; done’) #Ping sweep the network to find connected devices
tmp = re.findall(PREFIX+”\.(\d+)”, str(new)) #Pull out IP addresses from the ping results
for ip in tmp: #Loop through each found IP
found.append(commands.getoutput(‘nmap -v -A -Pn ‘+PREFIX+’.’+ip))
return found
app = flipGUI()
app.mainloop()
It’s ideal for an environment where it can just sit on the screen without much of any type of activity going on. If you are enumerating the entire network, there will be a lag… it happens.
“OpenVAS is a framework of several services and tools offering a comprehensive and powerful vulnerability scanning and vulnerability management solution” (http://www.openvas.org/).
So I’ve been using OpenVAS as an alternative to Nessus and I’ve actually been quite pleased with the tool. The initial installation was a little difficult (see post) but once up and running, it has been great. I haven’t been able to find a simple howto guide on the scanner so I have decided to write one from my own experience with OpenVAS server version 6 and the client tool GSAD version 3.03. I only provide this tutorial as a learning experience and I do not endorse illegal scanning activity.
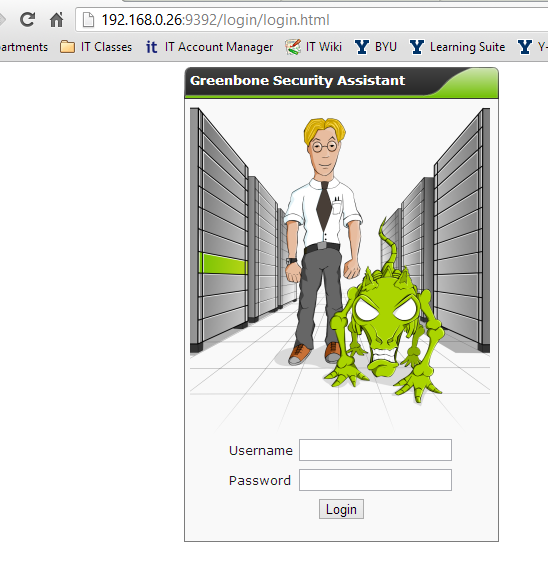
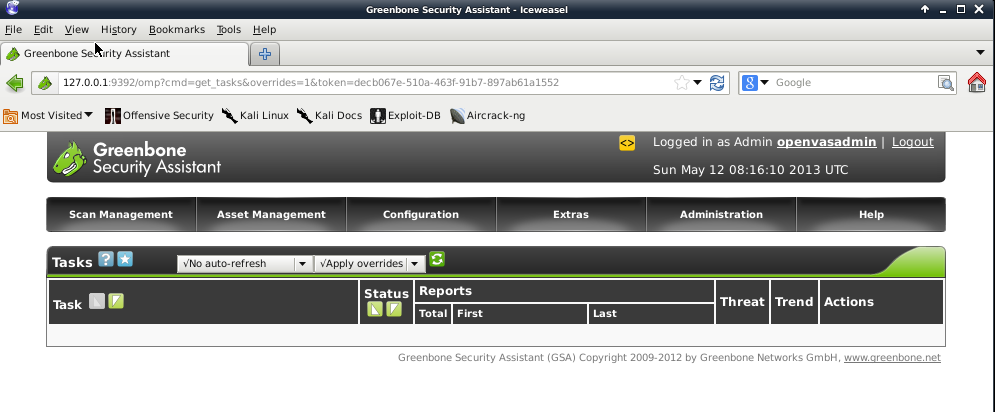
I used to GSAD web client interface to interact with OpenVAS once the tool was up and running (see post). I accessed the web interface at http://<OpenVAS IP Address>:<GSAD Port>.
Log into OpenVAS with credentials created during setup (see post). If you are unable to log in and you know your credentials are correct, its most likely your openVAS database is out-of-date. Try the following steps in a terminal window before attempting to login again:
Update the openVAS database with the latest definition (This can take an hour or more.): openvasmd –update
Migrate the database (This can take an hour or more.): openvasmd –migrate
Rebuild one last time to be safe (This can take an hour or more.): openvasmd –rebuild
If your server date/time is off this could also cause a problem later on, to correct this you will have to first stop all openVAS processes then change the server date/time to the current. Lastly, you will need to repeat creating the necessary certificates and starting up all the openVAS tools similar to the installation process (see post).
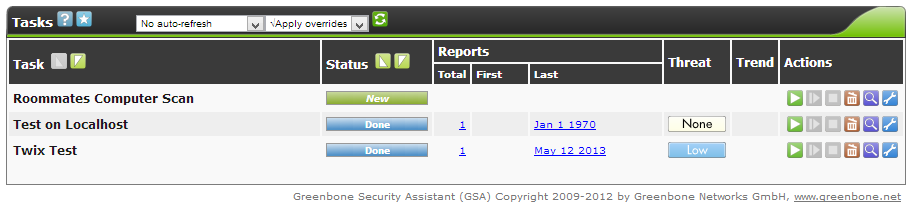
Upon a successful login, you will be greeted with a window of tasks scheduled and completed.
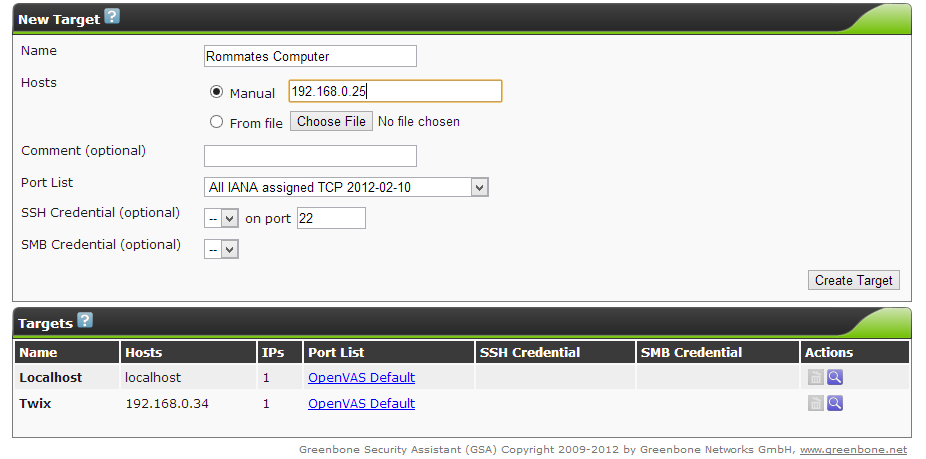
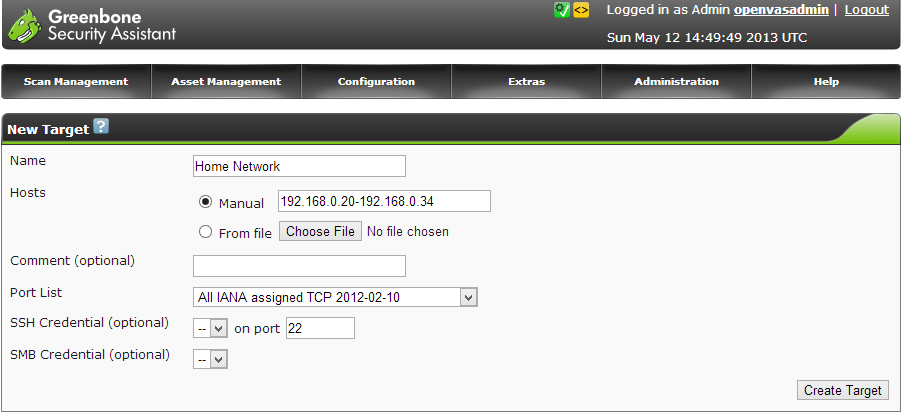
So for a simple vulnerability scan, you will need to setup a target. This is the machine OpenVAS will scan. By default, the tool has localhost already configured as a target but I’m assuming you will want to scan machines other than the one running OpenVAS. To setup a target, hover over the Configuration tab then select Targets.
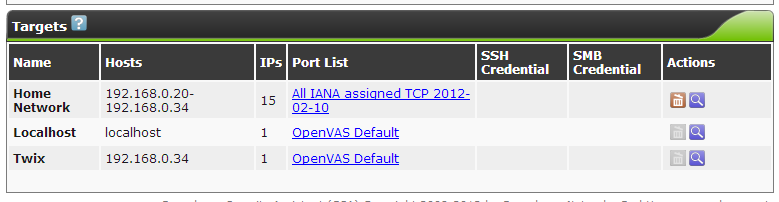
In the next window, fill out the desired target fields. OpenVAS can be scheduled to scan one or more devices. This is determined by the Hosts field, you can either enter one IP address (x.x.x.x) for a singular host scan or a range of addresses (x.x.x.x-x.x.x.x) for a multiple host vulnerability scan. You may find your device can only handle scanning one IP at a time (This is what I found true on my Raspberry Pi). It is a best practice to always scan by IP addresses, a domain name can resolve to multiple hosts and provide conflicting results. In the picture below, I only entered into the form a target name and a singular IP address, everything else I left as default (you can experiment around with the settings for a more detailed scan). When you are finished entering in all the details, create the target by selecting the Create Target button.
The new target will be visible in the box below the form once successfully created. Make sure OpenVAS has a value under the IPs column. This is to ensure it found the target IP address or addresses.
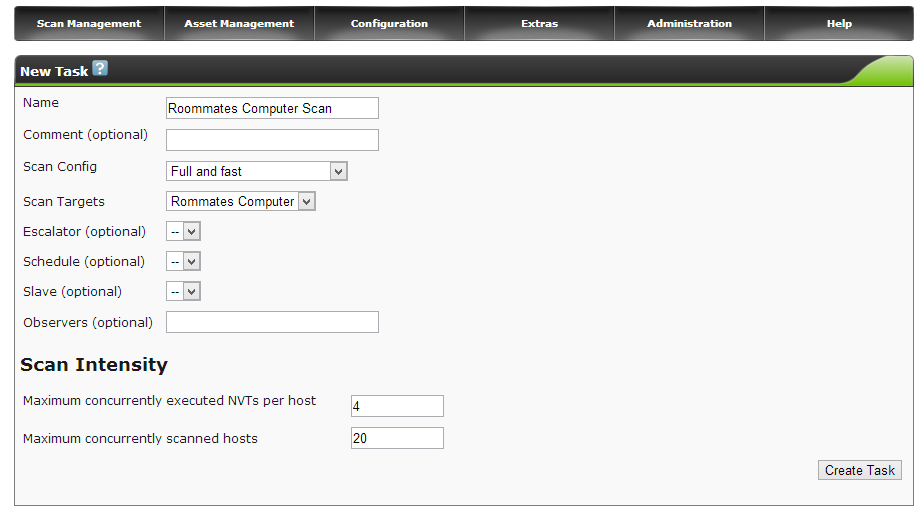
Now it is time to create a task to scan the new target. Hover over the Scan Management tab then select New Task.
Fill out the new task field with the desired task details. In the picture below, I only entered into the form a task name and selected a target to scan, everything else I left as default for a full and fast scan (you can experiment around with the settings for a more detailed scan). When you are finished entering in all the details, create the task by selecting the Create Task button.
The task will now appear in the task window and is ready to start. OpenVAS will not automatically start a task, you must select the green start icon under the Actions column in the task window to begin the scan. The other actions found in this column provide easy task management for when you want to start, pause or resume a task in order to pace server activity.
The scan will take a bit of time so be patient. If you want to view the progress of the scan, you can change the drop box settings above the task box to refresh ever X seconds and to no overrides. With these settings, the page will refresh every so often to notify you of the task progress under the Status column in the task box. Sometimes the task may stop itself, you can resume it by selecting the icon next to the start arrow under the Actions column.
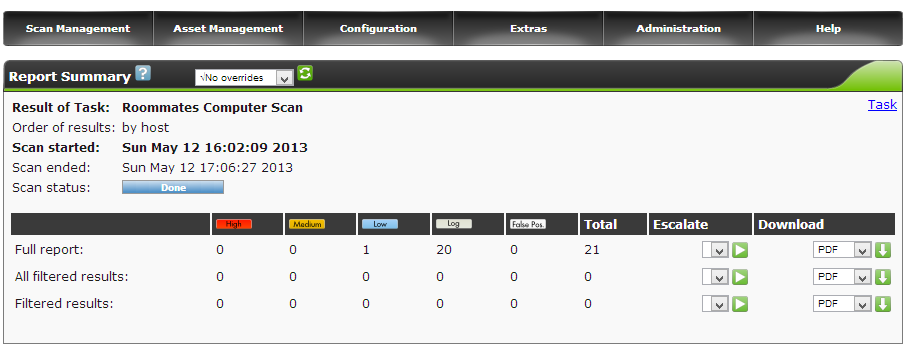
When the status of the scan shows Done, you can review the scan findings. Select the coordinating task date under the Last column. A summary of the report will be presented along with the capabilities to download a more detailed version of the report.
There you have it, you can review the findings in the report to learn of possible vulnerabilities in a host. Good luck!
I’m working on creating a semi-portable security platform. I decided to experiment with installing and using the armel version of Kali Linux (the new backtrack OS) on the raspberry pi. Initially, I faced a lot of problems getting OpenVAS to work on the device. This is one of the very few if only open source armel vulnerability scanners I could find. The following steps cover my successful attempt to setting up OpenVAS for anyone else interested in working with this tool in Kali on a Pi. Be prepared to spend a good amount of time waiting for the plugins to install and the database to update.
Downloaded and installed a fresh armel image of Kali (http://www.kali.org/downloads/). I used this image (Username: root, password: toor).
Use a disk imager to image a SD card with the Kali image to run on the Pi. I used Win32 Disk Imager.
Insert the SD card into the pi and power it up.
You may want to expand the partition created by the disk imager, a tutorial on how to expand an active partition can be found here.
Set the correct date if needed:
date <month><day><hour><minute><year>.<second>
Create the openVAS certificate:
openvas-mkcert
Create the openVAS client certificate:
openvas-mkcert-client -n om -i
Download the openVAS NVT’s (This takes a few minutes):
openvas-nvt-sync
Start the openVAS scanner (This takes 30+ minutes.):
openvassd
Build the openVAS database (This can take an hour or more.):
openvasmd --rebuild
Create an admin account:
openvasad -c 'add_user' -n openvasadmin -r Admin
Update the openVAS database with the latest definition (This can take an hour or more.):
openvasmd --update
Migrate the database (This can take an hour or more.):
openvasmd --migrate
Rebuild one last time to be safe (This can take an hour or more.):
openvasmd --rebuild
Start the openVAS manager on port 9390:
openvasmd -p 9390 -a 127.0.0.1
Start the openVAS admin:
openvasad -a 127.0.0.1 -p 9393
Start GSAD, this is the client tool for openVAS:
gsad --http-only -p 9392
Use the web client to interact with the tool, it can be accessed on http://<IP OF PI>:9392. You can log in with the admin account created earlier.
That’s it! Now you can use this amazing tool to scan machines in a network!
After a reboot or shutdown, openVAS can be started with the commands:
Start the openVAS scanner (This takes a few minutes this time.): openvassd
Start the openVAS manager on port 9390: openvasmd -p 9390 -a 127.0.0.1
Start the openVAS admin: openvasad -a 127.0.0.1 -p 9393
Start GSAD on port 9392, this is the client tool for openVAS: gsad –http-only -p 9392


