IIS 7.5 Detailed Error: HTTP Error 404.3 – Not Found

Error

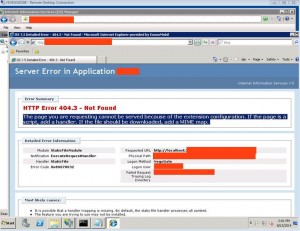
I received the following error while trying to run a WCF application built in Visual Studio 2013 running on a Windows 8 IIS 7.5 server.

HTTP Error 404.3 - Not Found
The page you are requesting cannot be served because of the extension 
configuration. If the page is a script, add a handler. 
If the file should be downloaded, add a MIME map.
 IIS 7.5 Error

Solution

My problem was that WCF wasn’t enabled in the IIS server. To fix this, I ran the following commands in an administrator command prompt.

C:\> DISM /Online /Enable-Feature /FeatureName:WCF-HTTP-Activation
C:\> DISM /Online /Enable-Feature /FeatureName:WCF-HTTP-Activation45

Credit is due to http://stackoverflow.com/questions/11460142/cannot-serve-wcf-services-in-iis-on-windows-8.

Compiling ParaView v4.1.0 CMake Error: The following variables are used in this project…

Error

I received the following error while configuring ParaView v4.1.0 with ccmake from source.

CMake Error: The following variables are used in this project, 
but they are set to NOTFOUND.
Please set them or make sure they are set and tested correctly 
in the CMake files:
GLUT_Xi_LIBRARY (ADVANCED)
     linked by target "icetTests_mpi" in directory 
     ...ParaView-v4.1.0/ThirdParty/IceT/vtkicet/tests
GLUT_Xmu_LIBRARY (ADVANCED)
     linked by target "icetTests_mpi" in directory 
     ...ParaView-v4.1.0/ThirdParty/IceT/vtkicet/tests

ParaView Compile Error

Solution

To fix this, I set the GLIT_Xi_Library and GLUT_Xmu_LIBRARY variables to the correct libXi and libXmu shared libraries.

ParaView Compile Error

Compiling Mesa 7.9.1 Error: brw_program.c:39:20: error: talloc.h: No such file or directory

Error

I received the following error while configuring mesa version 7.9.1 from its source code (running ./configure).

Error: “brw_program.c:39:20: error: talloc.h: No such file or directory”

Mesa compile error
Solution

To solve this issue, I added a statement to the ./configure line that added talloc’s include directory into the CPPFLAGS.

CPPFLAGS="-I<PATH TO TALLOC INCLUDE DIRECTORY>" ./configure

Make sure to keep the “-I” before the path with no spaces between them. I had talloc installed in a unique location, with a different prefix than the norm. Mesa wasn’t looking in the right places for it. To provide mesa with the correct path, I added it into CPPFLAGS. These flags are used to define include directory paths for the compiler.

Compiling ParaView v4.1.0 Error: libXi.so undefined reference to `_XGetRequest’

Error

While compiling ParaView from the source files, I ran into the following error while running the ‘make’ command.

…libXi.so undefined reference to `_XGetRequest'
make[2]: *** [bin/icetTests_mpi] Error 1
[ThirdParty/IceT/vtkicet/tests/CMakeFiles/
icetTests_mpi.dir/all] Error2

Solution

In my case, the X11 libraries were installed separately and were located in custom directory locations that differed from the default. I fixed this error by checking and correcting the paths for my X11 libraries and include directories within the ccmake configuration menu. The error was then fixed during the next ‘make.’

Compiling ParaView v4.1.0 Error: couldn’t connect to server

Error

I received the following error while trying to compile ParaView from source.

http://www.vtk.org/files/ExternalData/MD5/
7dc839fb2825efa8c55e4275fee02a75 ("couldn't connect to server")

ParaView Compile Error

For some reason, the requested files could not be pulled from the server. You may have proxy issues or restricted internet access.

Solution

Manually download all MD5 files from http://www.vtk.org/files/ExternalData/MD5/ and place into your ExternalData/Objects/ within the build directory.

Compiling ParaView v4.1.0 Error: error: X11/SM/SMlib: error: X11/StringDefs.h: No such file or directory

Error

After using ccmake to configure ParaView options, I received the following errors while running ‘make.’

In file included from ...X11/Shell.h:51:26: error: X11/SM/SMlib.h: 
No such file or directory

and

...VTK/Rendering/OpenGL/vtkXRenderWindowInteractor.h:39:73: 
error: X11/Intrinsic.h: No such file or directory

and

In file included from ...Wrapping/ClientServer/
vtkXRenderWindowInteractorClientServer.cxx:6:
VTK/Rendering/OpenGL/vtkXRenderWindowInteractor.h:38:74: 
error: X11/StringDefs.h: No such file or directory
VTK/Rendering/OpenGL/vtkXRenderWindowInteractor.h:39:73: 
error: X11/Intrinsic.h: No such file or directory
In file included from ...Wrapping/ClientServer/
vtkXRenderWindowInteractorClientServer.cxx:6:

ParaView Error: Missing header

Solution

These issues were due to my libraries being installed in custom locations. Double check all paths supplied in the ccmake configuration and try copying the libxt (X11/all file contents), ICE (X11/ICE), SM (X11/SM) library directories into VTK/Rendering/OpenGL/X11 within your build directory. The error occurred because the compiler could not find the requested libraries.

Linux – Compiling Downloaded Source Code with Make’s 101

I’ve been doing quite a bit of source code compiling using the “make” command and figured I provide a brief primer on how to compile.

DISCLAIMER – Not all source codes are the same, some may/may not follow this structure.

First step, download the source code you wish to compile. For this example, I will download cmake 3.0. The tool can be downloaded from: http://www.cmake.org/files/v3.0/cmake-3.0.0.tar.gz.

Untar the file, the following command will work when executed from the same directory the tar file is located.

tar -xvf cmake-3.0.0.tar.gz
Screen Shot 2014-07-28 at 9.50.37 PM

Next, change directories into the newly tar-ed folder (the source code directory).

cd cmake-3.0.0

The following commands need to be executed within the source directory. Some source codes have and autogen.sh file. If this exists, run it to auto generate the correct configure.

./autogen.sh

However, if there is already a configure file (note this is not configure.<EXTENSION>), run that to check and setup your environment.

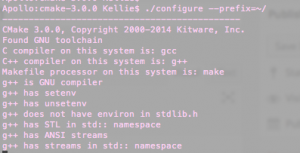
./configure

The command

./configure --help

will show you the manner different setup variables you can assign values. For example, if you do not want the source code to be compiled in default directories, add the –prefix flag to specify another directory.

./configure –prefix=<DIRECTORY FOR INSTALL>
Screen Shot 2014-07-28 at 9.52.33 PM

Some sources require you to run

make

first to run/setup default variables. However, I normal just run

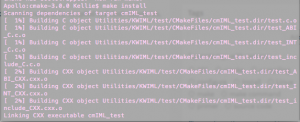
make install
Screen Shot 2014-07-28 at 9.58.47 PM

in most instances, after configuring.

That’s pretty much it! It is compiled and ready to go. Happy coding!

SSL Encryption for Django’s Local/Native Server

Django comes packaged with a lightweight python server. It is not intended to be a production server but more a testing/development host. Running the server is as easy as running the following command within a Django project:

python manage.py runserver

Since it’s so lightweight, it doesn’t come with the same abilities as other servers like Apache or Nginx. It can’t perform encryption, however, there’s a nifty tool called stunnel that can do it for you!

“Stunnel is an open-source multi-platform computer program, used to provide universal TLS/SSL tunneling service” (Wikipedia).

Environment

The following steps were performed on my iMac running OS X Mavericks with a Django 1.5 installation. I believe my instructions should still work for different versions (most) and Linux distributions.

Steps

Initially, I downloaded the latest version of Stunnel, however I ran into numerous compiling issues. One of them being: “ld: warning: directory not found for option ‘-L/usr//lib64.’” The error indicated I did not have the necessary 64x library. When I downloaded version, 4.54, everything compiled nicely.

  • Download the stunnel-4.54.tar.gz source code.
  • Open a terminal window and run the following command to untar (unzip) the file.
 tar –xvf stunnel-4.54.tar.gz
  • Run the following commands to enter the directory and install the tool (credit).
cd stunnel-4.54
./configure && make && make check && sudo make install
  • During the install stage, you will be required to enter in certificate data. Stunnel will conveniently make a self-signed SSL certificate for you and save it to /usr/local/etc/stunnel/stunnel.pem. Thanks Stunnel!
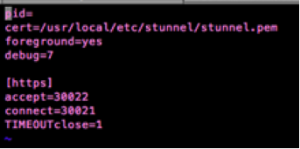
  • Create a configuration file for Stunnel (credit). I put the file inside my Django project to keep things organized.
vim dev_https
  • Edit the file and add the following lines in order to manipulate Stunnel to work with your environment.
pid=
cert=/usr/local/etc/stunnel/stunnel.pem
foreground=yes
debug=7
[https]
accept=<HTTPS ACCEPTING PORT>
connect=<LOCAL PORT YOUR DJANGO SERVER IS USING>
TIMEOUTclose=1
  • Save the file (For vim: ESC ‘:wq’ ENTER).
config

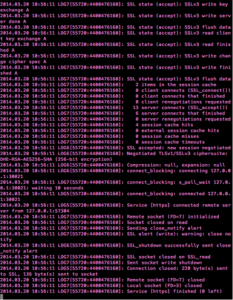
  • Start the Stunnel HTTPS tunneling service.
sudo stunnel <PATH OF dev_https>
stunnel
  • Next, start your Django server.
python manage.py runserver 127.0.0.1:< LOCAL PORT YOUR DJANGO SERVER IS USING>

django

Note – I used 127.0.0.1 purposefully as my hosting IP address, I only want Django to run locally. I do not want the server to run on a public/accessible IP.  Only stunnel will receive web requests.

That’s it! Now stunnel is listening for all encrypted, incoming messges on whatever port you specified. When a request comes in, it will decrypt it and send it locally to your Django server. Following, Django will then respond through the tunnel to the requesting client with the proper data.
Overclocking the Pi

Today, I wish to speed up my Raspberry Pi, it’s just too slow in opening up applications and jazz. After a google search on common ways to speed up your Pi I accumulated the following list of improvement methods:

  • Ensure you have the right type of SD card for the load, SDHD is good
  • Make sure you are getting the most out of you SD card by maximizing the partition. (I explained how to do this in this post)
  • Kill X applications, or the GUIs such as the desktop (In my case, I want the GUI so that’s not going to happen)
  • Use insserv –r to remove unwanted startup or init scripts
  • Overclock the sucker!

Overclocking

According to Wikipedia, “…overclocking is the process of making a computer or component operate faster than the clock frequency specified by the manufacturer by modifying system parameters.”

WARNING: Before overclocking your Pi be warned that power consumption may increase. You should be using a quality power supply, such as a wall adapter. Also, your Pi may emit quite a bit of heat depending on how high you clock it. It would be wise to consider a fan or something to regulate the temperature of the device.

I followed the tutorial here quite a bit during my experience of dealing with Pi overclocking.

Basically, I used raspy-config, I explained how I installed the configuration tool on Kali here.

Command:

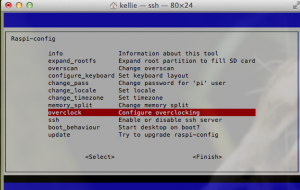
raspi-config

This will open up the Raspbian configuration menu.

Screen Shot 2014-02-11 at 9.08.07 PM

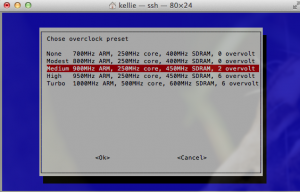
From the menu, select overclocking and choose your desired setting. Take the warning seriously, overclocking your system can shorten its life or even prevent the thing from starting up. Take things slow!

Screen Shot 2014-02-11 at 9.07.54 PM

Voila, reboot and there you have it.


Jaws Framework

I was Googling random topics today. One search was for “Jaws” because wouldn’t it be cool if they made a sequel that actually lived up to the Jaws name… they’re making a Jurassic Park sequel to be released in 2015. When searching for this, I found there is a web framework project named after the famous movie… go figure.

The Jaws framework is a new-ish PHP web application framework complete with the whole model-view-controller (MVC) structure.

I am amused.